
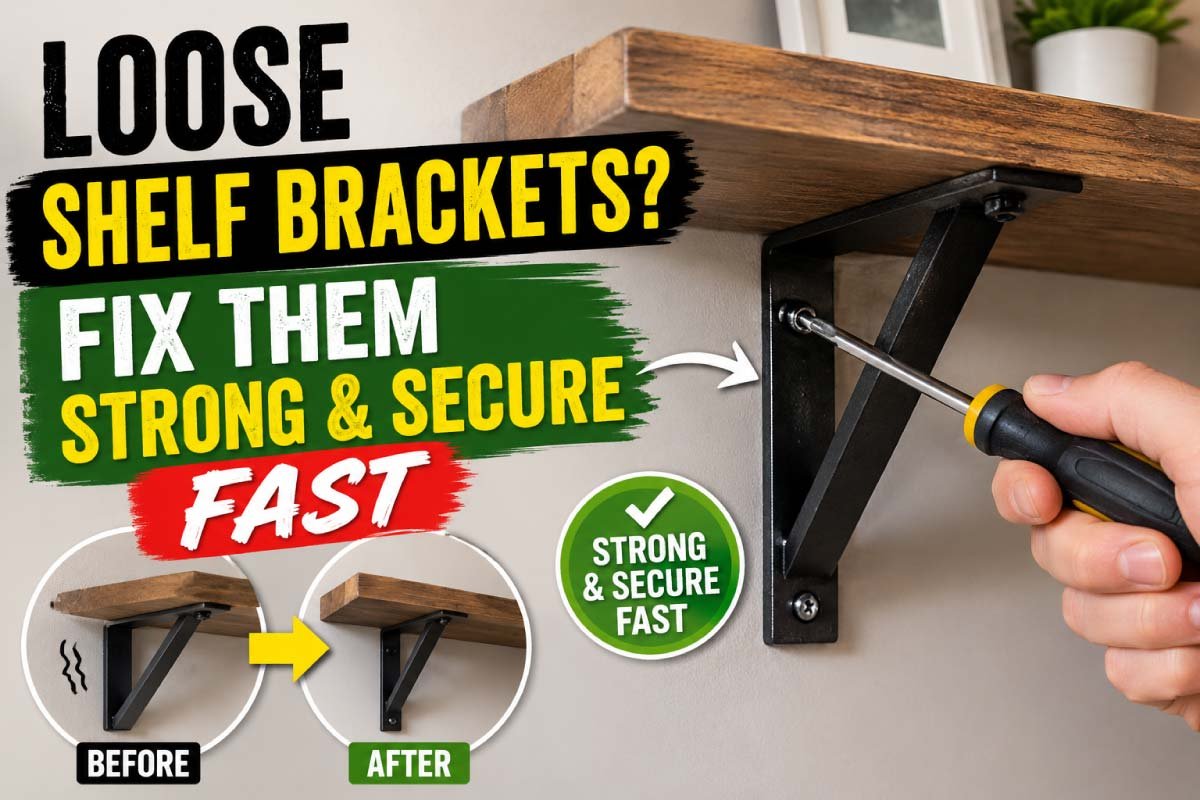
A shelf that slowly starts to sag or wobble is more than just an annoyance—it’s a warning sign. Loose shelf brackets can lead to damaged walls, fallen objects, and even accidents if left unchecked. The good news is that fixing them is usually simple, affordable, and something you can do yourself without professional help.
In this guide, you’ll learn why shelf brackets become loose, how to fix them properly, and how to make sure they stay strong and secure for years.
Table of Contents
ToggleWhy Shelf Brackets Become Loose
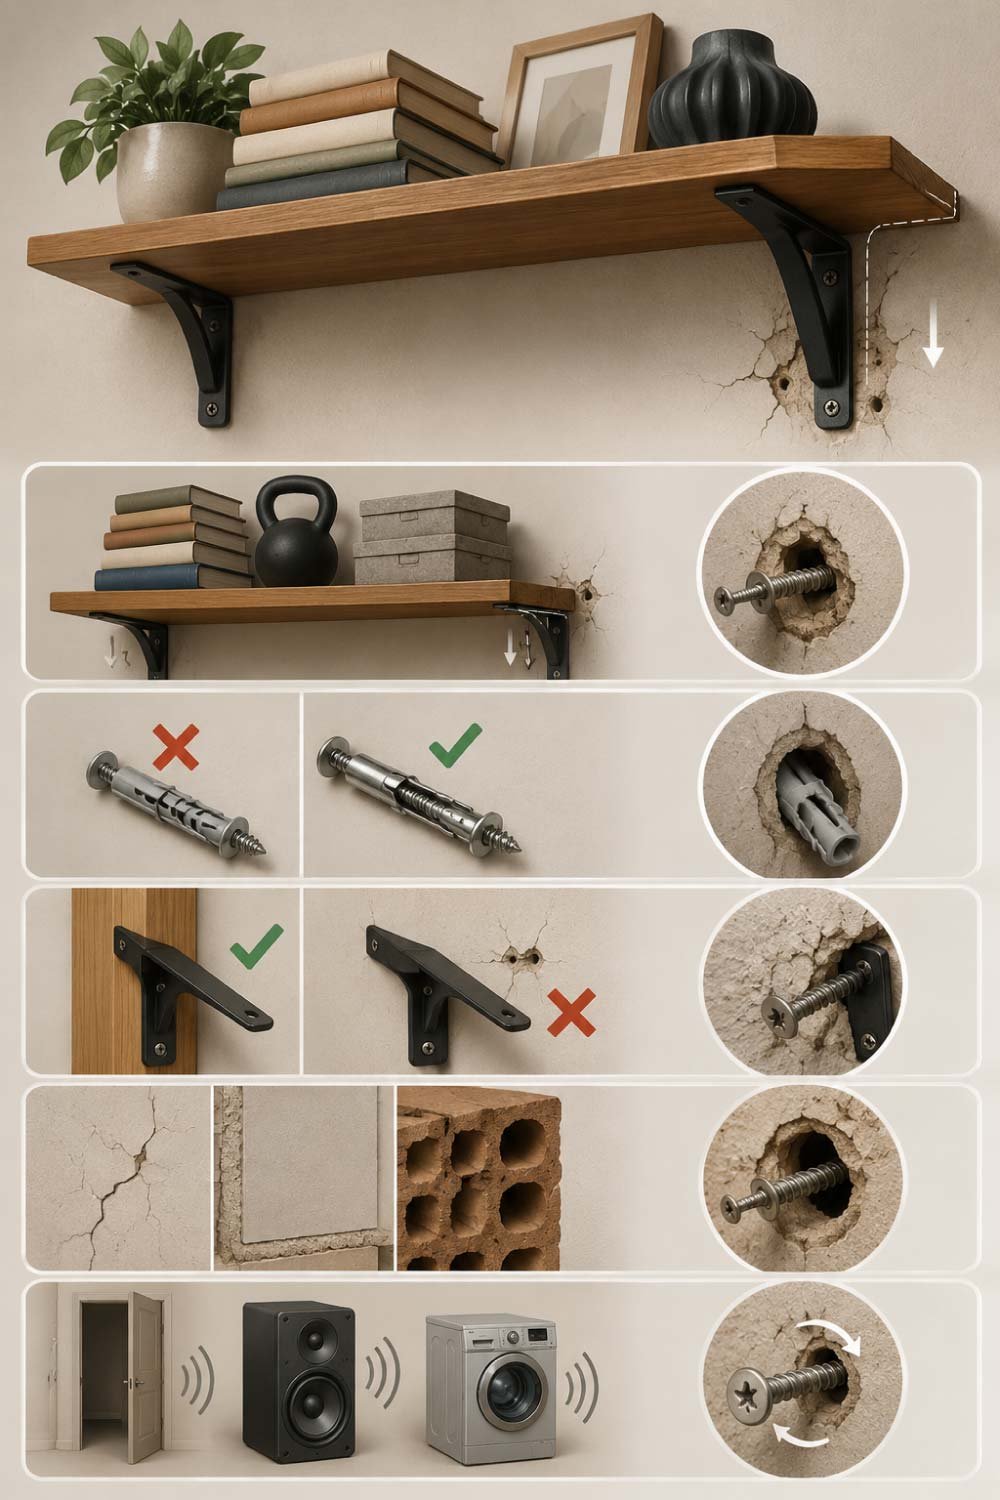
Shelf brackets often become loose over time due to everyday use and structural stress. Even a properly installed shelf can weaken as weight, wall condition, and environmental factors gradually affect the screws and anchors. Understanding these causes helps you choose the right repair method before damage gets worse.
- Overloading the Shelf
One of the most common reasons is simply too much weight. Books, kitchen items, tools, or decorative pieces can slowly pull screws out of the wall. - Weak Wall Anchors
If the bracket was installed using plastic wall plugs or poor-quality anchors, they may not be strong enough for long-term load-bearing. - Incorrect Installation
Brackets that were not aligned properly or screwed into weak plaster instead of studs often loosen quickly. - Wall Material Issues
Drywall, plaster, or hollow bricks may crumble or expand over time, reducing screw grip strength. - Frequent Movement or Vibration
If the shelf is near doors, speakers, or appliances that create vibration, the screws can gradually loosen.
Signs Your Shelf Brackets Are Loose
Loose shelf brackets rarely fail suddenly; they usually show warning signs first. Recognizing these early symptoms can help you prevent full collapse or wall damage. Even small changes in alignment or stability should not be ignored, as they often indicate weakening screws or damaged wall anchors.
- Shelf tilting slightly forward or sideways
- Visible gaps between bracket and wall
- Screws turning when touched
- Cracking sound when weight is placed
- Items sliding or shaking on the shelf
If you notice any of these, it’s time to fix the issue immediately before it worsens.
Tools and Materials You’ll Need
Before starting the repair, it’s important to prepare all necessary tools and materials in advance. Having everything ready not only saves time but also ensures the fixing process is smooth, safe, and properly aligned for a stronger, long-lasting shelf installation.
- Screwdriver or drill machine
- Wall anchors (plastic, metal, or expansion type)
- Wood filler or wall filler
- Screws (matching bracket size)
- Level tool
- Pencil for marking
- Hammer (optional)
- Rawl plugs or toggle bolts (for heavy loads)
Step-by-Step Fix: Tightening Loose Shelf Brackets
Fixing loose shelf brackets requires a careful step-by-step approach to ensure long-term stability. Rushing the process can cause repeat loosening or wall damage. By following each step properly, you can restore strength to the installation and make your shelf secure enough to handle everyday use again.
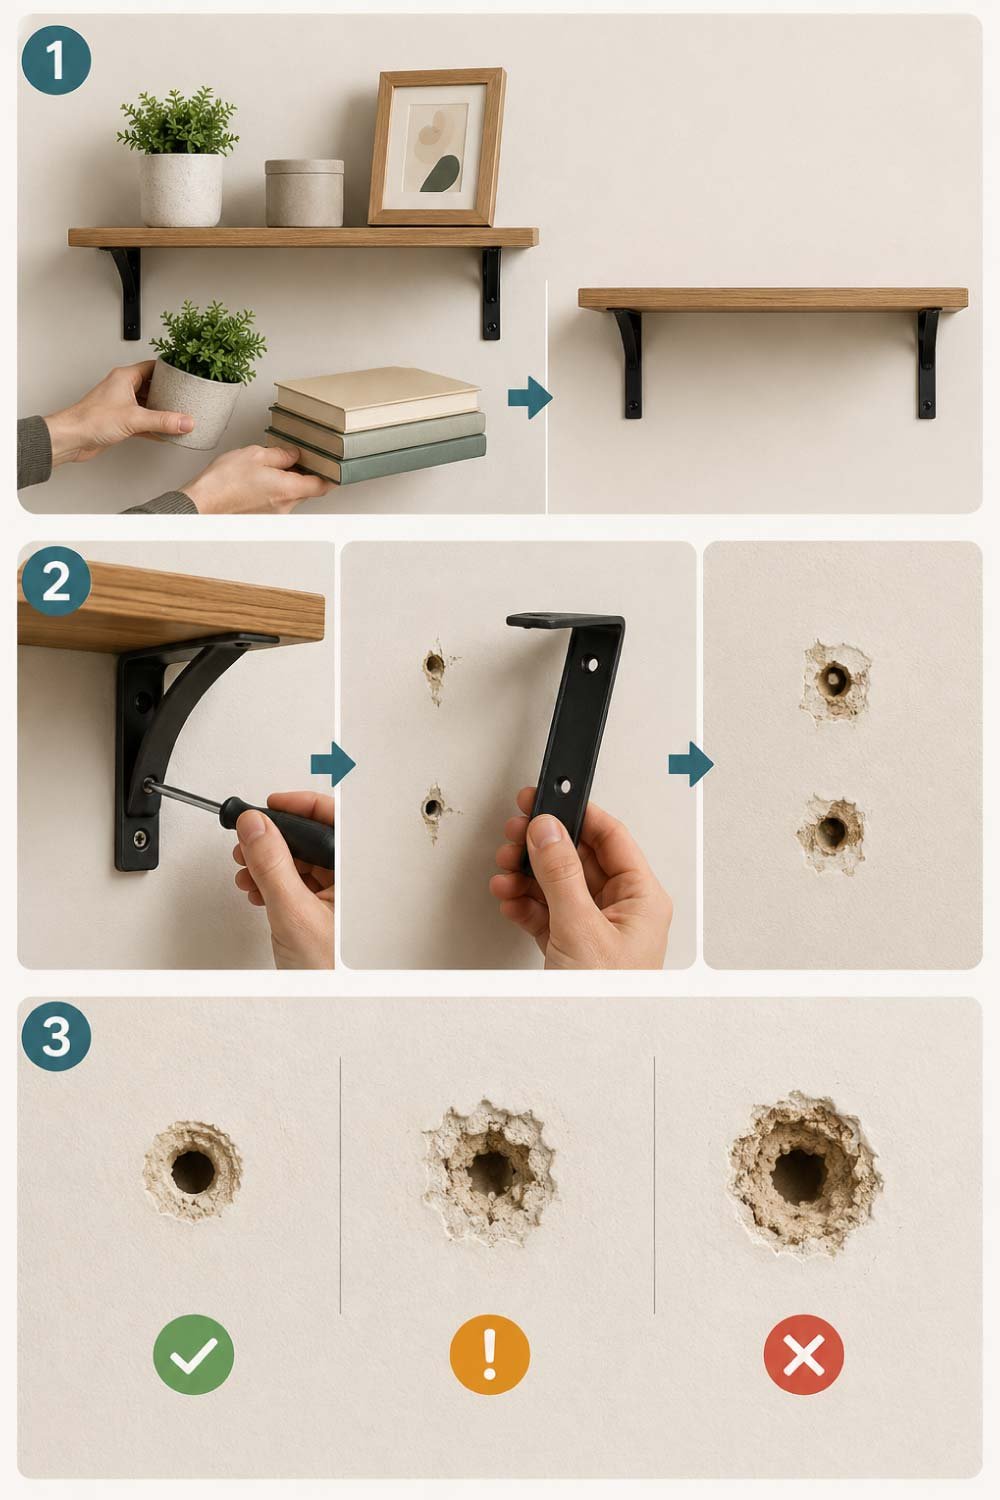
Step 1: Remove Everything from the Shelf
Start by clearing the shelf completely. Even a small amount of weight can make it harder to fix alignment properly.
Step 2: Take Down the Shelf Bracket
Unscrew the bracket carefully from the wall. If the screws are spinning freely, gently pull them out while supporting the bracket.
Inspect the wall area to see the level of damage. This helps you decide the right repair method.
Step 3: Inspect the Screw Holes
Check whether the holes are:
Slightly enlarged
Cracked or crumbling
Completely stripped
If the holes are only slightly loose, a simple fix may work. If they are badly damaged, you’ll need reinforcement.
Quick Fix Methods for Loose Shelf Brackets
Once you understand the damage level, you can choose the right quick fix method. Some solutions work for minor loosening, while others provide stronger reinforcement for heavier loads. Selecting the correct approach ensures your shelf remains stable and prevents future issues from developing again.
Method 1: Toothpick or Wooden Match Fix (Quick Small Repair)
This is one of the oldest DIY tricks and works surprisingly well for light shelves.
How it works:
Wood fills the empty space inside the screw hole, giving the screw something to grip.
Steps:
Insert wooden toothpicks or matches into the hole
Add a little wood glue for extra strength
Break off excess wood so it is flush with the wall
Reinsert the screw while glue is still slightly wet
Best for:
Lightweight shelves
Minor loosening
Quick temporary fix
Don’t miss out on this helpful guide!
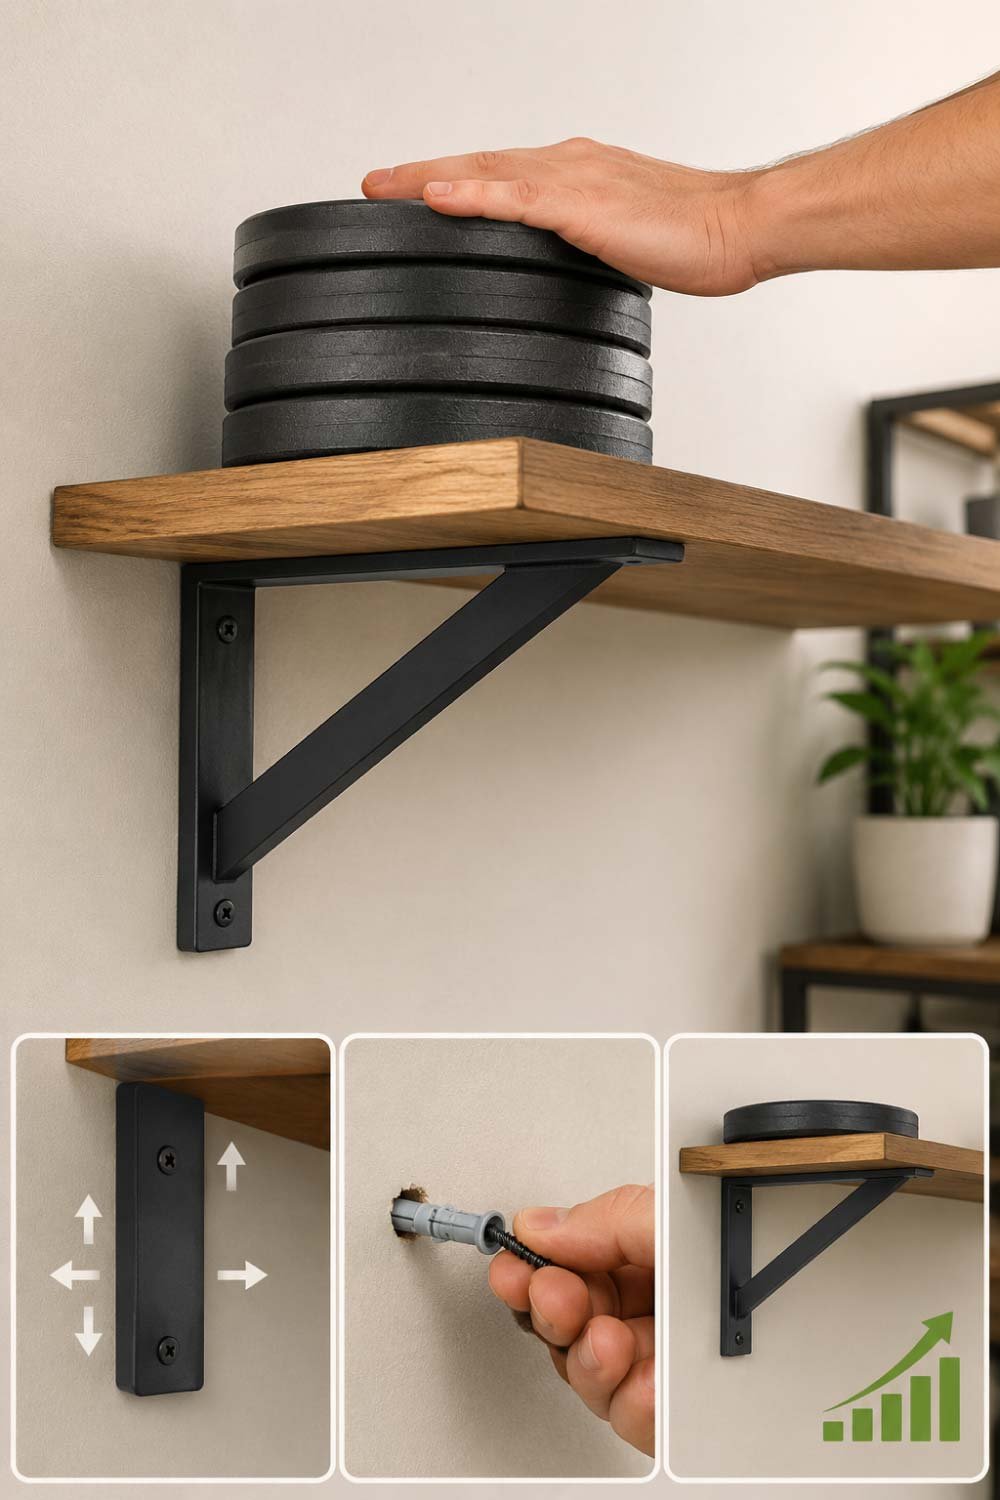
Method 2: Use Wall Anchors for Strong Support
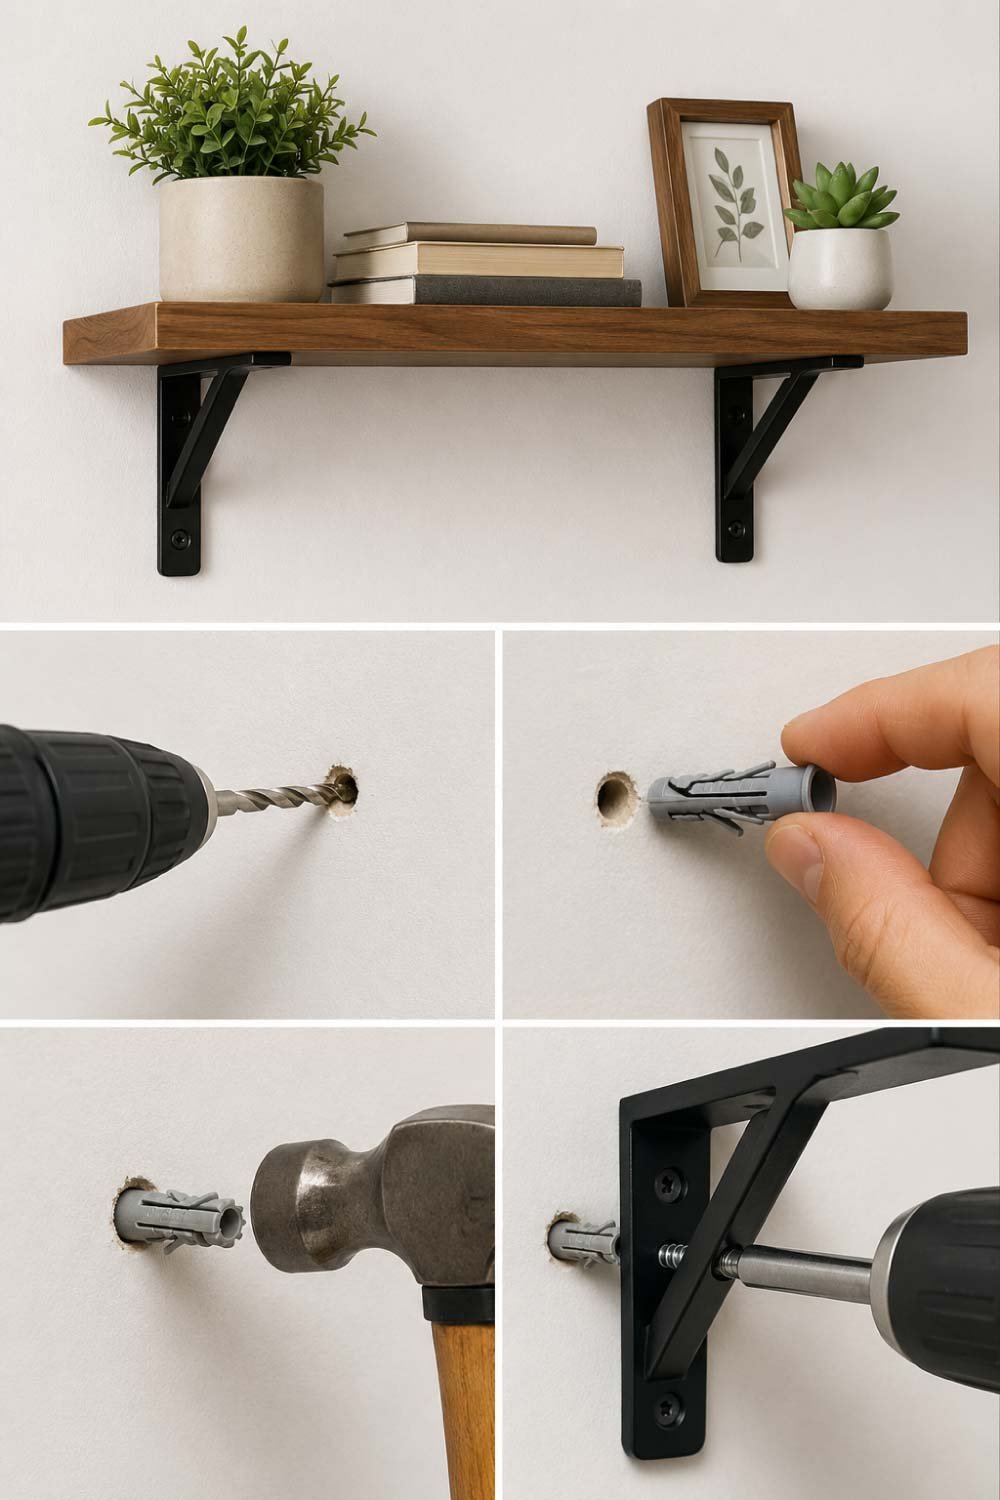
When the shelf is expected to carry moderate to heavy weight, simple fillers are not enough. Wall anchors provide a much more reliable grip by expanding inside the wall material. This method significantly improves stability and prevents screws from loosening again under pressure or repeated use.
Steps:
Enlarge the hole slightly if needed
Insert a plastic or metal wall anchor
Tap it gently with a hammer until flush
Screw the bracket back into the anchor
Why it works:
Wall anchors expand inside the wall, creating a strong grip that prevents slipping.
Best for:
Bookshelves
Kitchen shelves
Bathroom storage racks
Method 3: Use Epoxy or Heavy-Duty Filler (Permanent Fix)
If the screw holes are badly damaged or completely stripped, a stronger restoration method is required. Epoxy or heavy-duty wall filler rebuilds the internal structure of the hole, creating a solid base that can hold screws securely for long-term use.
Steps:
Clean the hole and remove dust
Fill it with epoxy or wall filler
Let it dry completely (follow product instructions)
Drill a new pilot hole
Reinstall bracket screws
Benefits:
Extremely strong bond
Long-lasting repair
Suitable for heavy loads
Method 4: Move the Bracket to a Fresh Spot
Sometimes the existing wall area is too damaged to repair effectively. In such cases, shifting the bracket slightly is the safest and most durable solution. This avoids weak spots and ensures the screws are anchored into solid, untouched material.
Steps:
Mark a new position slightly above or below old holes
Ensure alignment using a level tool
Drill new holes into solid wall area or stud
Install anchors and mount bracket
Tip:
Try to hit a wall stud whenever possible for maximum strength.
Method 5: Upgrade to Heavy-Duty Brackets
If shelf brackets repeatedly become loose, the issue may not be the wall but the hardware itself. Standard brackets are often not designed for heavy or uneven loads, so upgrading to stronger supports can completely solve the problem.
Consider upgrading to:
Steel L-brackets
Floating heavy-duty brackets
Reinforced industrial shelf supports
These distribute weight better and reduce pressure on screws.
Step 4: Reinstall the Shelf Properly
Once repairs are complete, reinstalling the shelf correctly is crucial for long-term stability. Even strong anchors can fail if installation is misaligned or uneven. Taking time during this step ensures the shelf remains level, secure, and capable of handling daily weight safely.
Key tips:
Use a level tool to avoid tilting
Tighten screws evenly
Don’t overtighten (can damage anchors)
Double-check alignment before adding weight
Don’t miss out on this helpful guide!
Step 5: Test the Strength Before Loading
Before placing heavy items back on the shelf, always perform a basic strength test. This helps confirm that the bracket and wall repair are holding properly. A quick check now can prevent future accidents, damage, or unexpected loosening under full load.
If you notice any movement:
Tighten screws again
Check anchors
Reevaluate wall grip
Only load gradually instead of all at once.
Don’t miss out on this helpful guide!
Don’t miss out on this helpful guide!
How to Prevent Shelf Brackets From Becoming Loose Again
Once your shelf is fixed, prevention becomes the most important step. Proper maintenance and correct installation habits can significantly extend the life of your brackets and keep them stable for years without repeated repairs or wall damage.
- Don’t Overload Shelves
Every bracket has a weight limit. Respect it. - Use Proper Wall Anchors
Always choose anchors based on wall type (drywall, concrete, brick). - Install Into Studs When Possible
Studs provide the strongest support inside walls. - Check Tightness Regularly
Every few months, lightly test screws for movement. - Distribute Weight Evenly
Avoid placing all heavy items on one side of the shelf.
Common Mistakes to Avoid
Even simple shelf repairs can fail if small but important mistakes are made. Many DIY issues come from rushing the process or using incorrect materials. Avoiding these errors ensures your repair lasts longer and prevents repeated loosening or wall damage.
- Reusing the same damaged holes without reinforcement
- Using cheap plastic anchors for heavy shelves
- Ignoring wall type compatibility
- Over-tightening screws and cracking plaster
- Skipping leveling during installation
When You Should Call a Professional
While most loose shelf bracket issues can be fixed at home, some situations are beyond basic DIY repair. Knowing when to seek professional help can prevent serious wall damage and ensure safe installation, especially for heavy or structurally sensitive shelving systems.
- Large wall cracks around mounting points
- Heavy industrial shelving systems
- Structural wall damage
- Repeated failures after multiple repairs
Don’t miss out on this helpful guide!
Final Thoughts
Loose shelf brackets might seem like a minor household issue, but if ignored, they can lead to bigger problems like damaged walls or falling objects. Fortunately, fixing them is usually quick and requires only basic tools and materials.
Whether you use wooden fillers, wall anchors, or upgraded brackets, the key is choosing the right method based on the level of damage. And once repaired, proper installation and weight management will keep your shelves strong and secure for years.
A few minutes of repair today can save you from major headaches tomorrow—and keep your home safer, more organized, and stress-free.
Don’t miss out on this helpful guide!