

Ceiling cracks are one of those household problems that can quietly grow from “barely noticeable” to “why is my ceiling doing that?” If you’ve spotted thin lines, peeling paint, or even wider splits across your ceiling, you’re not alone. Almost every home develops ceiling cracks at some point—whether due to age, temperature changes, moisture, or structural movement.
The good news is that most ceiling cracks are not dangerous and can be repaired with simple tools and the right method. In many cases, you don’t need to call a professional. You just need to understand why the cracks appear and how to fix them properly so they don’t come back.
This guide walks you through everything in a practical, easy-to-follow way—no technical jargon, no unnecessary complications—just a real solution that actually works.
Table of Contents
ToggleWhy Ceiling Cracks Appear in the First Place

Before starting any repair work, it is important to understand why ceiling cracks happen. Simply filling or painting over them without addressing the root cause often leads to the same problem returning. A clear understanding helps you choose a more permanent solution and avoid repeated repairs in the future.
- Houses naturally go through movement over time, which can create stress on ceilings
- Seasonal temperature and humidity changes cause expansion and contraction of materials
- Poor construction quality or aging plaster weakens ceiling strength
- Water leaks from roofs or pipes can damage ceiling layers
- Structural stress may indicate deeper issues that need attention
Before fixing anything, it helps to understand the cause. If you only cover the crack without addressing the reason behind it, it may return sooner than you expect.
1. Natural Building Movement
All buildings experience gradual movement over time due to settling in the foundation and structural adjustments. These shifts are usually very small, but they still create pressure on ceilings and walls. As a result, hairline cracks often appear, especially in plastered or drywall ceilings, even in otherwise strong and well-built homes.
- Buildings naturally settle into the ground over time
- Minor shifting creates stress on ceiling surfaces
- Plaster and drywall are sensitive to movement
- Hairline cracks commonly form in older homes
- This is usually a normal and non-serious issue
Houses are not completely static. Over time, they expand, settle, and shift slightly. This movement can create small hairline cracks in plaster or drywall ceilings.
2. Temperature and Humidity Changes
Ceiling materials react to environmental conditions such as heat, cold, and moisture in the air. When temperatures rise, materials expand, and when they drop, they contract. This repeated cycle slowly weakens the surface, leading to visible cracks. High humidity also softens plaster and paint layers, making ceilings more vulnerable over time.
- Heat causes ceiling materials to expand
- Cold weather leads to contraction and stress
- Repeated temperature cycles weaken surfaces
- High humidity softens plaster and paint layers
- Moisture increases the risk of cracking
Heat causes materials to expand, while cold causes them to contract. In places with seasonal changes, this constant expansion and contraction puts stress on ceiling surfaces.
Humidity also plays a role. Moisture in the air can weaken plaster or paint layers, making them more likely to crack.
3. Poor Construction or Aging Materials
Ceiling cracks often appear due to issues related to construction quality or material aging. In older homes, plaster loses its strength over time, while poorly constructed ceilings may lack proper finishing or reinforcement. Weak joints, low-quality materials, or rushed workmanship all contribute to early cracking and surface damage.
- Low-quality plaster weakens over time
- Poor workmanship leads to weak ceiling joints
- Aging materials lose flexibility and strength
- Improper finishing increases cracking chances
- Older homes are more prone to surface damage
Older homes or poorly finished ceilings often develop cracks due to low-quality plaster, weak joints, or insufficient finishing during construction.
4. Water Leaks
Water damage is one of the most serious causes of ceiling cracks. Leaks from roofs, bathrooms, or pipes above the ceiling slowly weaken the structure. Over time, this leads not only to cracks but also stains, peeling paint, and sagging plaster. If ignored, the damage can spread and become more expensive to repair.
- Roof leaks allow water to seep into ceilings
- Bathroom or pipe leaks weaken plaster layers
- Moisture causes stains and surface damage
- Paint may peel or bubble over time
- Continuous leakage worsens structural integrity
One of the more serious causes. A leaking roof, bathroom pipe, or air conditioning line above the ceiling can weaken the structure and create cracks along with stains.
5. Structural Stress
Some ceiling cracks are not just surface issues but signs of deeper structural movement. These cracks are usually wider, longer, or repeatedly return even after repairs. In such cases, the building may be experiencing stress in its foundation or load-bearing structure, requiring professional inspection to ensure safety.
- Cracks wider than normal may indicate structural issues
- Reappearing cracks suggest ongoing movement
- Foundation stress can affect ceiling stability
- Long or spreading cracks require attention
- Professional inspection is recommended for safety
If cracks are wide, spreading, or repeatedly returning, they may indicate structural movement. These cases need closer inspection.
Types of Ceiling Cracks You Should Know
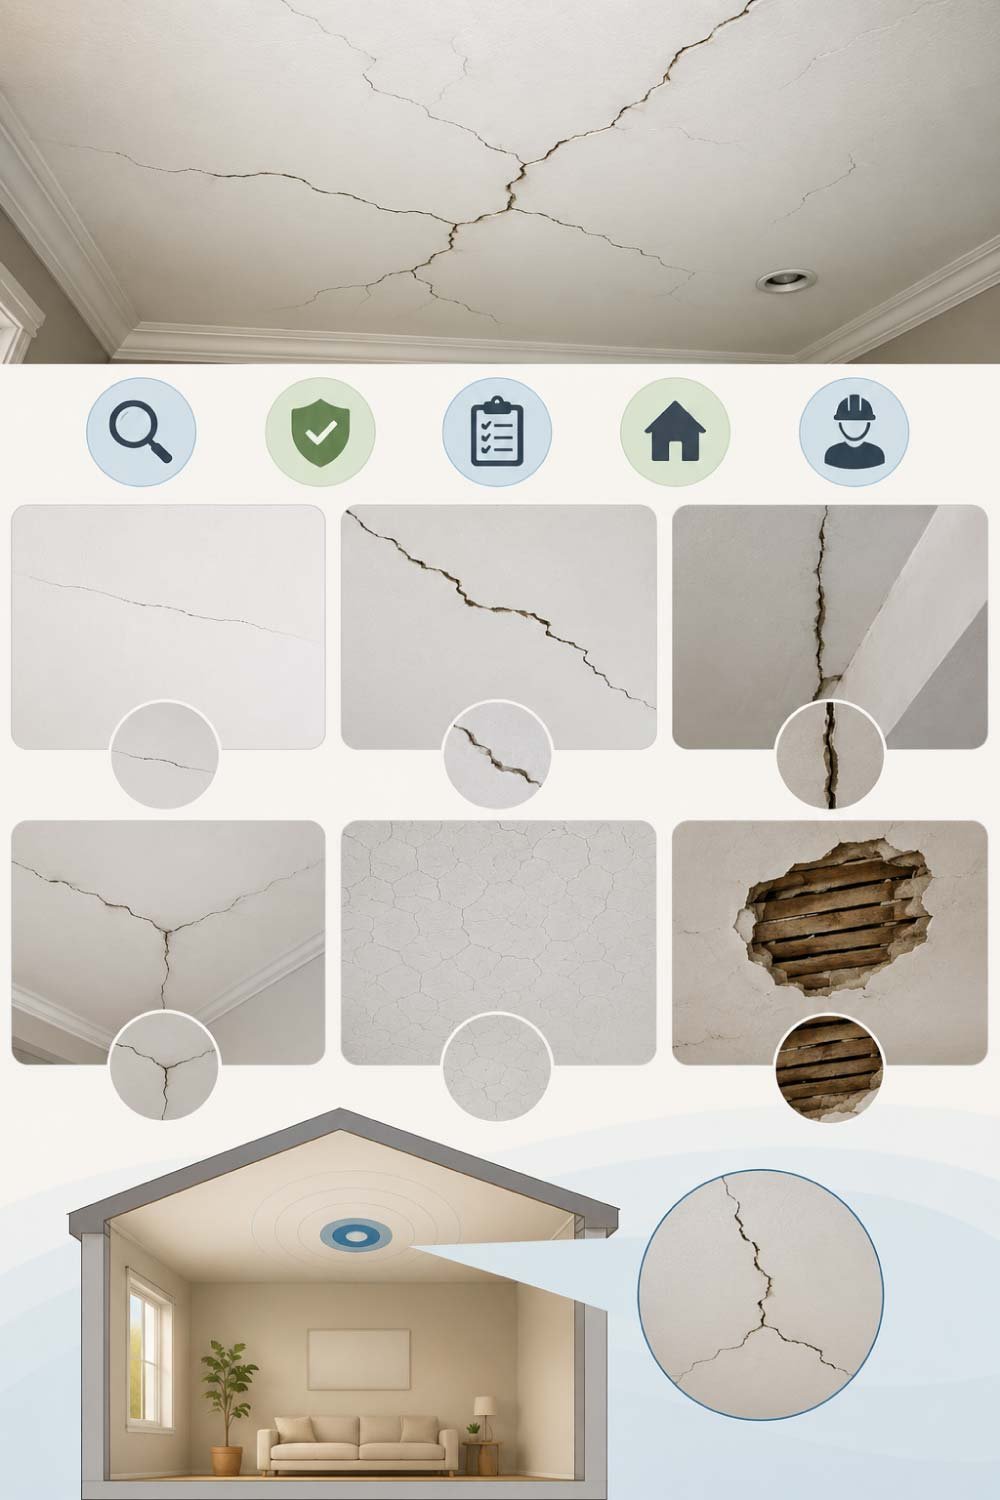
Understanding the type of ceiling crack is important because each one has a different cause and repair method. Some are purely cosmetic, while others may signal deeper issues. Identifying the crack type helps you decide whether a simple DIY fix is enough or if professional help is required.
- Different cracks indicate different underlying problems
- Some are harmless surface issues, others are serious
- Proper identification helps choose the right repair method
- Surface cracks are easier to fix at home
- Deep cracks may require professional attention
Not all cracks are equal. Identifying the type helps you choose the right repair method.
Hairline Cracks
Hairline cracks are very thin surface lines that usually appear in paint or plaster due to natural drying and shrinking. They are common and generally not a structural concern. These cracks are easy to repair with basic filler and repainting, making them one of the simplest ceiling issues to fix.
- Very thin and shallow surface cracks
- Usually caused by paint or plaster shrinkage
- Common in both new and old ceilings
- Not typically a structural problem
- Easy to repair with filler and paint
Thin, shallow lines usually caused by paint or surface plaster shrinking. These are the easiest to fix.
Straight Cracks Along Joints
These cracks often appear where drywall panels meet. They usually occur when joint tape fails or adhesive weakens over time. The crack runs in a straight line and may reappear if not properly repaired. Fixing them requires reinforcing the joint and applying fresh compound.
- Occur along drywall panel joints
- Caused by tape or joint failure
- Appear as straight, clean lines
- May return if not reinforced properly
- Require proper joint repair method
Common in drywall ceilings where boards meet. These often appear due to tape failure.
Spiderweb Cracks
Spiderweb cracks form a network-like pattern across the ceiling surface. They are usually caused by paint drying too quickly or uneven plaster application. While they look alarming, they are often surface-level issues and can be repaired with sanding, filling, and repainting the affected area.
- Cracks form a web-like pattern
- Caused by fast drying paint or plaster
- Mostly surface-level damage
- Can look widespread but not deep
- Repair involves sanding and repainting
Small interconnected cracks that spread in a pattern. Usually caused by paint or plaster drying too quickly.
Large or Deep Cracks
Large cracks are wider and more noticeable, often exceeding 3–5 mm. These cracks may indicate deeper problems such as structural stress, water damage, or severe material failure. They should not be ignored, as they may require reinforcement or professional repair before cosmetic fixing.
- Wider than typical surface cracks
- May indicate serious underlying issues
- Often linked to water damage or stress
- Can worsen over time if ignored
- May require professional inspection
These are wider than 3–5 mm and may indicate deeper issues like structural stress or water damage.
Tools and Materials You’ll Need
Having the right tools makes ceiling crack repair much easier and more effective. Fortunately, most materials are affordable and easily available at local hardware stores. Using proper tools ensures a smooth finish, better adhesion, and a longer-lasting repair without repeated patchwork.
- Basic tools are affordable and easy to find
- Proper materials ensure strong and lasting repair
- Preparation improves final finish quality
- Safety tools are important for ceiling work
- Simple DIY kit is usually enough
You don’t need expensive equipment. Most items are available at any hardware store.
Putty knife or scraper
Sandpaper (medium and fine grit)
Ceiling crack filler or joint compound
Plaster of Paris (for deeper cracks)
Primer
Paint matching your ceiling color
Clean cloth or brush
Ladder or step stool
Safety goggles and mask
Also Read:
Squeaky Door Hinges? Make Them Silent Instantly (Easy Fix Guide)
Step-by-Step Ceiling Crack Repair That Works
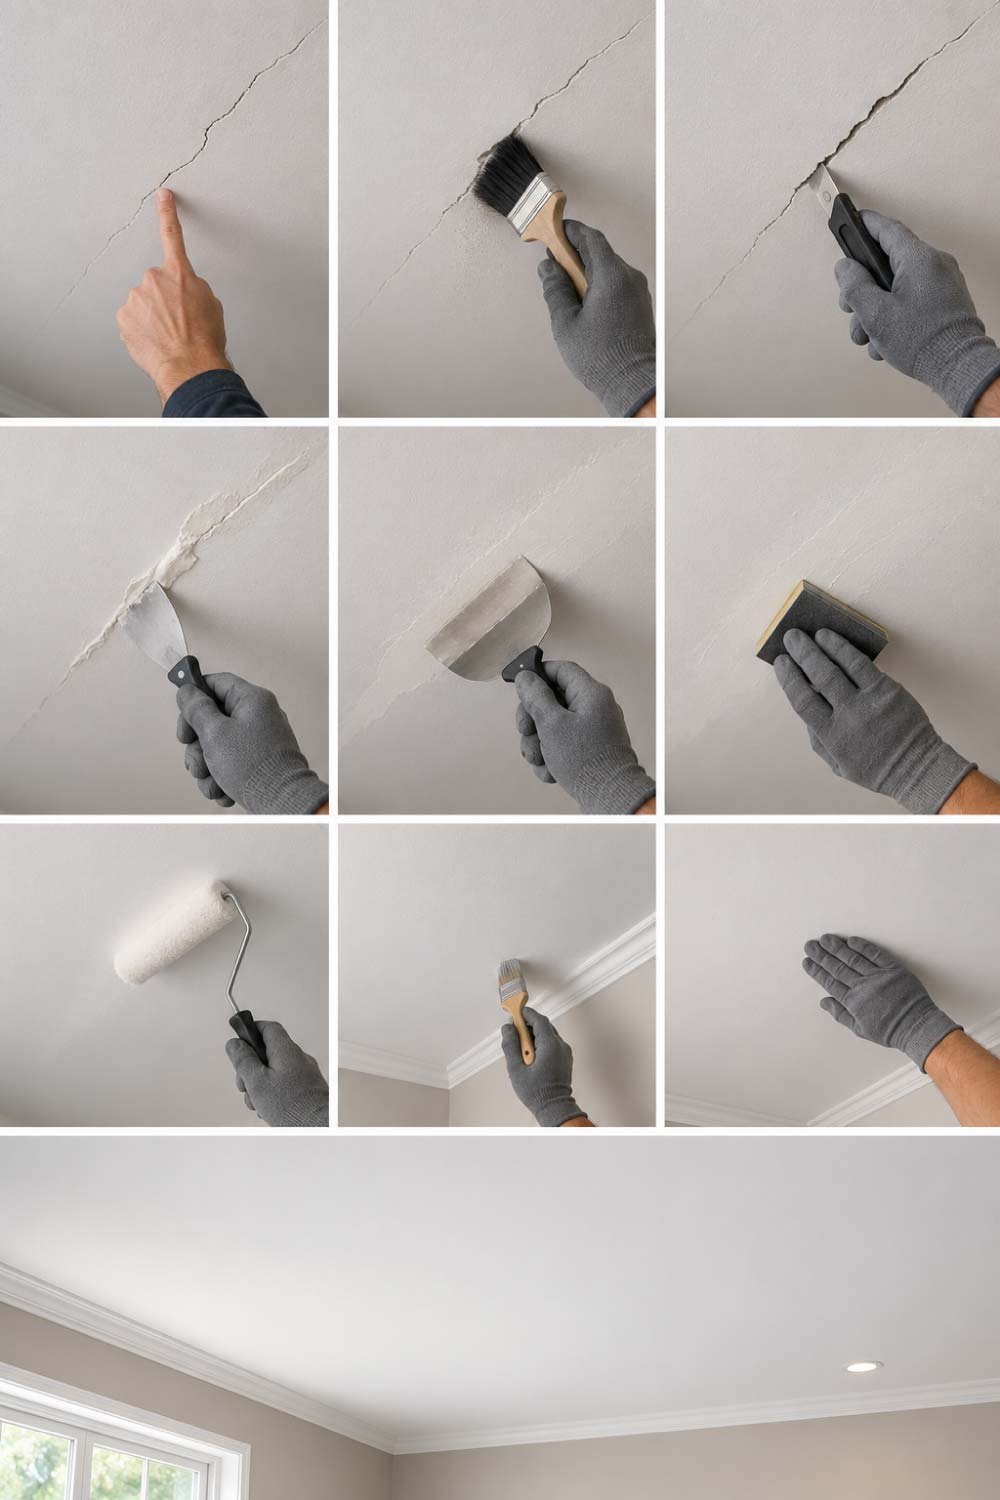
Fixing ceiling cracks properly requires a careful step-by-step approach. Skipping steps or rushing the process often leads to visible patches or recurring cracks. Following a structured method ensures a smooth finish and helps the repair blend naturally with the rest of the ceiling.
- Proper steps ensure long-lasting results
- Each stage prepares surface for the next
- Rushing leads to weak or visible repairs
- Cleaning and prep are just as important as filling
- Final finish depends on careful execution
Let’s go through a simple, reliable method used by professionals and homeowners alike.
Step 1: Clean the Crack Area Properly
Start by thoroughly cleaning the damaged area to ensure proper adhesion of the filler. Remove any loose paint, dust, or weak plaster. Slightly widening the crack helps the filler bond better. After cleaning, ensure the surface is completely dry for the best repair results.
- Remove loose paint and weak plaster
- Slightly widen crack for better grip
- Clean dust with dry cloth or brush
- Ensure surface is fully dry before repair
- Clean base ensures strong bonding
Start by removing any loose paint, dust, or weak plaster around the crack.
Use a scraper or putty knife to gently widen the crack slightly. This may sound counterintuitive, but it helps the filler grip better.
Then wipe the area with a dry cloth to remove dust. If the ceiling is greasy or damp, let it dry completely before proceeding.
A clean surface is the foundation of a strong repair.
Step 2: Check for Moisture or Leak Signs
Before applying any filler, it is essential to check whether moisture is present. Water issues can cause cracks to return even after repair. Look for stains, damp patches, or soft plaster. If any signs of leakage are found, fix the source first before continuing with cosmetic repairs.
- Inspect for yellow or brown stains
- Check for damp or soft plaster areas
- Identify any active leaks above ceiling
- Stop repair if moisture is present
- Fix leak before filling cracks
Before filling anything, inspect the area carefully.
Look for:
Yellow or brown stains
Damp patches
Soft or sagging plaster
If you find moisture, stop and fix the leak first. Repairing a wet ceiling is a temporary fix at best.
Also Read:
Step 3: Apply Crack Filler or Joint Compound
This is the main repair stage where the actual restoration begins. Using the right filler or joint compound ensures the crack is properly sealed and strengthened from within. The key is to press the material deep into the crack so there are no gaps left behind, then smooth it evenly for a natural finish.
- Use ceiling filler or joint compound for best results
- Press material firmly into the crack for full coverage
- Smooth outward for a blended surface finish
- Apply in layers for deeper or wider cracks
- Avoid air pockets to prevent future weakening
Now comes the actual repair work.
Take your ceiling filler or joint compound and apply it using a putty knife. Press it firmly into the crack so it fills every gap.
Smooth it outward so it blends slightly with the surrounding surface.
For deeper cracks:
Apply a first layer
Let it dry
Apply a second layer for strength
Avoid leaving air pockets because they can weaken the repair over time.
The goal is not just to cover the crack—but to rebuild a stable surface.
Step 4: Let It Dry Completely
Drying is one of the most ignored yet most important parts of ceiling repair. Rushing this step can undo all your hard work. The filler needs enough time to harden fully so it bonds properly with the ceiling surface. Temperature, humidity, and product type all affect drying time.
- Drying time varies based on crack depth and product type
- Small repairs usually dry faster than deep ones
- Never paint or sand before full drying
- Soft filler means more drying time is needed
- Proper drying prevents future cracking
Drying time is important and often rushed, which leads to poor results.
Depending on the product used:
Small cracks may dry in 1–2 hours
Deeper fills may need 6–24 hours
Do not paint or sand before it is fully dry. If you press it and it feels soft, it needs more time.
Good patience here prevents future re-cracking.
Step 5: Sand the Surface Smooth
Sanding is what gives your repair a clean, invisible finish. Once the filler is completely dry, it must be leveled with the surrounding ceiling surface. Proper sanding ensures that after painting, the repaired area blends seamlessly without visible bumps or uneven patches.
- Start with medium-grit sandpaper
- Finish with fine-grit for smoothness
- Use gentle circular or side-to-side motions
- Avoid over-sanding the surrounding paint
- Wipe dust before moving to next step
Once fully dry, use medium-grit sandpaper first, then fine-grit for finishing.
Sand gently in circular or side-to-side motions until the repaired area is level with the ceiling.
Be careful not to over-sand, or you may damage surrounding paint.
After sanding, wipe off dust using a clean cloth.
A smooth surface ensures the crack becomes invisible after painting.
Also Read:
Noisy Door Driving You Crazy? Make It Silent in Seconds (Simple Fix Guide)
Step 6: Apply Primer for Strong Bonding
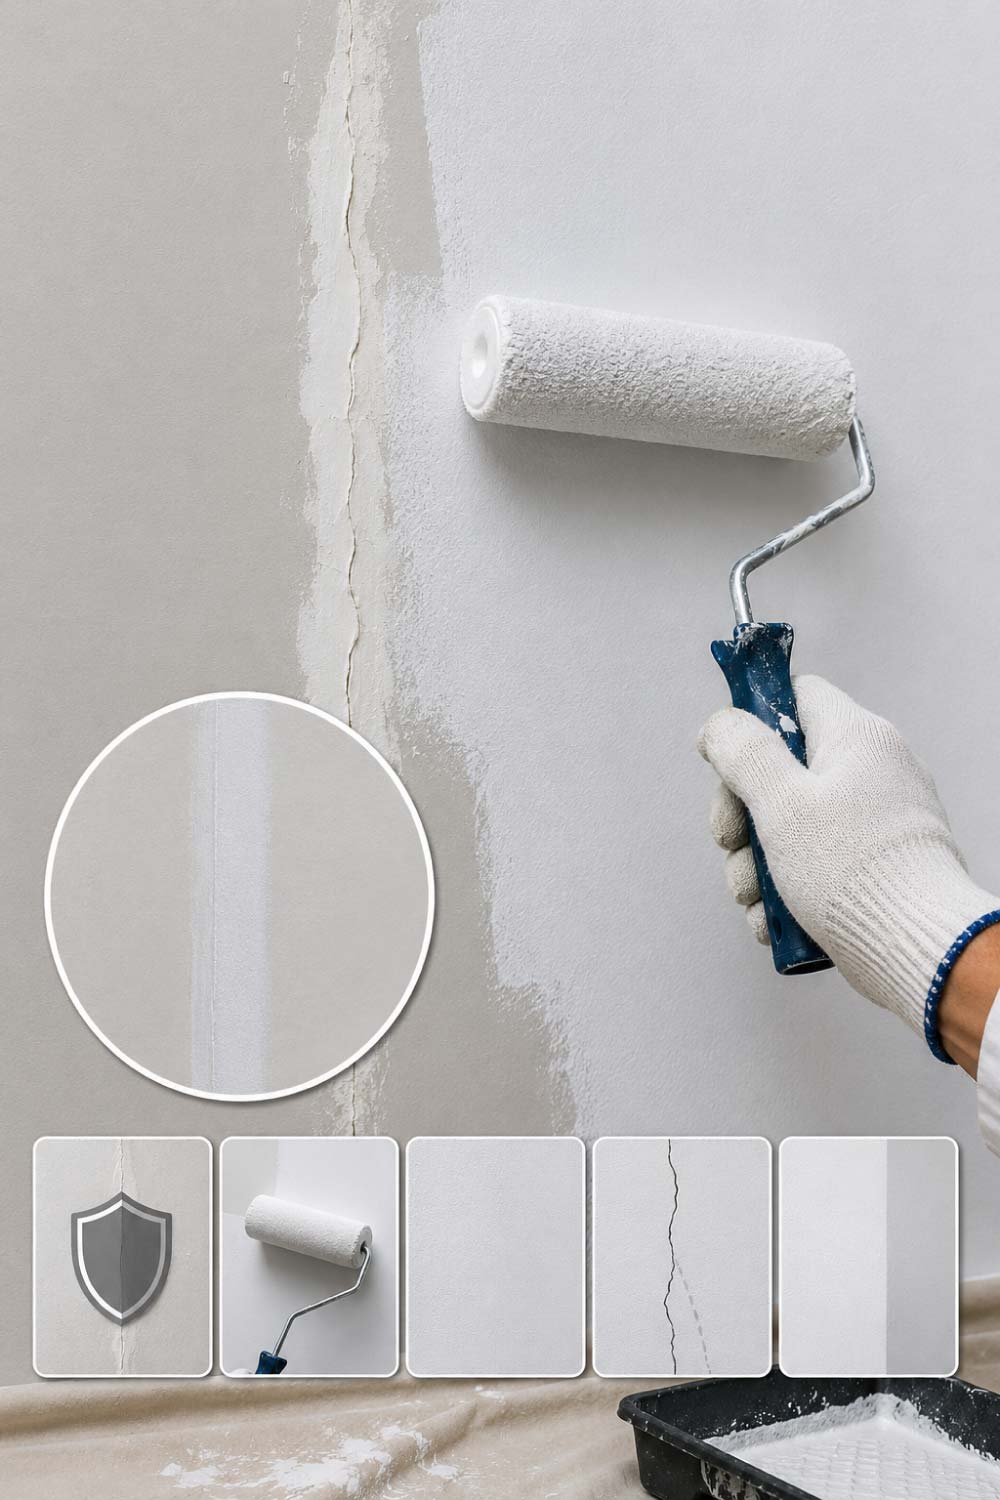
Primer is often overlooked, but it plays a crucial role in making the repair long-lasting. It seals the patched area and ensures that paint adheres evenly. Without primer, repaired sections may absorb paint differently, making the crack visible again over time.
- Seals repaired surface for durability
- Helps paint stick evenly and smoothly
- Prevents patchy or uneven color appearance
- Reduces chances of crack reappearing visually
- Creates a strong base for final paint layer
Primer is often skipped—but it is one of the most important steps.
It helps:
Seal the repaired area
Improve paint adhesion
Prevent future cracks from showing through
Apply a thin, even coat using a brush or roller and let it dry completely.
Think of primer as a bridge between the repair and the paint.
Step 7: Repaint the Ceiling
The final step restores the visual finish of your ceiling. Matching the existing color and applying paint carefully ensures the repaired area blends in naturally. Proper technique, such as feathering the edges, helps avoid visible lines or patches after the paint dries.
- Use matching ceiling paint for uniform look
- Apply one or two coats as needed
- Feather edges for seamless blending
- Allow proper drying between coats
- Final result should hide the repair completely
Now the final step—restoring the look of your ceiling.
Use ceiling paint that matches the existing color. Apply one or two coats depending on coverage.
Feather the edges slightly so the repaired area blends naturally with the rest of the ceiling.
Once dry, the crack should be nearly invisible.
Extra Tips for Long-Lasting Results
Repairing cracks is only half the job—preventing them from coming back is just as important. A few simple maintenance habits can greatly reduce the chances of future ceiling damage and help keep your home in better condition for longer.
- Proper ventilation reduces moisture buildup
- Stable indoor temperature protects ceiling material
- Regular roof checks prevent hidden leaks
- High-quality materials last longer and perform better
- Preventive care reduces future repair costs
A good repair is not just about fixing—it’s about preventing recurrence.
Control Indoor Moisture
Use ventilation in kitchens and bathrooms. Moisture is a silent crack-maker.
Avoid Temperature Extremes
Rapid heating or cooling can stress ceiling materials.
Inspect Roof Regularly
Even small leaks can lead to big ceiling problems over time.
Use Quality Materials
Cheap fillers or paint often fail faster.
When Ceiling Cracks Are a Bigger Problem
While most ceiling cracks are harmless and cosmetic, some can signal deeper structural or moisture-related issues. Recognizing warning signs early is important because ignoring them may lead to costly repairs or safety concerns in the future.
- Wide cracks may indicate structural stress
- Growing cracks suggest ongoing movement
- Multiple cracks can signal widespread issues
- Sagging ceilings require immediate attention
- Water leaks must be addressed quickly
While most cracks are harmless, some should not be ignored.
Call a professional if you notice:
Cracks wider than 5 mm
Cracks that keep growing
Multiple cracks spreading across the ceiling
Sagging or bulging areas
Water leakage from above
Also Read:
Final Thoughts
Ceiling cracks may look worrying, but in most homes they are simply a normal sign of aging materials and environmental changes. The key is not to panic, but to repair them properly and patiently.
A successful fix comes down to five essentials:
- Clean the area properly
- Use the right filler
- Allow proper drying time
- Sand smoothly
- Seal and repaint correctly
When done right, the repair doesn’t just hide the crack—it strengthens the ceiling surface and helps prevent future damage.
With a little effort and attention to detail, your ceiling can look clean, smooth, and crack-free again without expensive repairs or complicated tools.