

A loose ceiling fixture is one of those household problems that can start small but quickly turn into a serious safety concern if ignored. Whether it’s a ceiling fan wobbling slightly, a light fixture shifting out of place, or a decorative ceiling mount hanging unevenly, the issue often points to weakened support or improper installation.
The good news is that in many cases, you can fix a loose ceiling fixture safely with basic tools and a careful approach. You don’t always need to call an electrician immediately—though in some cases, that is the safest option.
In this guide, we’ll walk through the causes, warning signs, and step-by-step repair methods so you can handle the problem confidently and safely.
Table of Contents
ToggleWhy Ceiling Fixtures Become Loose
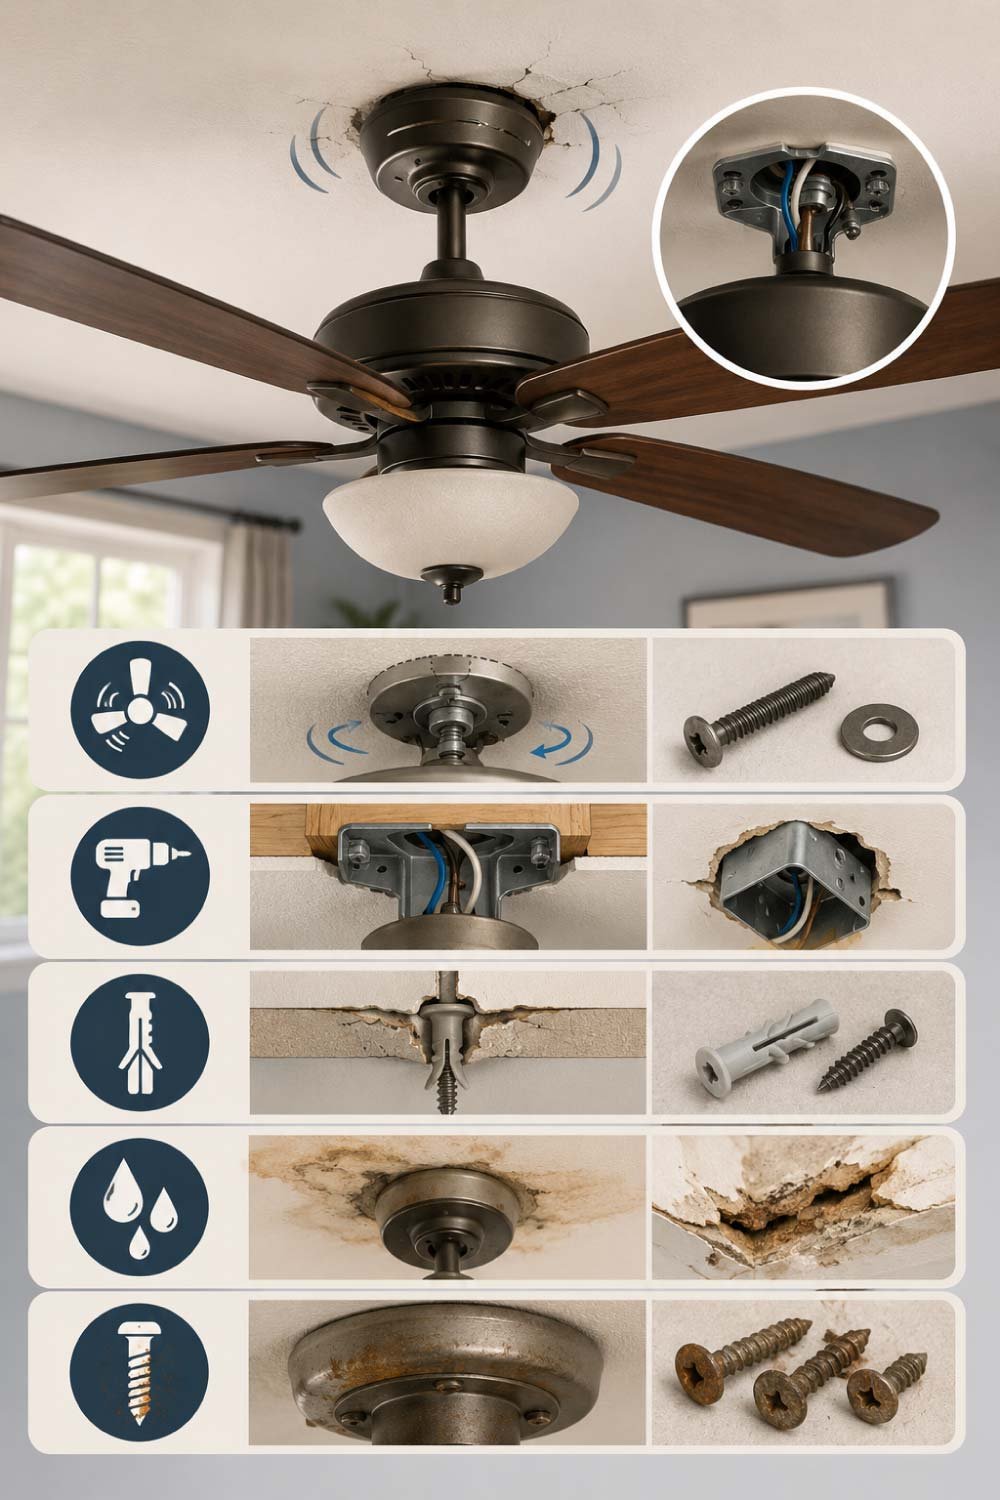
Ceiling fixtures often loosen gradually over time, and the process is usually so slow that homeowners don’t notice until it becomes visible or unsafe. Understanding the underlying causes is important because it helps you apply the right fix and avoid repeat problems in the future. Most issues develop from a combination of movement, poor installation, and material fatigue.
Before jumping into repairs, it’s important to understand why ceiling fixtures loosen in the first place. Identifying the cause helps prevent the issue from returning.
Vibrations Over Time
Ceiling fans and even heavy light fixtures create small but continuous vibrations. Over time, these vibrations can loosen screws, mounting brackets, or anchor points.
Poor Installation
If a fixture was not properly installed into a ceiling joist or with the right electrical box, it may gradually pull away from the ceiling under its own weight.
Weak Drywall Anchors
Many fixtures are mounted using drywall anchors. While these are fine for lightweight items, they often fail under heavier loads like fans or chandeliers.
Moisture Damage
In kitchens, bathrooms, or areas with roof leaks, moisture can weaken ceiling materials and loosen grip points.
Aging Hardware
Metal screws, brackets, and ceiling boxes can corrode or wear out over time, reducing their holding strength.
Warning Signs You Should Not Ignore
Loose ceiling fixtures rarely fail without warning. They usually show small but noticeable signs that something is wrong. Recognizing these early symptoms can help you prevent accidents, electrical hazards, or complete fixture detachment. Even minor movement or sound changes should be taken seriously and inspected immediately before the problem worsens.
A loose ceiling fixture doesn’t always fall immediately. It usually gives early warning signs:
- Visible gaps between fixture and ceiling
- Wobbling or shaking when touched or when the fan is on
- Flickering lights due to loose wiring connections
- Cracking sounds from the ceiling area
- Slight tilting of the fixture
- Screw heads sticking out or pulling away
If you notice any of these signs, it’s best to fix the issue quickly before it becomes dangerous.
Safety First: Before You Start
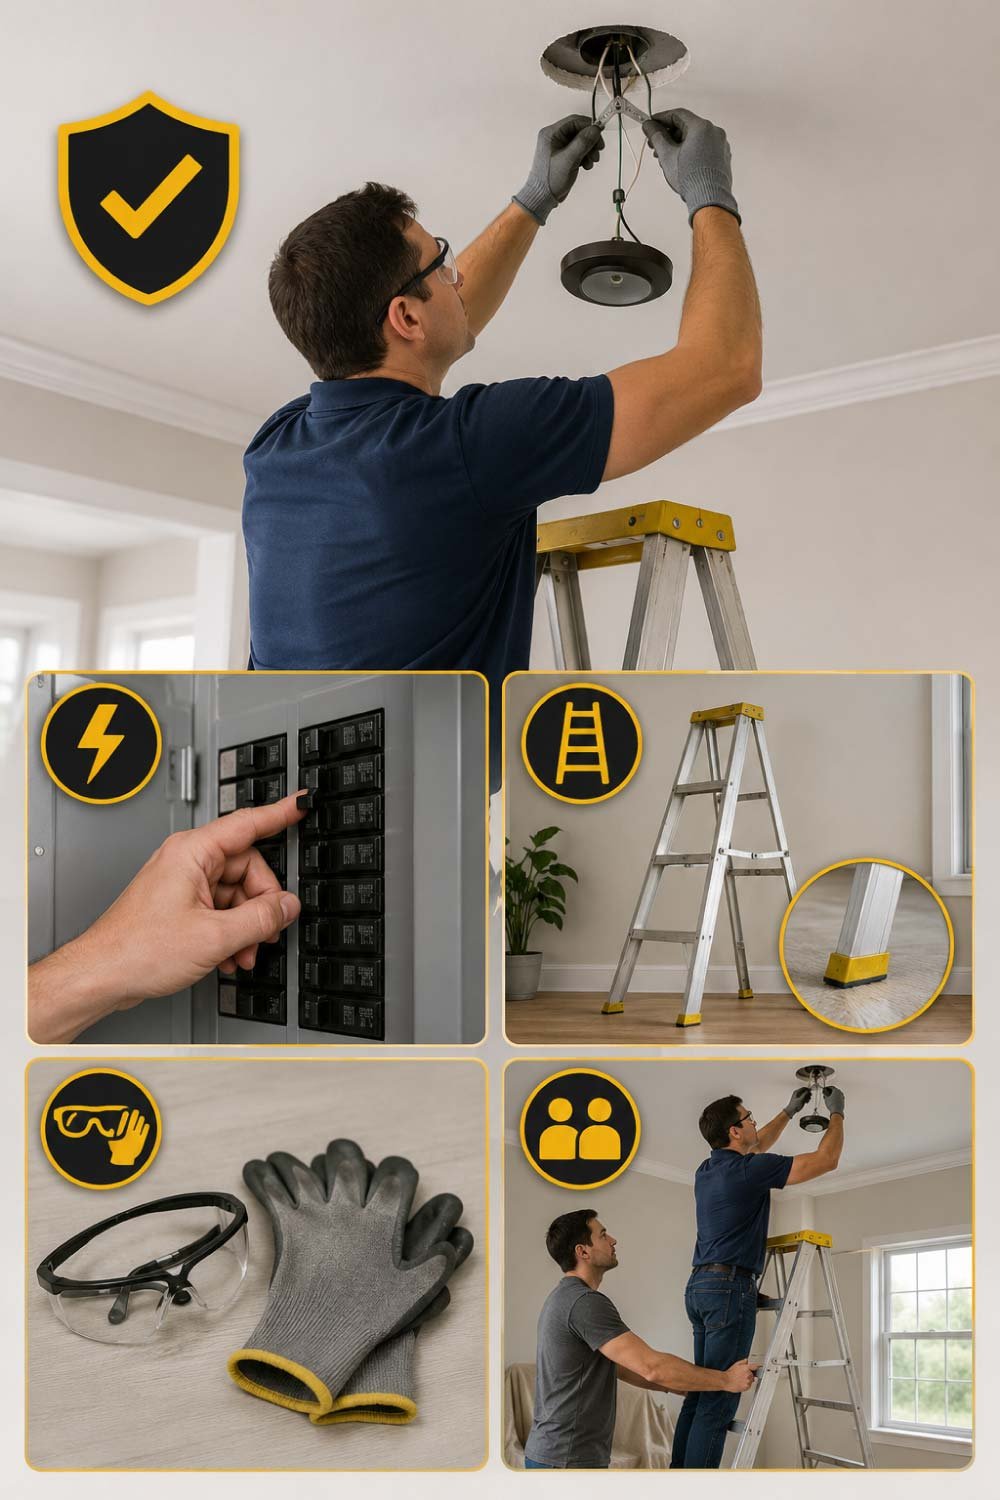
Safety is the most important part of any ceiling repair work because you are dealing with both electricity and overhead positioning. A small mistake can lead to electric shock or falling injuries. Taking a few precautionary steps before starting ensures the repair process is safe, controlled, and free from avoidable risks.
Working on ceiling fixtures involves both height and electricity, so safety is critical.
- Turn Off Power Completely
Go to your home’s main electrical panel and switch off the breaker connected to the fixture. Never rely only on a wall switch. - Use a Stable Ladder
Make sure your ladder is on flat ground and fully locked in place. Avoid chairs or unstable surfaces. - Wear Safety Gear
Simple precautions like gloves and safety glasses can protect you from dust and debris. - Have a Helper (If Possible)
One person can hold the ladder or pass tools while the other works on the fixture.
Tools You May Need
Having the right tools ready before starting the repair makes the entire process smoother and faster. Most ceiling fixture issues can be fixed with basic household tools, but in some cases, additional hardware may be needed for reinforcement or replacement. Preparing in advance saves time and prevents interruptions during work.
Most ceiling fixture repairs require only basic household tools:
- Screwdriver set (flathead and Phillips)
- Voltage tester
- Drill (optional)
- Replacement screws
- Ceiling fan or light fixture mounting bracket (if needed)
- Wall anchors or toggle bolts
- Ladder
- Electrical tape
Step-by-Step: Fixing a Loose Ceiling Fixture
Fixing a loose ceiling fixture becomes much easier when you follow a structured process. Instead of rushing into tightening or replacing parts, it’s important to inspect, diagnose, and repair step by step. This ensures the fixture is not only secured properly but also safe for long-term use without repeated loosening issues.
Now let’s go through the actual repair process in a simple, structured way.
Step 1: Inspect the Fixture
Carefully examine how the fixture is attached.
Check for:
- Loose screws on the mounting plate
- Cracked or bent bracket
- Damage to the ceiling surface
- Signs of a failing electrical box
Gently move the fixture (after power is off) to understand how much movement there is. This will help you decide the type of repair needed.
Step 2: Tighten Existing Screws
In many cases, the issue is simply loose screws.
- Remove the decorative cover if necessary
- Tighten all visible screws connecting the fixture to the ceiling box
- Also check screws inside the mounting bracket
If the screws keep spinning without tightening, the hole may be stripped and need reinforcement (we’ll cover that next).
Step 3: Check the Electrical Box
A secure ceiling fixture should be attached to a solid electrical box fixed to a ceiling joist.
If the box is plastic or feels loose:
- It may not support heavy fixtures
- It might need replacement with a metal fan-rated box
For ceiling fans especially, always ensure a fan-rated box is installed, as standard boxes are not designed for weight and motion.
Step 4: Reinforce Stripped Screw Holes
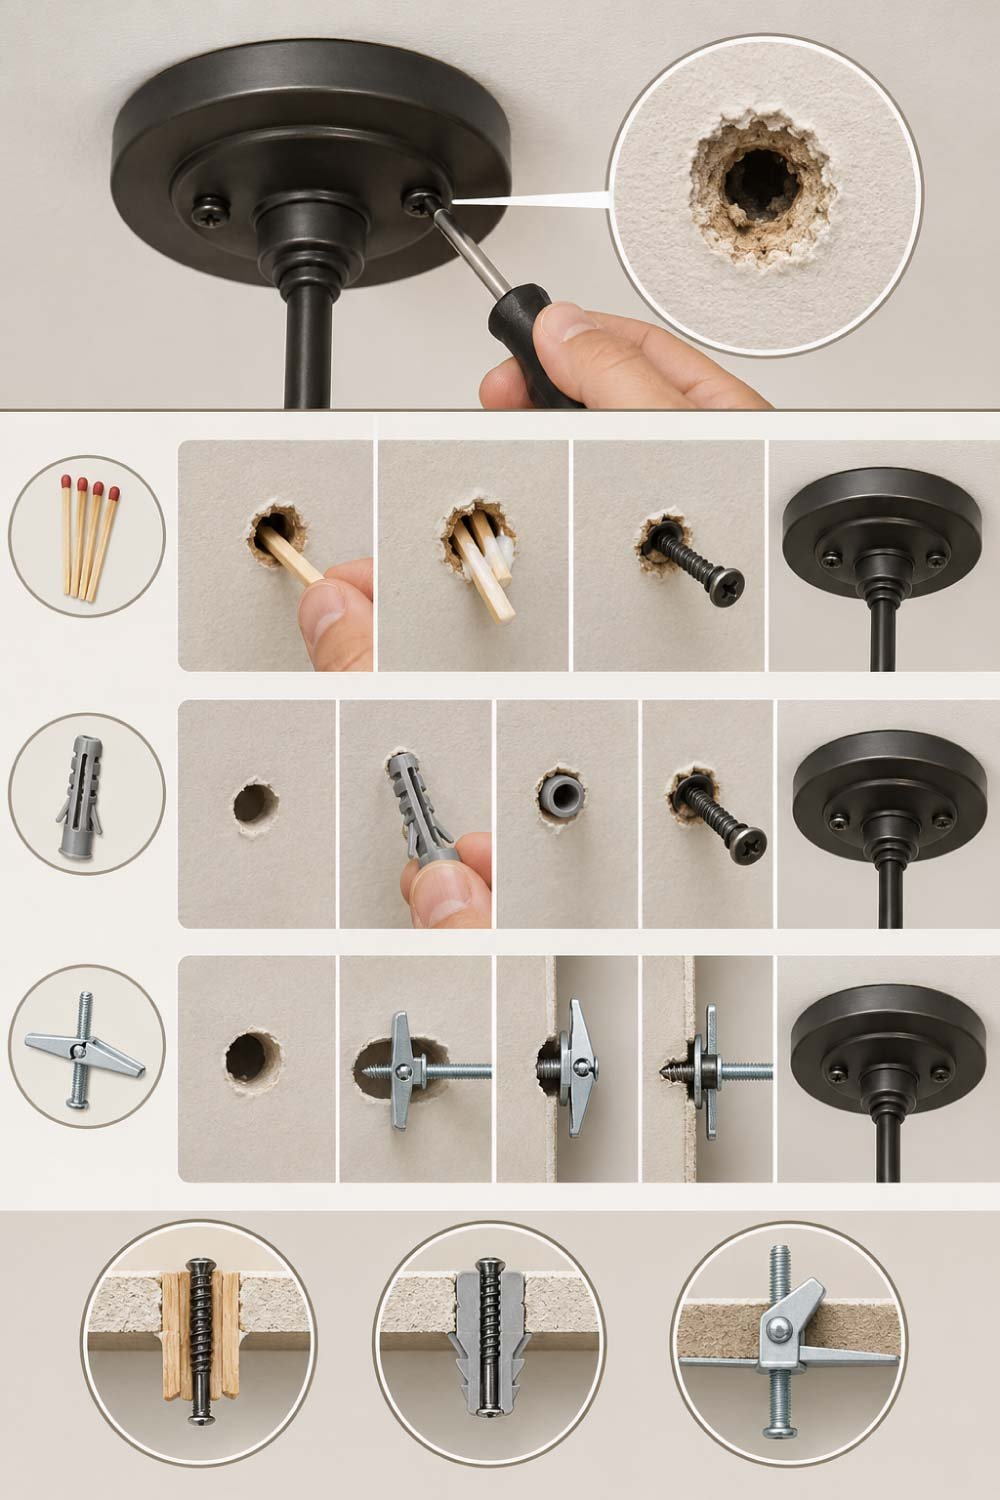
When screws stop holding tightly, the problem is usually stripped or enlarged holes in the ceiling material or mounting surface. This weakens the grip and allows the fixture to loosen again. Reinforcing these holes restores stability and ensures the screws can hold weight properly without slipping or rotating over time.
If screws are not gripping properly, the mounting holes may be worn out.
You can fix this using:
- Option A: Wooden Matchstick Trick (Light Fixtures Only)
Insert wooden toothpicks or matchsticks with wood glue into the hole
Let it dry
Reinsert the screw for a tighter grip - Option B: Wall Anchors
Remove loose screws
Insert plastic or metal anchors
Reattach screws securely - Option C: Toggle Bolts (Best for Heavy Fixtures)
Drill a slightly larger hole
Insert toggle bolts behind drywall
Tighten to create a strong hold
Also Read:
Step 5: Secure the Mounting Bracket
The mounting bracket is the main support structure that holds the entire fixture in place. If this part is loose or weak, no amount of tightening elsewhere will solve the problem. Ensuring it is properly aligned and firmly anchored is essential for long-term safety and stability of the ceiling fixture.
The mounting bracket is the backbone of your fixture.
- Remove the fixture if needed
- Check bracket alignment
- Tighten screws into the ceiling joist or electrical box
- Replace weak brackets if bent or damaged
A strong bracket ensures long-term stability.
Step 6: Fix Ceiling Damage (If Any)
Sometimes the ceiling itself becomes part of the problem, especially if the material around the fixture has cracked or weakened. Even a well-secured fixture can loosen again if the surrounding drywall cannot support it. Repairing ceiling damage ensures a stable surface for proper reinstallation.
Sometimes the ceiling itself becomes damaged around the fixture.
For small cracks:
- Apply joint compound
- Let it dry
- Sand lightly and repaint if needed
For larger damage:
- You may need drywall patching or reinforcement before reinstalling the fixture
Step 7: Reinstall the Fixture Carefully
After completing all repairs and reinforcements, reinstalling the fixture properly is the final and most important step. This ensures everything stays aligned, secure, and safe. Taking time during reinstallation helps prevent uneven pressure, gaps, or future loosening issues.
Once everything is secure:
- Reconnect wiring (if disconnected)
- Attach fixture to mounting bracket
- Tighten screws evenly
- Ensure no gaps remain between fixture and ceiling
Turn the power back on and test the fixture.
Special Case: Loose Ceiling Fan
Ceiling fans are more demanding than standard fixtures because they constantly rotate and create ongoing vibration. Even a slightly loose fan can become dangerous over time. That’s why extra inspection and reinforcement are necessary to ensure safe and stable operation without wobbling or imbalance.
Ceiling fans require extra attention because they move continuously.
If your ceiling fan is loose:
- Check for a fan-rated electrical box
- Tighten blade screws and motor housing
- Ensure downrod is properly secured
- Replace weak mounting hardware immediately
A loose ceiling fan should never be ignored due to safety risks from falling or imbalance.
Also Read:
When You Should Call a Professional
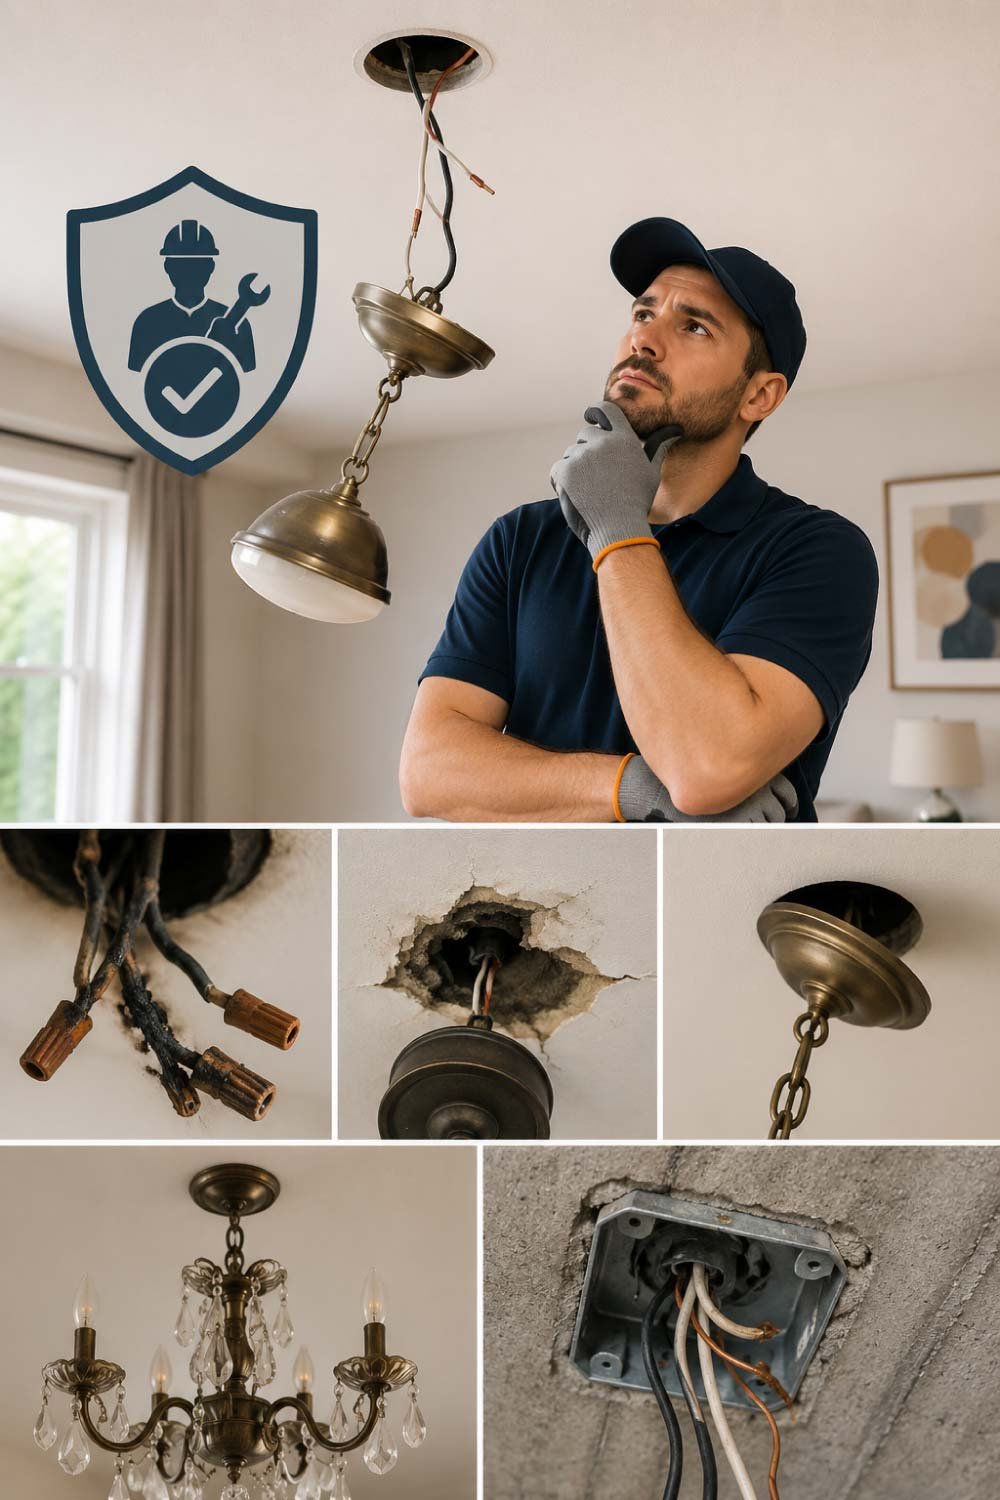
While many ceiling fixture problems can be handled with basic tools, some situations go beyond safe DIY repair. Electrical risks, structural damage, or repeated failures indicate deeper issues that require professional expertise to ensure safety and long-term reliability.
While many loose fixture problems are DIY-friendly, some situations require expert help:
- Burnt or damaged wiring
- Severe ceiling damage
- Fixture repeatedly loosens after repair
- Heavy chandelier installations
- Electrical box replacement in concrete ceilings
If you feel uncertain at any stage, hiring an electrician is the safest option.
Preventing Future Looseness
Once your fixture is properly fixed, maintenance becomes the key to long-term safety. Regular checks and proper installation habits can significantly reduce the chances of future loosening. A few simple preventive steps help keep fixtures secure, stable, and trouble-free for years.
Once your fixture is secure, take steps to prevent the issue from returning:
- Inspect fixtures every 6–12 months
- Tighten screws during routine home maintenance
- Avoid overloading ceiling mounts
- Use high-quality anchors and brackets
- Ensure proper installation for all new fixtures
Small maintenance steps can prevent big repairs later.
Final Thoughts
A loose ceiling fixture might seem like a minor annoyance, but it can quickly turn into a serious safety hazard if ignored. The key is early detection and proper reinforcement. In most cases, the fix is straightforward—tighten screws, reinforce anchors, or upgrade the mounting system.
By taking a careful, step-by-step approach and prioritizing safety, you can restore stability to your ceiling fixtures in just minutes. And more importantly, you can ensure they stay secure for years to come.
Also Read: