
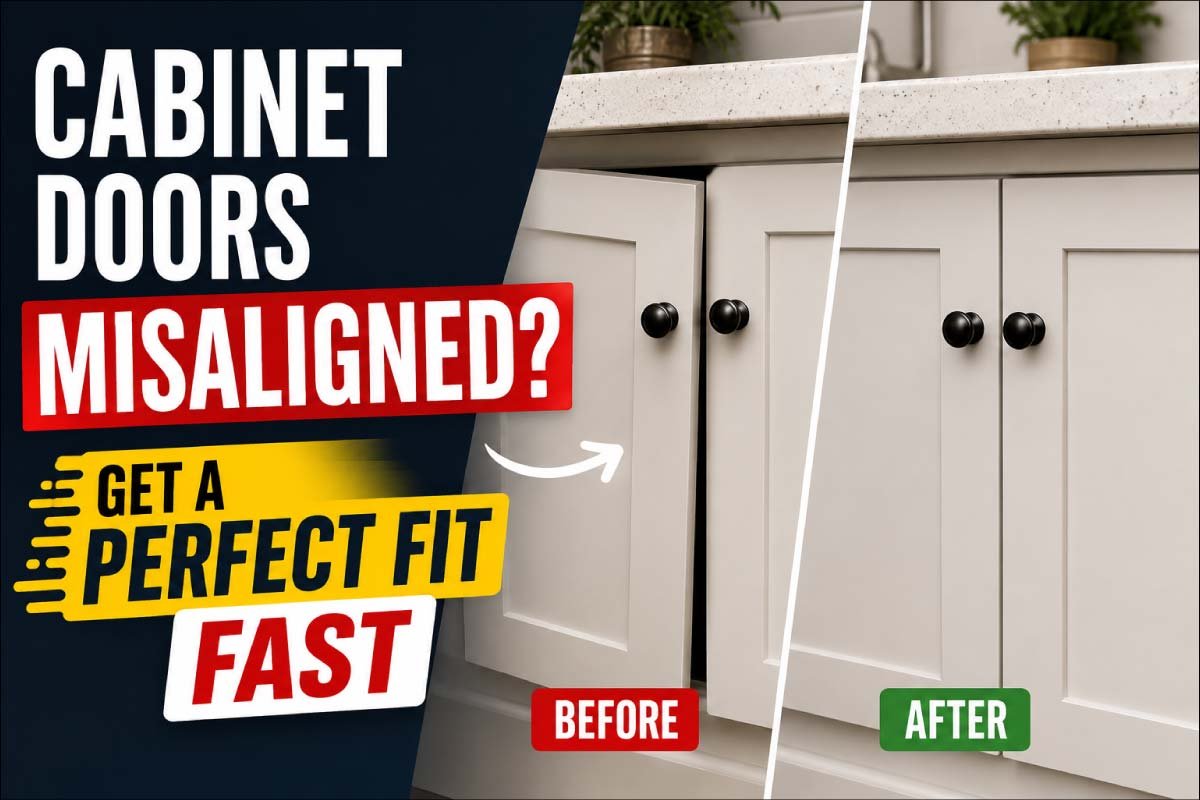
Cabinet doors are one of those small household details that you barely notice—until they stop lining up properly. A slightly crooked door or uneven gap can make an entire kitchen or bathroom look older, messier, and less functional than it really is. The good news is that misaligned cabinet doors are extremely common, and in most cases, you don’t need a carpenter or expensive tools to fix them.
With a little patience and the right adjustment techniques, you can restore a clean, balanced look in under an hour. This guide walks you through why cabinet doors go out of alignment, how to diagnose the issue, and step-by-step methods to fix them quickly at home.
Why Cabinet Doors Become Misaligned
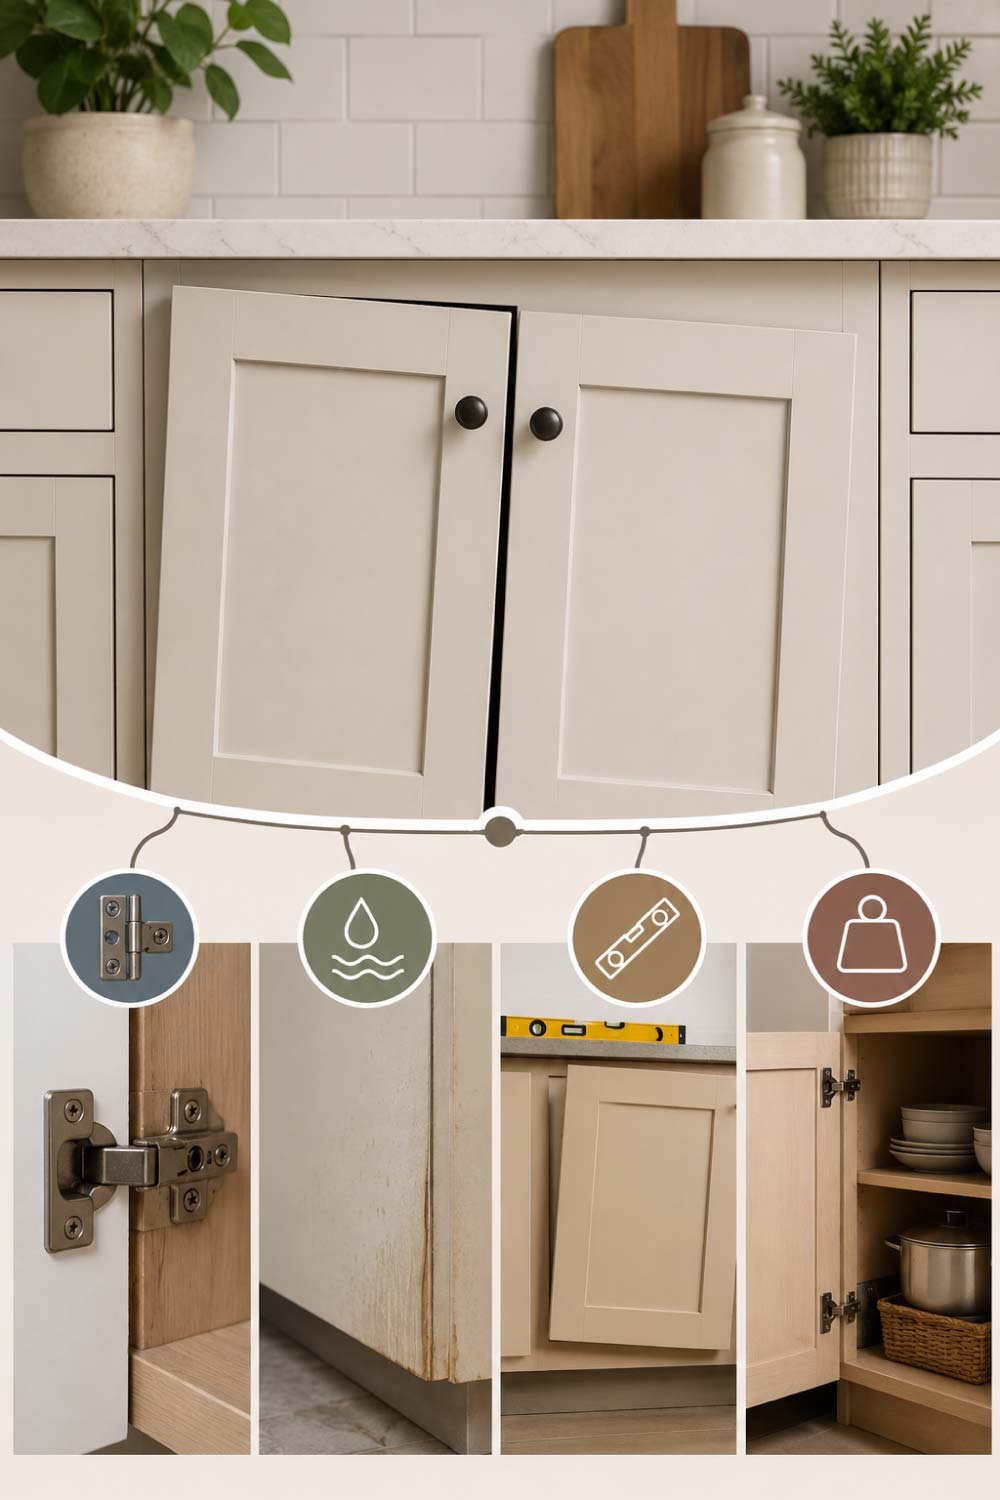
Before jumping into repairs, it helps to understand what causes the problem in the first place. Cabinet doors rarely shift randomly—there’s always a reason behind it.
One of the most common causes is loose hinges. Over time, constant opening and closing gradually loosens screws, especially in MDF or particleboard cabinets. Once even one screw shifts, the door starts sagging or tilting.
Another major factor is humidity and moisture. Wood naturally expands and contracts depending on temperature and moisture levels. In kitchens and bathrooms, this movement is even more noticeable, causing doors to rub, stick, or shift out of alignment.
Poor installation is another hidden reason. If cabinets were not leveled correctly during installation, the doors will always appear slightly off, no matter how much you adjust them later.
Finally, everyday wear and tear—such as slamming doors or overloading shelves—can slowly distort the cabinet frame and hinges.
Step 1: Identify the Type of Misalignment
Before making any adjustments, it is important to determine exactly how the door is misaligned. A door may sit too high, too low, lean toward one side, or fail to close evenly against the frame. Carefully inspect the gaps around all edges of the door and note where rubbing, sticking, or uneven spacing occurs. This initial assessment helps you choose the correct repair method and prevents unnecessary adjustments that could worsen the problem.
Look closely at:
- The gap between doors
- Whether the door is tilted or slanted
- If it rubs against the frame
- Whether it closes fully or bounces back
Common problems include:
Uneven gaps: One side is wider than the other.
Sagging door: The door droops downward on one side.
Door rubbing: The door scrapes the cabinet frame.
Door not closing properly: It sticks out or doesn’t sit flush.
Once you understand the issue, the solution becomes much easier and faster.
Step 2: Tighten All Hinges First
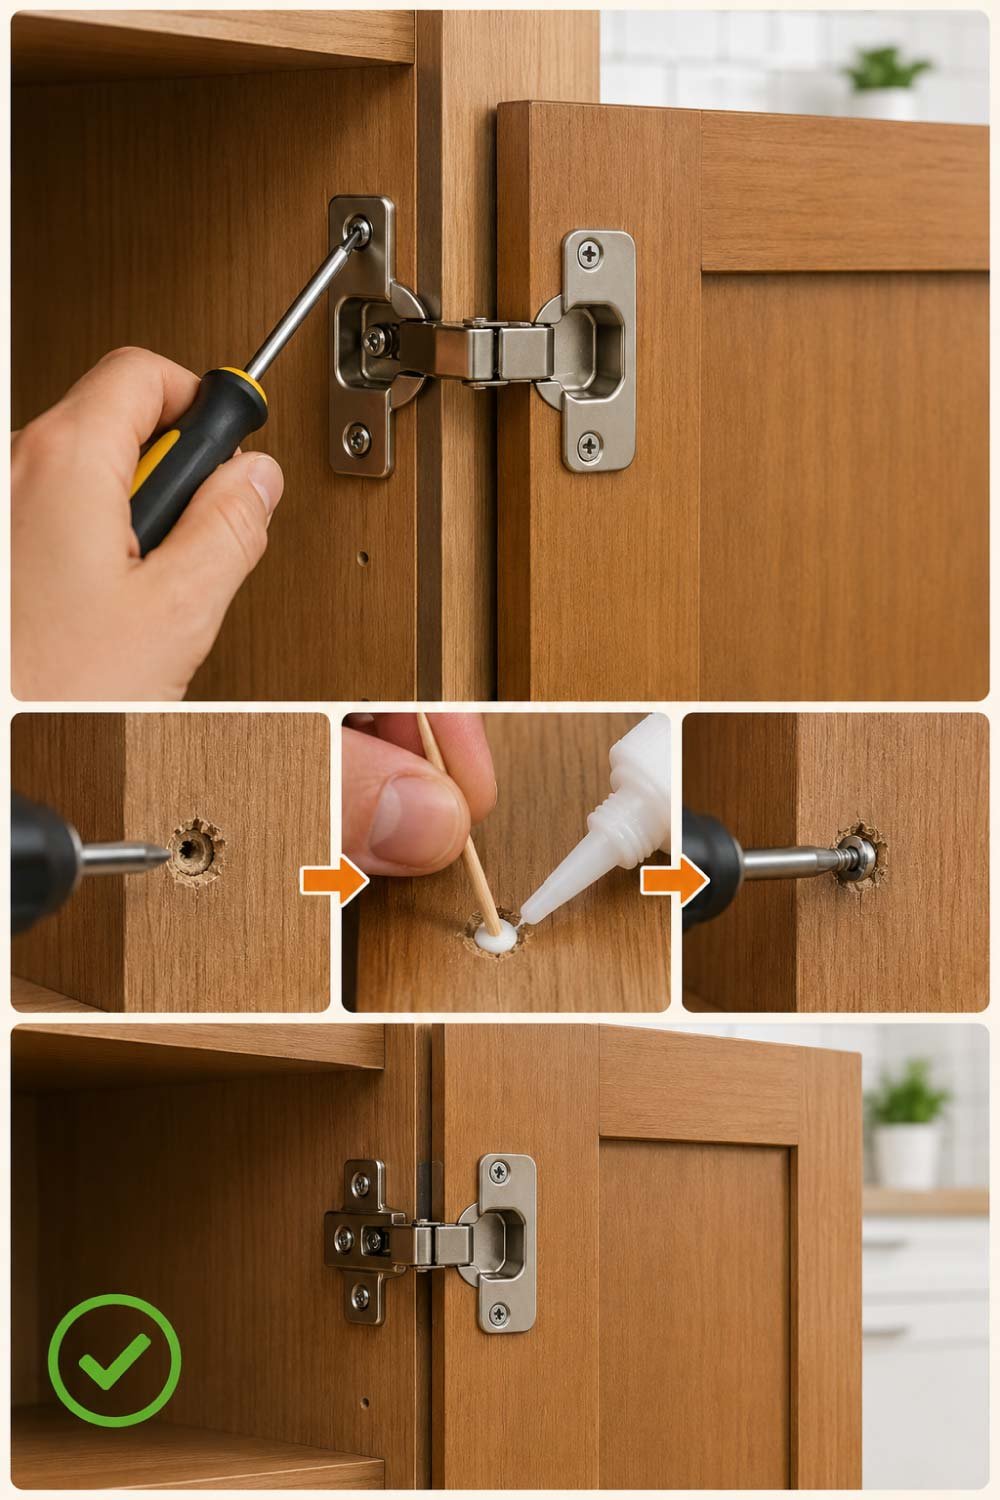
In most cases, loose hinges are the main culprit. Start with the simplest fix before adjusting anything else.
Grab a screwdriver and tighten every screw on the hinge—both on the cabinet frame and the door itself. Don’t overtighten, especially if the wood is soft, as this can strip the screw holes.
If you notice a screw keeps spinning without tightening, the hole may be worn out. In that case, insert a wooden toothpick with a bit of wood glue, break off the excess, and reinsert the screw once it dries. This gives the screw fresh grip.
Once everything is tightened, check the door again. Sometimes this step alone restores perfect alignment.
Step 3: Use the Hinges for Fine Adjustment
Door hinges are often the easiest and most effective place to correct minor alignment problems. Even a small adjustment to one hinge can significantly improve how the door opens and closes. Start by tightening all hinge screws to ensure the door is firmly attached to the frame. If the door still appears uneven, loosen the screws slightly and reposition the hinge as needed. You can also insert thin cardboard or metal shims behind a hinge to move the door in small, precise increments for a better fit.
Typically, there are three types of adjustments:
1. Side-to-Side Adjustment
Side-to-side adjustment is necessary when a door shifts toward the latch side or hinge side, creating uneven gaps along the frame. This type of misalignment can cause the door to rub, stick, or fail to latch correctly. Begin by examining the spacing on both vertical edges of the door. Tightening or loosening specific hinge screws can move the door slightly left or right. For more precise correction, insert thin shims behind one hinge to reposition the door until the gaps become even and the latch aligns properly.
2. Height Adjustment
Height adjustment is used when a door has dropped over time and begins rubbing against the floor, threshold, or upper frame. This problem is common in older doors where hinges loosen due to repeated use. Start by checking whether the top or bottom gap is uneven. Tightening the upper hinge screws often lifts the door slightly and restores proper positioning. If additional correction is needed, place thin shims behind the lower or upper hinge to raise or lower the door until it opens and closes smoothly without sticking.
3. Depth Adjustment
This controls how close or far the door sits from the cabinet frame. If the door sticks out or doesn’t close properly, adjust this screw to bring it forward or backward.
Make small adjustments—just a quarter turn at a time. Check the alignment after each tweak to avoid overcorrecting.
Also Read:
Step 4: Fix Sagging Doors

A sagging door is one of the most common alignment problems and usually occurs when hinge screws loosen or the door’s weight pulls it downward over time. This causes the top corner on the latch side to rub against the frame and prevents smooth closing. Begin by tightening all hinge screws, especially on the upper hinge, which supports most of the door’s weight. If the screws no longer grip firmly, replace them with longer screws that anchor into the wall stud and restore the door to its proper position.
To fix it:
- Tighten all hinge screws first
- Adjust the top hinge slightly upward
- Loosen the bottom hinge a bit if needed
- Realign until the door sits straight
If the sagging persists, you may need to add an additional hinge for better support, especially on taller or heavier doors.
Another trick is reinforcing screw holes with wooden filler or matchsticks and glue, which restores stability and prevents future sagging.
Step 5: Correct Doors That Rub or Stick
If your cabinet door scrapes the frame or gets stuck when closing, alignment is slightly off along the edges.
To fix this:
- Open the door fully and observe where it rubs
- Adjust the hinge closest to the problem area
- Move the door slightly away from the frame using side adjustment screws
- Test repeatedly until movement is smooth
Sometimes, swelling due to humidity is the real cause. In that case, lightly sanding the rubbing edge can help, followed by sealing the wood to prevent future moisture absorption.
Also Read:
Step 6: Align Double Doors Evenly
Double cabinet doors can be tricky because both sides must line up perfectly.
Start by adjusting one door as a reference point. Usually, pick the one that looks more stable or is attached more securely.
Then:
- Adjust the second door to match height
- Ensure both gaps between doors are equal
- Check alignment from top and bottom angles
A small difference can be visually noticeable, so step back and view the cabinet from a distance during adjustments. This helps you see imbalance more clearly.
Step 7: Check the Cabinet Frame
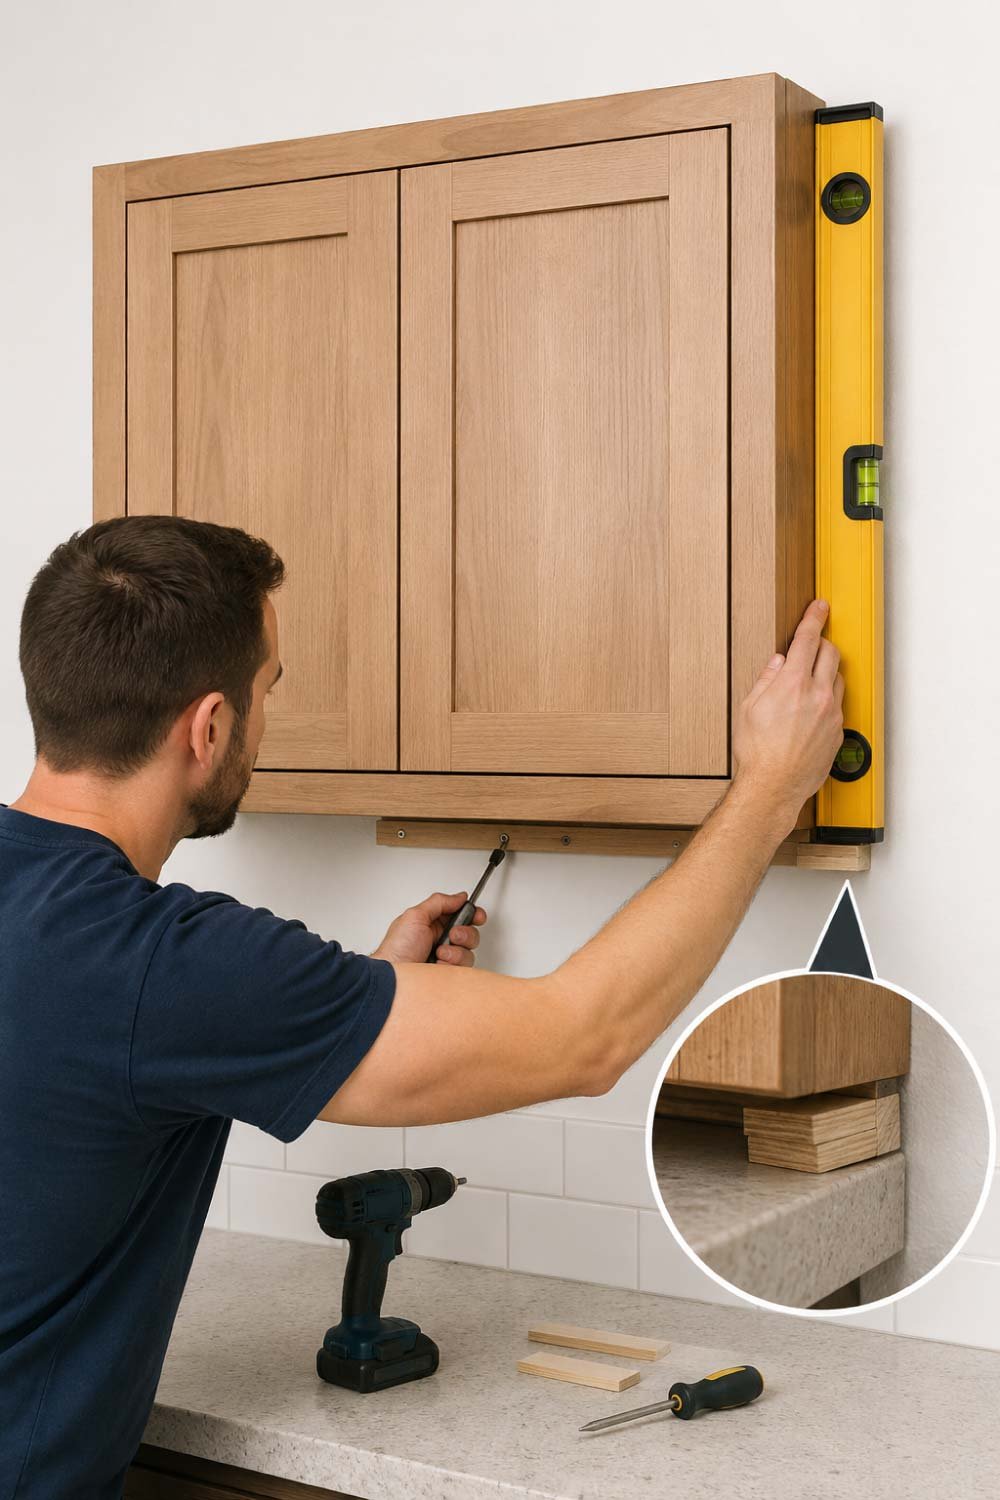
If you’ve adjusted hinges and doors still look uneven, the issue might be the cabinet frame itself.
Use a spirit level to check if the cabinet is properly aligned against the wall. If it’s tilted, even slightly, the doors will never look correct.
To fix this:
- Loosen mounting screws slightly
- Reposition the cabinet carefully
- Use shims behind the cabinet if needed
- Retighten screws once level
This step is more advanced but often necessary in older kitchens or DIY installations.
Also Read:
Step 8: Replace Damaged Hinges if Needed
Sometimes, hinges are simply worn out or bent. If adjustments don’t help, replacement is the best option.
Signs of bad hinges include:
- Visible rust or damage
- Loose movement even after tightening
- Doors dropping repeatedly
- Screws no longer holding firmly
Replacing hinges is inexpensive and can completely transform cabinet performance. Always match the new hinge style with the old one for easier installation.
Preventing Future Misalignment
Once your cabinet doors are perfectly aligned, a few simple habits can keep them that way for years.
- Avoid slamming doors
- Tighten hinge screws every few months
- Keep cabinets dry and well-ventilated
- Don’t overload shelves
- Fix small alignment issues early before they worsen
Regular maintenance prevents major repairs later and keeps your kitchen looking clean and well-kept.
Final Thoughts
Misaligned cabinet doors may seem like a frustrating household issue, but in reality, they are one of the easiest home fixes you can handle yourself. Most problems come down to loose screws, minor hinge adjustments, or slight frame imbalance.
With a screwdriver, a little patience, and careful observation, you can restore perfect alignment without replacing entire cabinets or calling a professional. The key is to make small adjustments, test frequently, and understand how each hinge affects movement.
A well-aligned cabinet not only improves the look of your space but also makes daily use smoother and more enjoyable. Once you fix it properly, you’ll wonder why you didn’t do it sooner.