
Ceiling cracks are one of the most common problems homeowners face, and they can appear in both old and new buildings. While some cracks are purely cosmetic, others may indicate underlying structural issues. Understanding the cause and knowing how to repair ceiling cracks properly can help you maintain your home’s safety, appearance, and long-term value.This guide explains everything you need to know—from identifying the type of crack to repairing it like a professional.
Understanding Why Ceiling Cracks Appear
Ceiling cracks are a common issue in homes and buildings, but they can range from harmless cosmetic flaws to signs of deeper structural problems. Understanding the cause behind these cracks helps you decide whether a simple repair is enough or if further investigation is needed.
Before jumping into repairs, it’s important to understand why ceiling cracks form in the first place. Not all cracks are serious, but they always tell a story about what’s happening in your building.
One of the most common causes is natural settling. As a building ages, it slowly shifts and settles into the ground. This movement can create small, hairline cracks in ceilings and walls. These are usually harmless and mostly cosmetic.
Another major cause is temperature and humidity changes. Materials like plaster, drywall, and paint expand in heat and contract in cold conditions. Over time, this expansion and contraction weakens the surface, leading to cracks.
Poor construction or low-quality materials can also be responsible. If the ceiling was not properly installed or the joints were not correctly taped and sealed, cracks may appear within a few years.
In some cases, cracks may result from water damage. Leaks from roofs, bathrooms, or pipes above the ceiling can weaken the structure and cause visible splitting or sagging.
Finally, more serious cracks may indicate structural movement or stress in beams and foundations. These types of cracks are usually wider and may grow over time, requiring professional inspection.
Types of Ceiling Cracks You Should Know
Understanding the type of crack is essential for choosing the correct repair method. Different crack patterns often indicate different underlying issues, ranging from simple cosmetic problems to more serious structural concerns.
Not all ceiling cracks are the same, and identifying the type helps determine the right repair method.
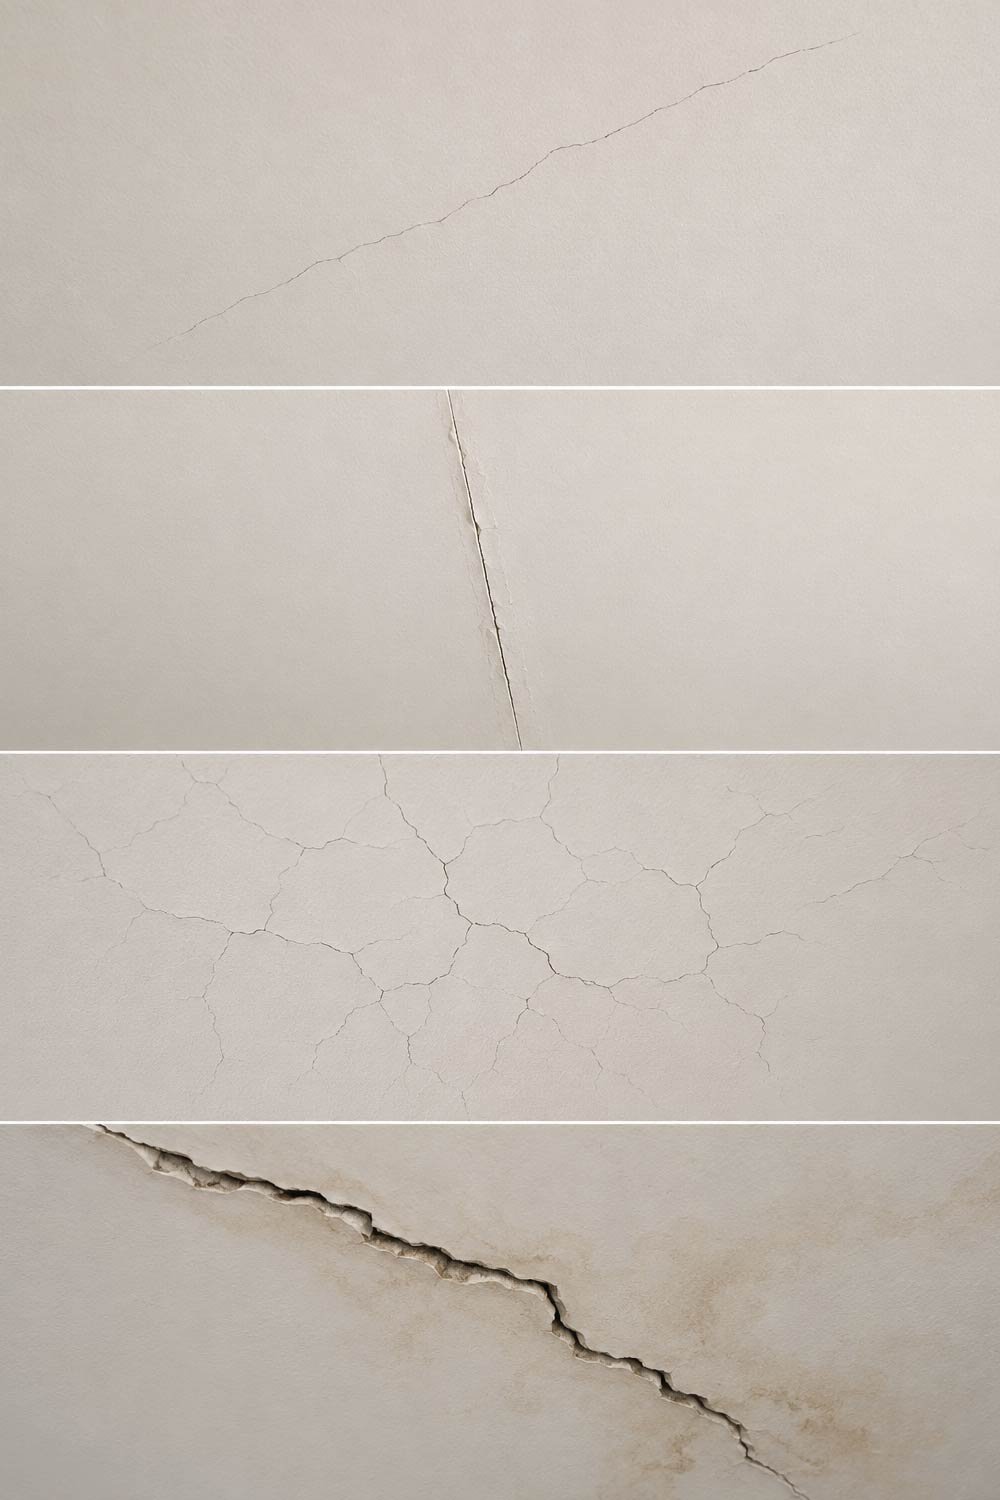
1. Hairline Cracks
Hairline cracks are the most common and are usually harmless, affecting only the surface layer of paint or plaster.
These are very thin cracks that usually appear in plaster or paint. They are mostly cosmetic and easy to fix.
2. Straight Cracks Along Joints
These cracks typically occur where drywall sheets meet and often indicate a failure in the joint tape or installation.
These appear where two drywall sheets meet. They often mean the joint tape has failed.
3. Spiderweb or Random Cracks
These cracks spread in multiple directions and are often related to surface shrinkage or aging materials.
These spread in multiple directions and are often caused by paint or plaster shrinkage.
4. Large or Deep Cracks
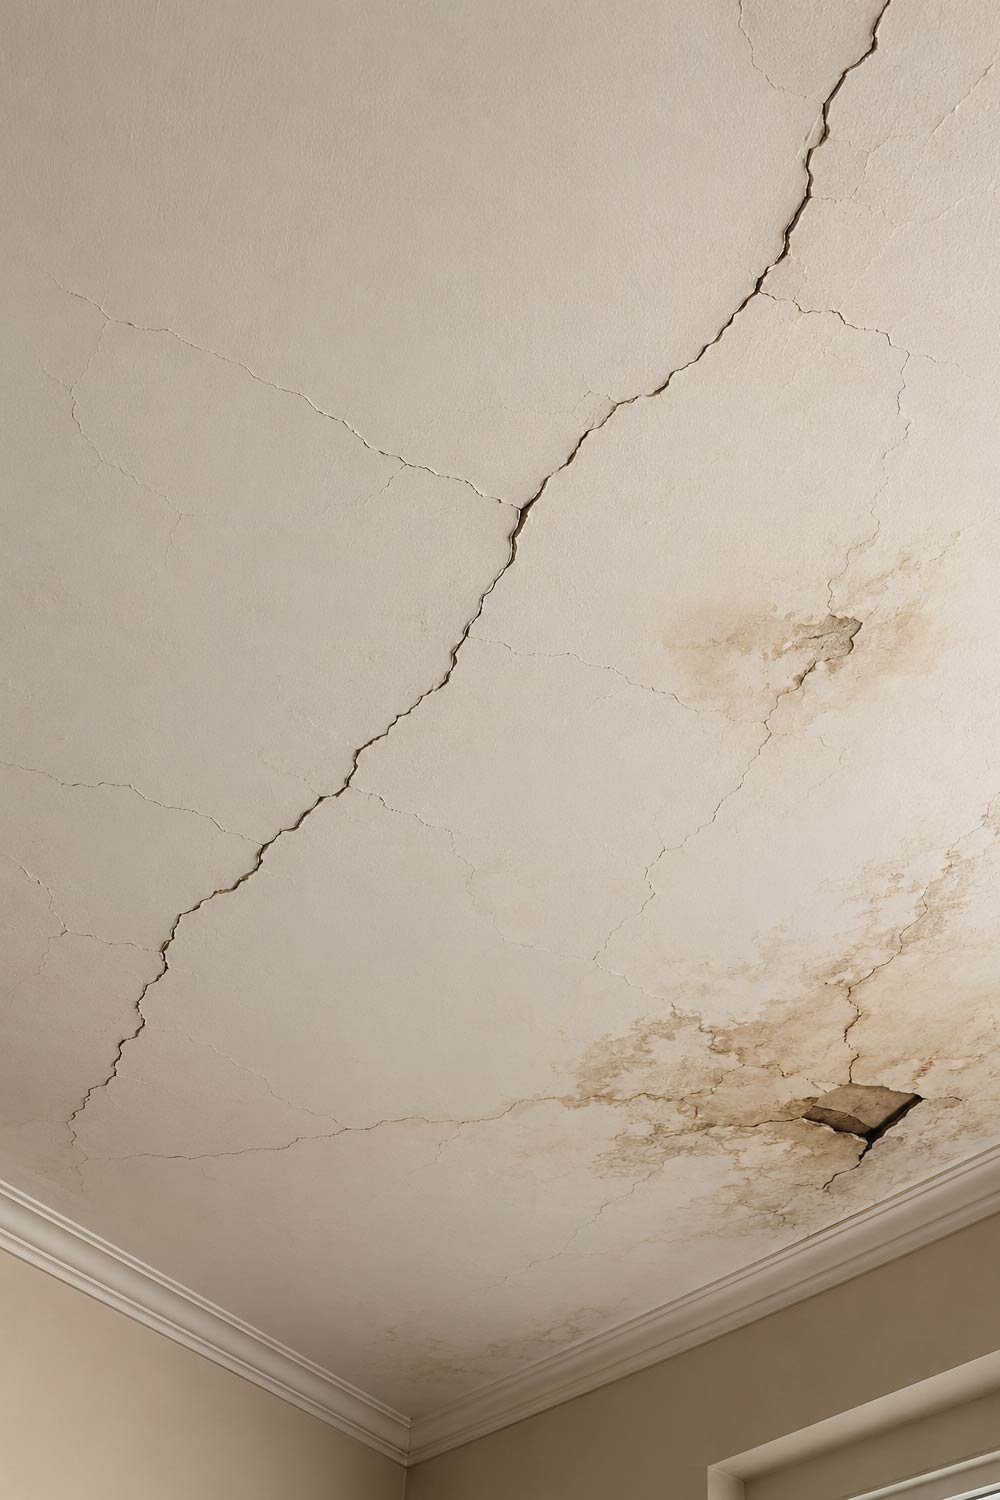
Larger cracks may signal more serious issues such as structural stress or water damage and should be monitored carefully.
These cracks are wider than a few millimeters and may indicate structural issues or serious water damage.
If you notice large cracks that are widening over time, it’s important to investigate further before attempting repairs.
Tools and Materials You Will Need
Having the right tools and materials ready ensures a smooth and efficient repair process. Proper preparation helps you complete the job quickly while achieving a clean and professional finish.
To repair ceiling cracks effectively, gather the following tools and materials:
- Putty knife or scraper
- Sandpaper (medium and fine grit)
- Joint compound or plaster filler
- Drywall tape (for larger cracks)
- Primer
- Paint matching your ceiling color
- Ladder or step stool
- Clean cloth or sponge
- Protective mask and goggles
Having everything ready before starting will make the process smoother and more efficient.
Step-by-Step Guide to Repair Ceiling Cracks
Repairing ceiling cracks requires careful handling and proper technique, especially since you’ll be working overhead. Following these steps will help you achieve a durable and seamless repair.
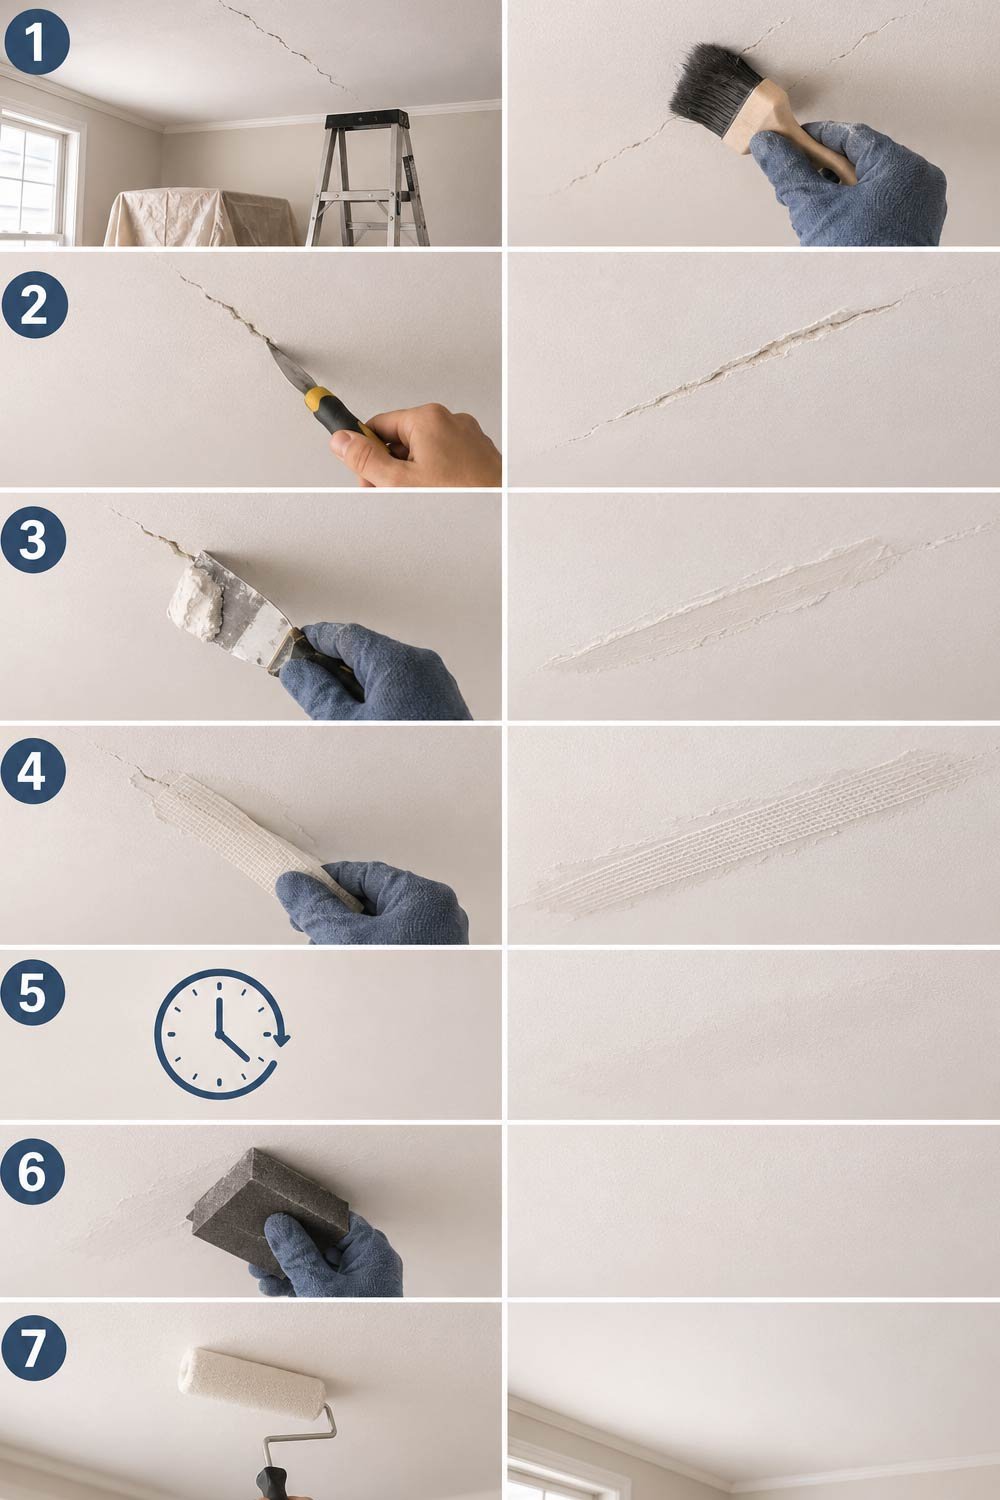
Step 1: Prepare the Area
Preparation ensures safety and improves the quality of the repair by creating a clean and stable working surface.
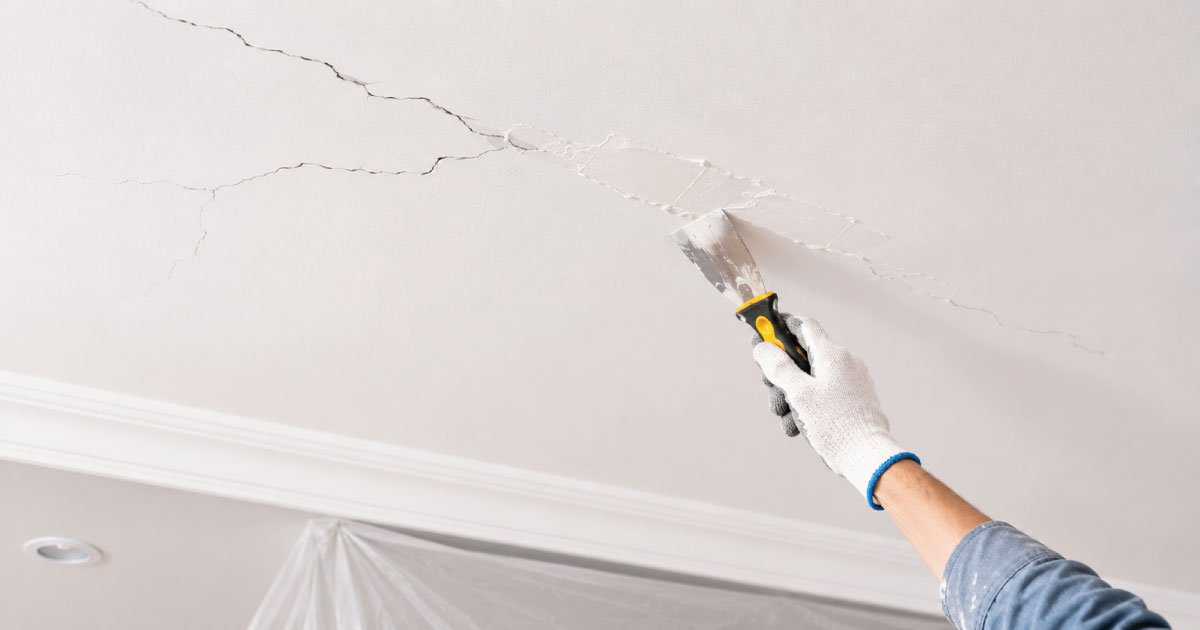
Start by moving furniture away from the work area. Cover the floor with a drop cloth or old sheets to protect it from dust and debris. Use a ladder to safely reach the ceiling, and make sure the area is well-lit.
Before repairing, clean the crack using a dry cloth or brush to remove dust, loose paint, or debris. A clean surface helps the filler stick better.
Step 2: Widen the Crack Slightly (If Needed)
Slightly widening the crack allows the repair material to penetrate deeper and form a stronger bond.
It may sound strange, but small cracks often need to be slightly widened using a scraper or utility knife. This allows the filler or compound to penetrate deeper and bond properly.
Be careful not to make the crack too large—just enough to create a clean, stable surface.
Also Read:
How to Fix Kitchen Plumbing Issues: A Step-by-Step DIY Guide
Step 3: Apply Joint Compound or Filler
Applying filler correctly ensures the crack is fully sealed and creates a smooth surface for finishing.
Using a putty knife, apply joint compound directly into the crack. Press firmly so the material fills the entire depth. Smooth the surface as much as possible while applying.
For hairline cracks, one layer may be enough. For deeper cracks, you may need to apply multiple layers, allowing each layer to dry before applying the next.
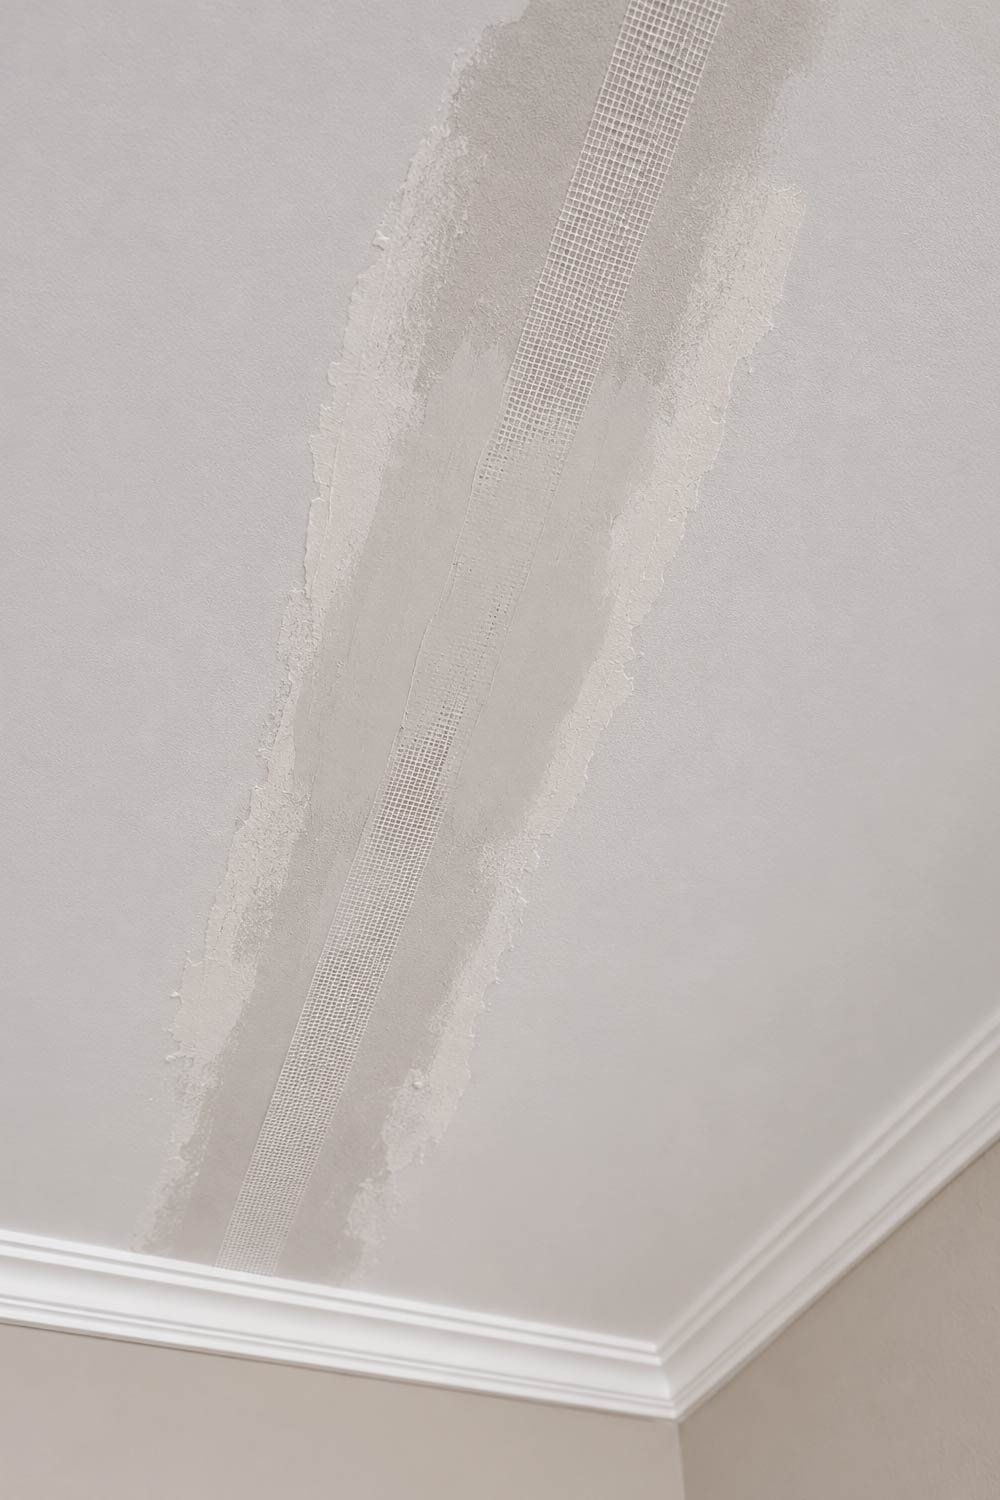
Step 4: Use Drywall Tape for Larger Cracks
Reinforcing larger cracks with tape helps prevent them from reopening and strengthens the repaired area.
If the crack is wider or located along a joint, apply drywall tape over the wet compound. This helps reinforce the area and prevents the crack from reappearing.
Once the tape is in place, apply another thin layer of compound over it and smooth it out evenly.
Step 5: Let It Dry Completely
Proper drying is essential to ensure the repair is strong and long-lasting.
Drying time depends on the product used, but most compounds take between 12 to 24 hours to fully dry. Avoid rushing this step. If you sand too early, the repair may become uneven or weak.
Make sure the room is well-ventilated to speed up the drying process.
Step 6: Sand the Surface Smooth
Sanding creates a level and even finish, allowing the repaired area to blend seamlessly with the rest of the ceiling.
Once the compound is completely dry, use fine-grit sandpaper to smooth the repaired area. The goal is to make the surface level with the rest of the ceiling.
Be gentle while sanding—too much pressure can damage the repair.
After sanding, wipe the area with a clean cloth to remove dust.
Step 7: Apply Primer and Paint
Applying primer and paint is the final stage that restores the ceiling’s appearance and ensures the repaired area blends seamlessly with the rest of the surface.
Before painting, apply a coat of primer to seal the repaired area. This helps the paint stick evenly and prevents visible patches.
Once the primer is dry, paint the ceiling using the same color and finish as the existing surface. You may need two coats for a perfect match.
Also Read:
Tips for a Long-Lasting Repair
A long-lasting repair depends not only on proper technique but also on preventing the underlying causes of cracks from returning.A successful repair is not just about fixing the crack—it’s about preventing it from coming back.
- Always identify and fix the root cause before repairing. If there’s a leak, fix it first.
- Avoid applying thick layers of compound at once; thin layers work better.
- Use high-quality filler and tape for stronger results.
- Maintain proper ventilation in your home to reduce humidity.
- Inspect your ceiling regularly for new cracks.
Also Read:
When You Should Be Concerned
While many ceiling cracks are harmless, some signs may indicate more serious structural or moisture-related problems that require immediate attention.
While most ceiling cracks are harmless, some signs should not be ignored:
- Cracks wider than 5 mm
- Cracks that continue to grow
- Sagging or bulging ceiling areas
- Water stains along with cracks
- Multiple cracks appearing suddenly
These symptoms may indicate structural damage or serious water leakage. In such cases, it is best to consult a professional builder or structural engineer instead of attempting DIY repairs.
Also Read:
Essential Home Plumbing Maintenance Tips Every Homeowner Should Know
Final Thoughts
Repairing ceiling cracks is a manageable DIY task when done correctly. Small cracks can be fixed with basic tools, patience, and proper technique. The key is preparation, careful application, and allowing enough drying time.
However, always remember that cracks are symptoms—not just surface problems. While many are harmless, some can signal deeper issues in your home’s structure or plumbing. Paying attention early can save you time, money, and stress in the long run.
With the right approach, you can restore your ceiling to a smooth, clean finish and keep your home looking well-maintained for years to come.