
Cracks in walls are one of the most common problems homeowners face, whether the building is new or old. While some cracks are harmless and only affect appearance, others can indicate deeper structural issues. The good news is that most minor and moderate wall cracks can be repaired at home with the right tools and techniques.In this guide, you’ll learn what causes wall cracks, how to identify different types, and a complete step-by-step process to fix them properly so they don’t return.
Understanding Wall Cracks: Why Do They Happen?
Wall cracks are a common issue in both new and old buildings, often causing concern for homeowners. However, not all cracks indicate serious problems. Understanding their root causes helps you determine whether they are harmless or require immediate attention and proper repair.
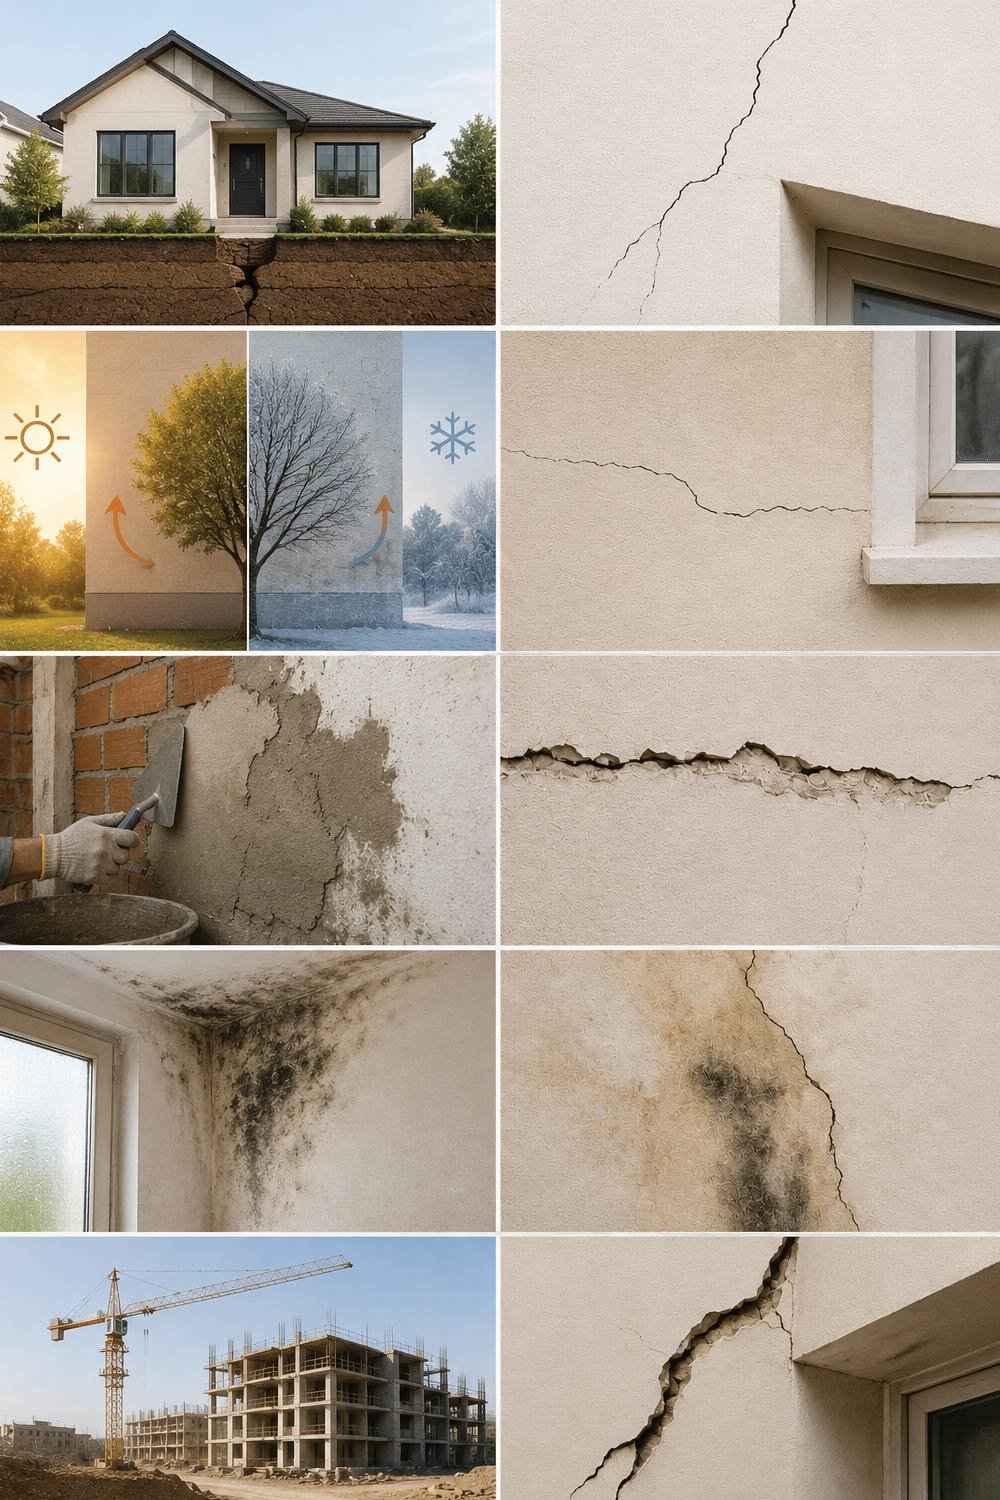
Before repairing cracks, it’s important to understand why they appear. Cracks don’t happen randomly; they are usually caused by stress, movement, or environmental conditions.
1. Natural settling of the building
All buildings settle slightly over time as the foundation adjusts to the soil. This gradual movement can lead to minor cracks, especially during the early life of a structure, and is generally considered normal.
All buildings settle slightly over time as the foundation adjusts to the soil. This often leads to small hairline cracks, especially in new homes.
2. Temperature and humidity changes
Changes in weather conditions can significantly affect building materials. Expansion during heat and contraction during cold create stress within walls, eventually leading to visible cracks on the surface.
Materials like plaster, cement, and paint expand in heat and shrink in cold. Over time, this expansion and contraction create surface cracks.
3. Poor construction work
The quality of construction plays a major role in the durability of walls. Poor workmanship or low-grade materials can weaken the structure, causing cracks to appear much earlier than expected.
If low-quality materials are used or the plastering is not done properly, cracks can appear much sooner than expected.
4. Moisture and water leakage
Water intrusion is one of the most harmful factors for walls. It weakens internal structures, damages finishes, and creates an environment for mold, making cracks both a cosmetic and structural concern.
Water seepage weakens walls from inside. This is one of the most damaging causes because it can also lead to mold and structural deterioration.
5. Structural stress
External forces such as heavy loads or nearby construction can place pressure on walls. Over time, this stress can result in deeper and more serious cracks that may require professional evaluation.
Heavy loads, foundation movement, or nearby construction work can put stress on walls and create deeper cracks.
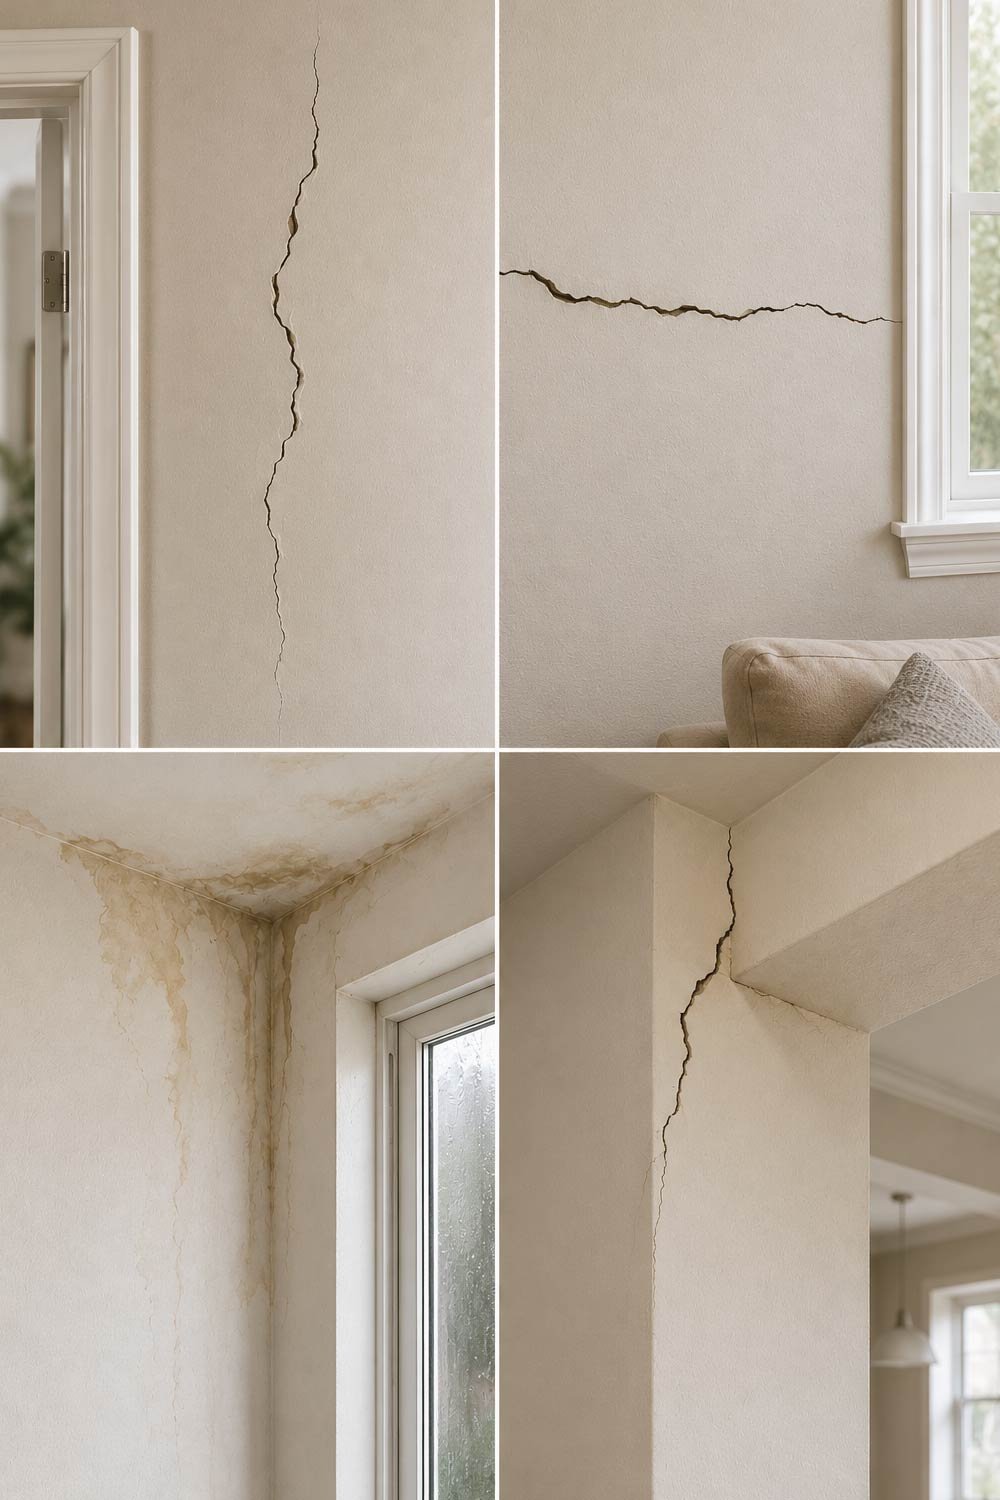
Types of Wall Cracks You Should Know
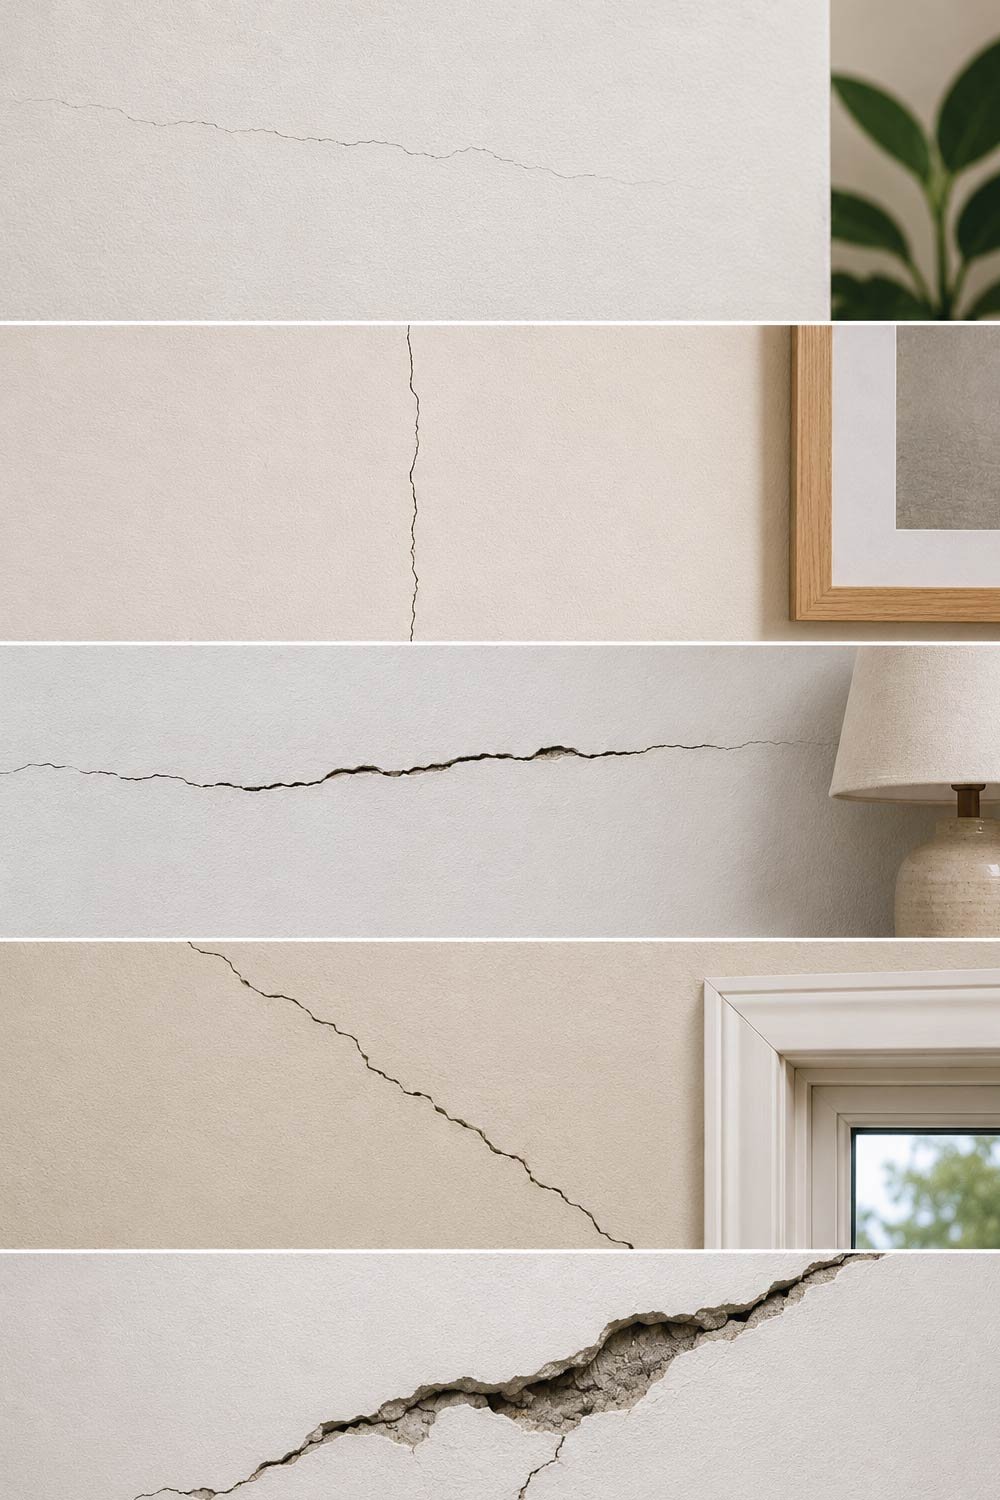
Different types of wall cracks indicate different underlying issues. Identifying the type of crack is essential for choosing the right repair method and determining whether the problem is cosmetic or structural.
Not all cracks are the same. Identifying the type helps you decide whether it’s a simple repair or something more serious.
1. Hairline cracks
Hairline cracks are the most common and least serious type. They usually affect only the surface layer and can be repaired easily without extensive work.
These are very thin surface cracks in paint or plaster. They are mostly cosmetic and easy to fix.
2. Vertical cracks
Vertical cracks often occur due to natural settling and are typically not dangerous if they remain small. However, monitoring their size over time is still important.
These run up and down the wall and are often caused by settling. Small vertical cracks are usually not dangerous.
3. Horizontal cracks
Horizontal cracks can be more concerning, as they may indicate pressure within the wall or structural issues. These should be examined more carefully, especially if they widen over time.
These can be more serious, especially if they are wide. They may indicate pressure or structural movement.
4. Diagonal cracks
Diagonal cracks are commonly found around doors and windows. They often result from uneven foundation settling and can vary in severity depending on their size and progression.
Often seen near doors and windows, these may result from uneven settling of the foundation.
5. Wide or deep cracks
Larger cracks are a warning sign of potential structural problems. Immediate attention is recommended, particularly if the cracks continue to grow or affect multiple areas.
If a crack is wider than 5 mm or keeps growing, it may signal structural issues that need professional inspection.
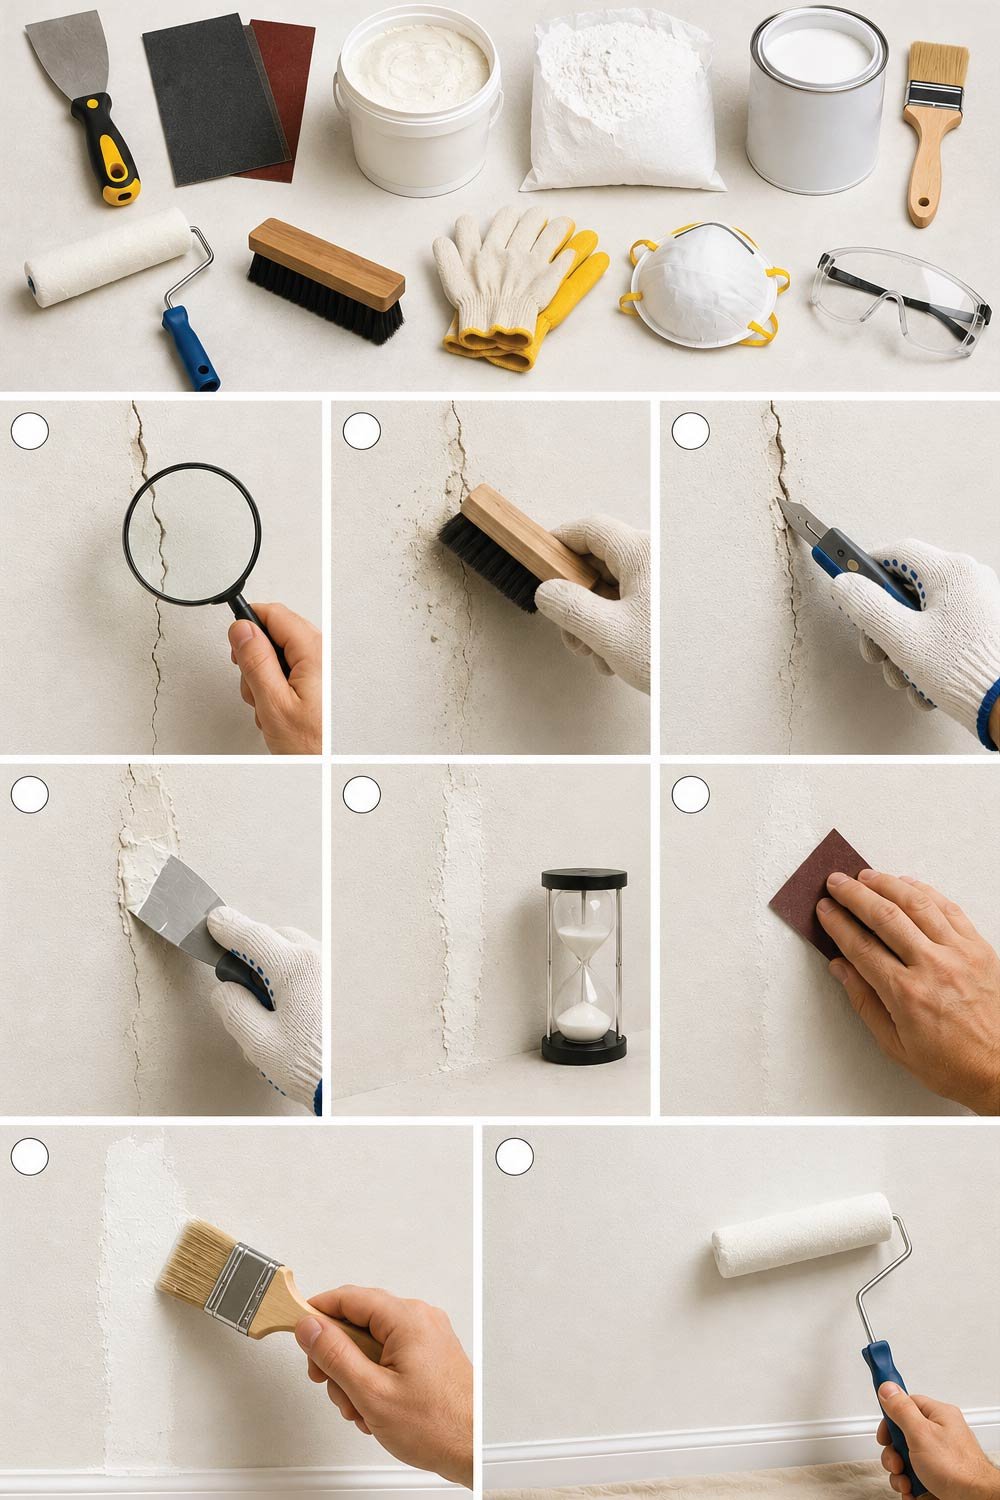
Tools and Materials You Will Need
Preparing the right tools and materials before starting ensures a smooth and efficient repair process. Having everything ready helps avoid interruptions and allows you to complete the task properly.
Before starting repairs, gather all necessary tools so the process is smooth and uninterrupted.
- Putty knife or scraper
- Sandpaper (medium and fine grit)
- Wall filler or crack filler (cement-based or acrylic)
- Plaster of Paris (for indoor walls)
- Primer and paint
- Paintbrush or roller
- Cleaning brush or vacuum
- Safety gloves and mask
Also Read:
Essential Home Plumbing Maintenance Tips Every Homeowner Should Know
Step-by-Step Guide to Fix Wall Cracks
Repairing wall cracks requires a systematic approach to ensure long-lasting results. Following each step carefully helps restore the wall’s appearance while preventing the crack from reappearing in the future.
Now let’s go through the actual repair process in detail.
Step 1: Inspect the Crack Carefully
A proper inspection helps determine the severity of the crack and whether it can be repaired easily or needs professional attention.
Start by closely examining the crack. Ask yourself:
- Is it shallow or deep?
- Is it increasing in size?
- Is there moisture around it?
If the crack is very wide or growing, it may require professional help. Otherwise, you can proceed with repair.
Step 2: Clean the Area
Cleaning the affected area is crucial for ensuring that repair materials adhere properly and provide long-lasting results.
Cleaning is essential for proper adhesion of filler materials.
- Use a scraper to remove loose paint and plaster
- Brush away dust and debris
- If needed, use a vacuum for deeper cleaning
- Make sure the crack is dry before proceeding
A clean surface ensures that the filler sticks properly and lasts longer.
Step 3: Widen the Crack Slightly (For Better Filling)
Although it may seem counterintuitive, slightly widening the crack improves the effectiveness of the repair by allowing the filler to bond more securely.
This may sound strange, but slightly widening the crack helps the filler penetrate deeper.
- Use a scraper or utility knife
- Carefully open the crack into a shallow “V” shape
- Do not over-widen it; just enough to remove loose edges
This step improves bonding strength and prevents future reopening.
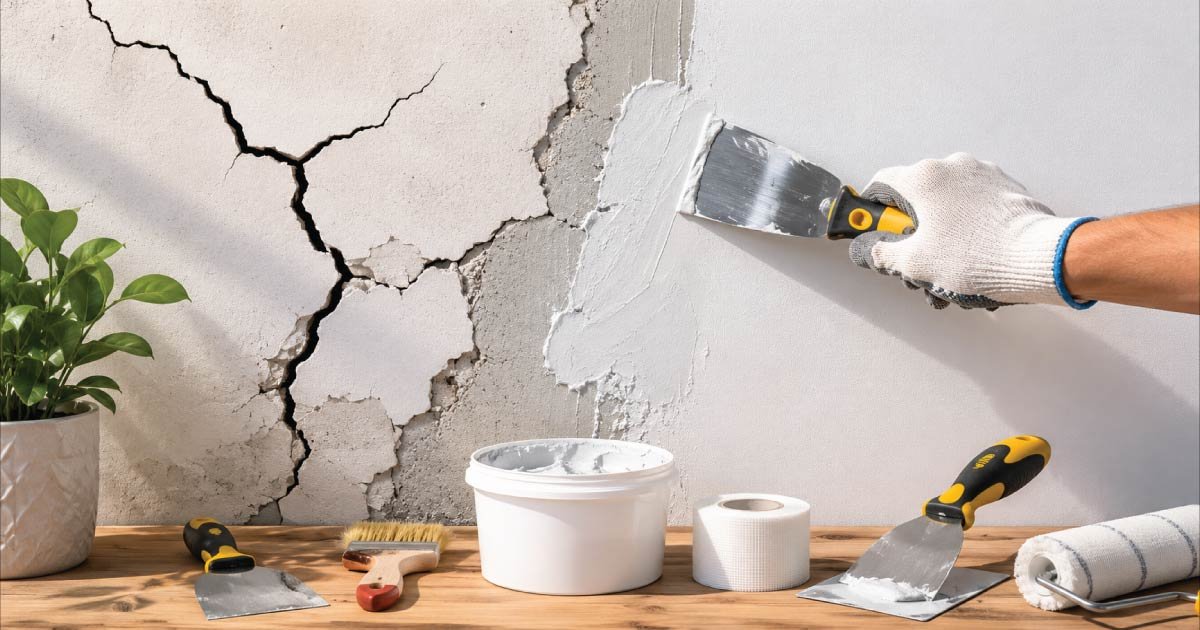
Step 4: Apply Crack Filler or Wall Putty
Filling the crack correctly is the most important step in the repair process, as it restores the wall’s structure and prepares it for finishing.
Now fill the crack using appropriate material.
For small cracks:
Use acrylic crack filler or wall putty.
For deeper cracks:
Use cement-based filler or plaster of Paris.
How to apply:
- Press filler firmly into the crack using a putty knife
- Ensure no air gaps remain
- Smooth the surface level with the wall
- Remove excess material immediately
If the crack is deep, apply filler in layers instead of one thick coat.
Step 5: Let It Dry Completely
Allowing sufficient drying time is essential to ensure the repair holds firmly and does not weaken during finishing.
Drying time depends on the material used:
- Wall putty: 4–6 hours
- Cement filler: 12–24 hours
- Plaster of Paris: 1–2 hours
Do not rush this step. If you sand or paint too early, the repair may weaken.
Step 6: Sand the Surface Smooth
Sanding helps achieve a smooth and even finish, ensuring the repaired area blends seamlessly with the rest of the wall.
Once fully dry, use sandpaper to smooth the repaired area.
- Start with medium grit sandpaper
- Finish with fine grit for a smooth surface
- Ensure the repaired area blends with the rest of the wall
After sanding, wipe away all dust.
Step 7: Apply Primer
Applying primer is an essential step that prepares the repaired surface for painting. It ensures even paint absorption, improves adhesion, and prevents visible patches or uneven tones after the final coat is applied.
Primer helps paint stick evenly and prevents patchy results.
- Apply a thin, even coat over the repaired area
- Let it dry completely
- If needed, apply a second coat for better coverage
Primer also helps seal the filler and increases durability.
Also Read:
Step 8: Repaint the Wall
Repainting is the final stage that restores the wall’s appearance and ensures the repaired area blends seamlessly with the rest of the surface for a clean and professional finish.
Now the final step is repainting.
- Match the paint color with the existing wall
- Apply at least two coats for a uniform finish
- Use a brush for small areas and roller for larger sections
After drying, the crack should be completely invisible.
Special Cases: When Cracks Need Extra Attention
While many wall cracks are minor and easy to fix, some situations require extra care and attention. Identifying these special cases helps prevent recurring damage and ensures that underlying issues are properly addressed.
Not all cracks are simple cosmetic issues. Here are situations where you should be more careful:
1. Reappearing cracks
Cracks that return after repair often indicate deeper structural movement or unresolved underlying issues that need further investigation.
If a crack returns after repair, it may indicate ongoing movement in the wall.
2. Large horizontal cracks
These cracks can signal serious structural stress within the wall and should not be ignored, especially if they widen over time.
These may suggest structural stress and should be checked by an engineer.
3. Damp or wet cracks
Moisture-related cracks require immediate attention because water damage can weaken the wall and lead to repeated cracking.
Moisture problems must be fixed first; otherwise, cracks will keep returning.
4. Cracks near beams or columns
Cracks appearing near load-bearing elements are more critical and may affect the structural integrity of the building.
These are load-bearing areas and should not be ignored.
Also Read:
How to Fix Shower Water Flow: A Complete DIY Troubleshooting Guide
Preventing Wall Cracks in the Future
Preventing cracks is always better than repairing them later. By following proper construction practices and regular maintenance, you can significantly reduce the chances of cracks forming in your walls.
Repairing cracks is important, but preventing them is even better. Here are some practical tips:
1. Use quality construction materials
High-quality materials ensure better durability and resistance to environmental stress, reducing the likelihood of cracks forming over time.
Good cement, sand, and paint reduce the chances of cracks.
2. Ensure proper curing
Proper curing strengthens the wall structure by allowing cement to gain full strength, minimizing the risk of early cracking.
Fresh cement walls should be cured with water for several days to strengthen them.
3. Control moisture
Managing moisture effectively prevents water damage, which is one of the leading causes of cracks and wall deterioration.
Fix leaks, waterproof walls, and ensure proper drainage around the house.
4. Avoid structural overload
Excess weight on walls can create stress and lead to cracks, especially if proper support is not provided.
Do not overload walls with heavy fixtures without proper support.
5. Regular maintenance
Routine inspection and timely repairs help identify small cracks early, preventing them from turning into major structural issues.
Inspect walls regularly and repair small cracks early before they grow.
Also Read:
How to Fix a Leaking Tap: A Complete Step-by-Step Guide (DIY)
DIY vs Professional Repair: When to Call an Expert
Knowing when to handle repairs yourself and when to call a professional is crucial for both safety and cost-effectiveness. While minor cracks are manageable, serious structural issues require expert intervention.
You can easily fix:
- Hairline cracks
- Small plaster cracks
- Minor surface damage
But you should call a professional if:
- Cracks are wide and deep
- Cracks are spreading quickly
- There is visible wall displacement
- You suspect foundation issues
Ignoring serious cracks can lead to costly repairs later.
Also Read:
How to Repair a Leaking Pipe Under the Sink (DIY Homeowner Guide)
Final Thoughts
Wall cracks are a natural part of a building’s life, but they should never be ignored. Most minor cracks can be repaired easily with simple tools and a careful step-by-step process. The key is proper preparation, correct filling material, and patience during drying and finishing.
By understanding the cause of cracks and fixing them early, you can keep your walls strong, smooth, and visually appealing for years.
If you maintain your walls regularly and address small issues quickly, you’ll avoid bigger structural problems in the future—and keep your home looking fresh and well cared for.