

A broken drawer handle might seem like a small inconvenience, but anyone who deals with it daily knows how annoying it can be. Every time you try to open the drawer, you end up pulling at a loose screw, a cracked knob, or worse—your fingers slip and you have to pry it open from the edge. The good news is that replacing a broken drawer handle is one of the easiest home repairs you can do yourself, even if you have zero experience with tools.
In this guide, you’ll learn everything you need to know to replace a broken drawer handle quickly, safely, and without making things more complicated than they need to be. Whether it’s a kitchen drawer, bedroom dresser, office cabinet, or bathroom storage unit, the process is almost always the same.
Table of Contents
ToggleWhy Drawer Handles Break in the First Place

Drawer handles rarely fail without warning, and in most cases the issue builds up over time due to everyday use. Constant pulling, environmental factors, and weak installation gradually reduce strength, eventually leading to loosened or broken handles that seem sudden but actually have clear underlying causes.
Common reasons include:
- Loose screws from repeated daily use and movement
- Material fatigue in cheap plastic or low-quality metal handles
- Moisture damage weakening wood or particleboard around fittings
- Poor initial installation with incorrect screw size or alignment
Before jumping into the repair, it helps to understand why handles fail. Most drawer handles don’t just “break randomly”—there’s usually a pattern behind it.
One common reason is loose screws. Over time, repeated pulling and pushing causes screws to loosen inside the wood or particleboard. Once that grip weakens, the handle starts wobbling and eventually detaches.
Another reason is material fatigue. Cheap plastic handles, especially in older furniture, tend to crack after years of use. Metal handles can also bend or snap if too much force is applied.
Moisture is another silent culprit. In kitchens and bathrooms, humidity can weaken the wood around the screw holes, making it harder for handles to stay secure.
Finally, improper installation from the start can shorten the lifespan of a handle. If screws weren’t tightened properly or the wrong size was used, failure is just a matter of time.
Understanding the cause helps you avoid repeating the same problem after you replace the handle.
What You’ll Need for the Replacement
Before starting the repair, it’s important to gather all necessary tools and materials so the process goes smoothly without interruptions. Most items required for replacing a drawer handle are simple, affordable, and commonly available in households or local hardware stores.
Basic tools and materials:
- New drawer handle with matching screws
- Phillips head screwdriver for easy removal and installation
- Measuring tape or ruler for accurate alignment
- Pencil for marking screw positions
- Drill (optional, only if new holes are needed)
- Wood filler or toothpicks for repairing damaged holes
One of the best things about this DIY task is that you don’t need expensive tools or special equipment. Most of what you need is already at home.
Here’s a simple checklist:
New drawer handle (with screws included)
Screwdriver (usually Phillips head)
Measuring tape or ruler
Pencil
Drill (optional, only if holes need adjustment)
Wood filler or toothpicks (for damaged screw holes)
If you’re replacing multiple handles, it’s a good idea to buy a matching set so everything looks consistent.
Also Read:
Step 1: Remove the Broken Handle
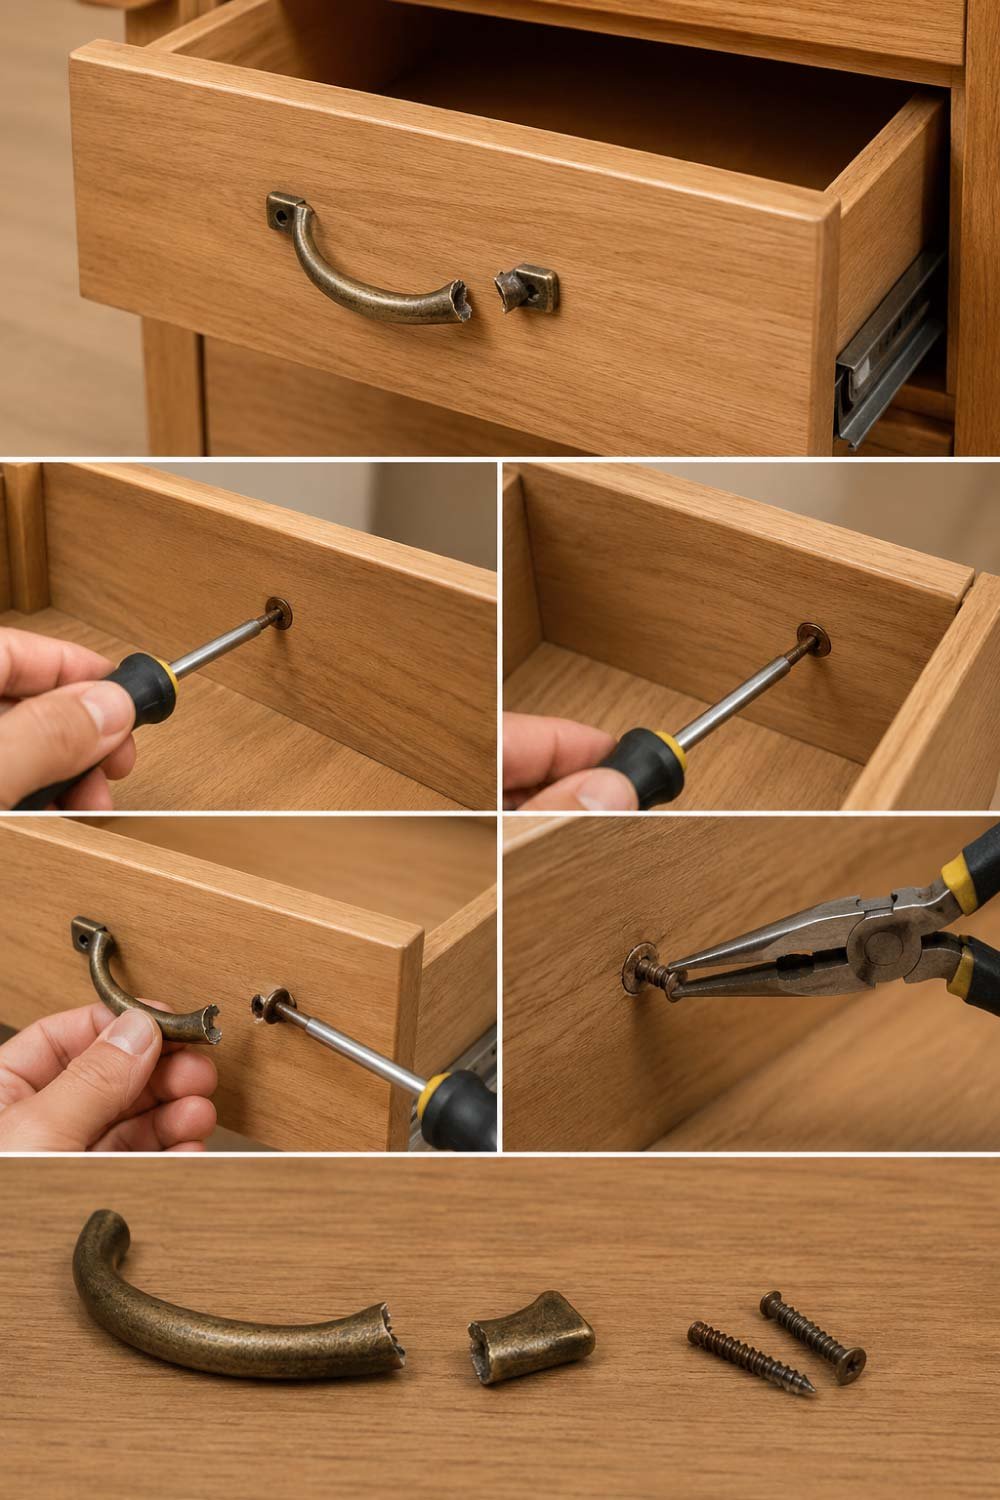
Removing the damaged handle is the first practical step in the repair process. This stage requires a bit of care to avoid damaging the drawer surface further, especially if the screws are tight, rusted, or partially broken inside the wood.
Important removal tips:
- Keep the drawer fully open for easy access
- Hold loose handle parts to prevent scratching wood
- Use steady pressure when unscrewing
- Use pliers if screws are stripped or stuck
Start by opening the drawer fully so you can access the back of the handle screws.
In most cases, screws are inserted from inside the drawer and hold the handle in place from the front. Use your screwdriver to loosen them by turning counterclockwise.
If the handle is already broken and only one side is attached, hold it steady with one hand while removing the screws to avoid damaging the wood.
Sometimes screws are stripped or rusted. If that happens, apply gentle pressure while turning, or use pliers to grip the screw head.
Once removed, set aside the old handle and screws—you may still need them for reference when installing the new one.
Step 2: Check the Screw Holes
Inspecting the screw holes is a crucial step before installing a new handle, as weak or damaged holes can cause the same issue to repeat. Taking a few minutes to repair them ensures a stronger grip and long-lasting installation without future loosening.
Things to check:
- Cracked or widened screw holes
- Soft or crumbling wood around fittings
- Loose grip when inserting screws
- Moisture-damaged areas weakening structure
Before installing the new handle, inspect the existing holes. This step is important because damaged holes are one of the most common reasons new handles become loose again.
If the wood is clean and firm, you’re good to go.
If the holes are slightly worn or enlarged, you can fix them easily using a simple trick:
Insert a few wooden toothpicks coated in wood glue into the hole. Break off the excess and let it dry for a few minutes. This strengthens the grip so the screws hold tightly again.
For severely damaged holes, you may need wood filler or a slightly larger screw, depending on the situation.
Step 3: Measure and Align the New Handle

Proper alignment is essential when installing a new handle, as even a small miscalculation can affect both appearance and functionality. Taking accurate measurements ensures the handle fits perfectly and sits evenly, giving the drawer a clean and professional finish.
Alignment tips:
- Compare old and new screw hole spacing
- Mark positions lightly with a pencil
- Double-check alignment before drilling
- Ensure handle sits straight and centered
Not all drawer handles are identical in size. Even a few millimeters of difference can make installation difficult if you don’t align it properly.
Measure the distance between the screw holes on the new handle and compare it with the old one. If they match, installation is straightforward.
If you’re installing a new design with a different spacing, you may need to mark new holes using a pencil. Place the handle where you want it and lightly mark the screw points through the holes.
Double-check alignment before drilling or screwing anything in. A slightly tilted handle can make the entire drawer look uneven.
Step 4: Install the New Handle
Installing the new handle is the most satisfying part of the process, as you begin to see the repair take shape. With careful alignment and proper tightening, you can secure the handle firmly without damaging the wood or causing future loosening.
Installation best practices:
- Start screws by hand to avoid misalignment
- Tighten gradually for secure fit
- Avoid over-tightening to prevent damage
- Ensure handle sits flush against surface
Now comes the satisfying part—fitting the new handle.
Align the handle with the screw holes. Insert the screws from inside the drawer and hold the handle steady from the outside.
Start tightening by hand first to ensure the screw is going in straight. Once it feels stable, use the screwdriver to secure it fully.
Avoid over-tightening. Many people make the mistake of forcing screws too tightly, which can crack the wood or strip the hole again. Tight enough to hold firmly is all you need.
Once both screws are in place, give the handle a gentle tug to confirm it’s secure.
Also Read:
Step 5: Test the Drawer Movement
Testing the drawer after installation ensures everything is functioning correctly and the handle is properly secured. This final step helps confirm stability, smooth operation, and proper alignment so you can be confident the repair has been completed successfully.
What to check:
- Handle stability during pulling
- Smooth opening and closing motion
- Proper alignment with drawer front
- Any signs of loosening or resistance
After installation, open and close the drawer a few times. Check for:
Wobbling handle
Misalignment
Resistance when pulling
If everything feels smooth, the job is done. If the handle feels slightly loose, tighten the screws a bit more—but still avoid overdoing it.
Common Mistakes to Avoid
Even though replacing a drawer handle is simple, a few mistakes can cause problems later.
One common mistake is reusing old damaged screws. If screws are bent or rusted, they won’t hold properly. Always use new screws if possible.
Another mistake is ignoring damaged wood holes. Installing a new handle without fixing weak holes will almost always lead to the same issue again.
People also sometimes choose the wrong handle size. If the spacing doesn’t match, forcing it can damage the drawer front.
Lastly, over-tightening is a big issue. It might feel like “stronger is better,” but it actually weakens the grip over time.
When You Should Upgrade Instead of Replace
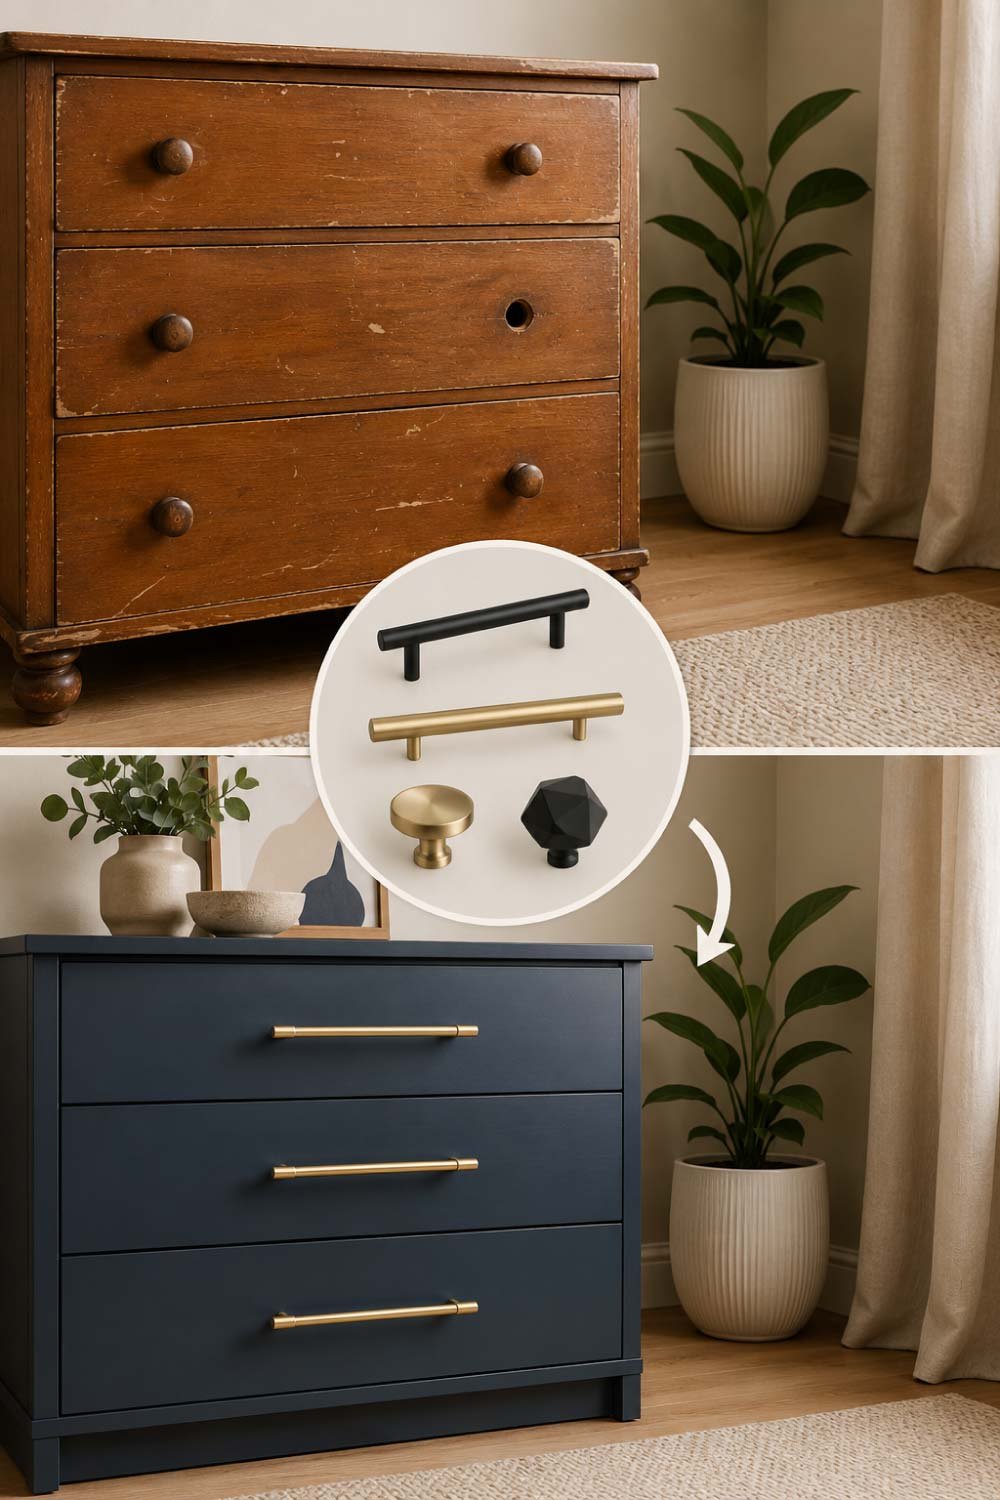
Sometimes, replacing a broken handle is a good opportunity to upgrade your furniture instead of just restoring it.
If your drawers are older or mismatched, consider installing modern handles for a cleaner look. Sleek metal handles, minimalist bars, or even decorative knobs can completely change the appearance of a room without replacing the furniture itself.
Upgrading is especially useful in kitchens and wardrobes where handles are used frequently and design matters more.
How to Prevent Future Breakage
Once you’ve replaced the handle, a little maintenance goes a long way in preventing future damage.
Tighten screws every few months, especially in high-use drawers like kitchen cabinets. Keep an eye on early signs of loosening before it becomes a bigger problem.
Avoid pulling drawers with excessive force. If a drawer is stuck, check the track instead of yanking the handle.
In humid environments, consider using protective coatings or moisture control methods to protect the wood.
These small habits can significantly extend the life of your hardware.
Also Read:
Final Thoughts
A broken drawer handle might seem like a small household issue, but fixing it properly can improve both the functionality and appearance of your furniture. The repair itself takes only a few minutes, requires minimal tools, and can save you from unnecessary frustration every day.
Once you understand the basic steps—removal, inspection, alignment, installation, and testing—you can confidently replace handles on any drawer in your home.
It’s one of those simple DIY skills that pays off immediately, and once you’ve done it once, you’ll probably never need to call anyone for it again.