
A toilet tank is simple in design but plays a crucial role in your bathrooms plumbing system. When it stops working properly, it can lead to constant running water, weak flushing, leaks on the floor, or even no refill at all. The good news is that most toilet tank problems are not serious and can be fixed at home without calling a plumber.
This guide explains the most common toilet tank issues, how to diagnose them, and step by step solutions to repair them safely and effectively.
Understanding How a Toilet Tank Works
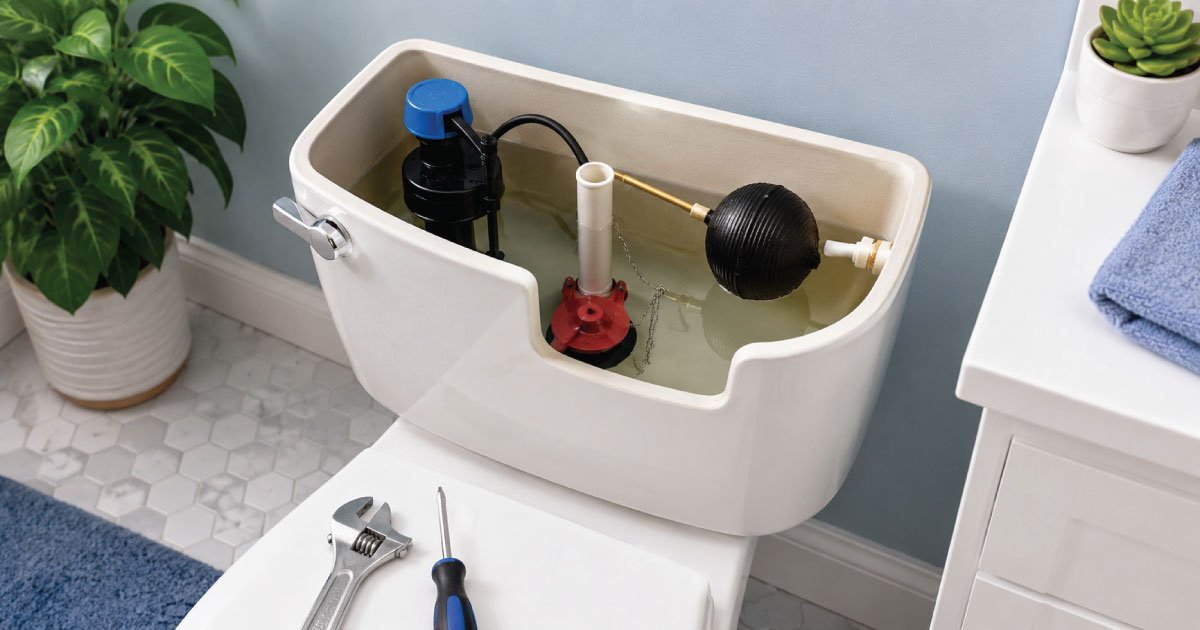
Understanding how a toilet tank works is important because all flushing issues come from these simple internal mechanisms working together. Each component has a specific role in controlling water flow, storage, and release. Knowing their function helps you quickly identify problems and apply the correct fix safely.
- Fill valve: Controls water entering the tank after a flush
- Float (ball or cup): Detects water level and stops filling
- Flush valve: Releases water into the bowl when you flush
- Flapper: Rubber seal that opens during flushing and closes afterward
- Overflow tube: Prevents tank from overflowing
- Chain: Connects flush handle to flapper
When any of these parts malfunction, the toilet starts behaving abnormally.
Common Toilet Tank Problems
Common toilet tank problems usually develop over time due to worn-out internal parts, mineral buildup, or improper adjustments. These issues affect flushing performance, water usage, and efficiency. Identifying symptoms early can help prevent higher water bills and more serious damage to the toilet system.
- Toilet keeps running continuously
- Tank does not fill properly
- Weak or incomplete flush
- Water leaking into the toilet bowl
- Tank leaking onto the bathroom floor
- Strange noises after flushing
Let’s go through each problem and how to fix it.
1. Toilet Keeps Running (Most Common Issue)
Toilet keeps running is one of the most common household plumbing problems and usually indicates that water is continuously escaping from the tank into the bowl. This issue wastes water, increases bills, and often results from small but important mechanical faults inside the flushing system.
Causes:
These are the most common reasons a toilet keeps running, and they usually involve small internal parts not functioning correctly. A damaged seal, incorrect chain tension, or improper water control can all prevent the system from stopping the water flow after flushing.
- Worn-out flapper not sealing properly
- Chain too tight or too loose
- Fill valve malfunction
- Water level too high
How to Fix It:
Fixing a running toilet involves checking each component step by step to identify where water is escaping or not shutting off properly. Most issues can be solved with simple adjustments or low-cost replacements without needing a plumber.
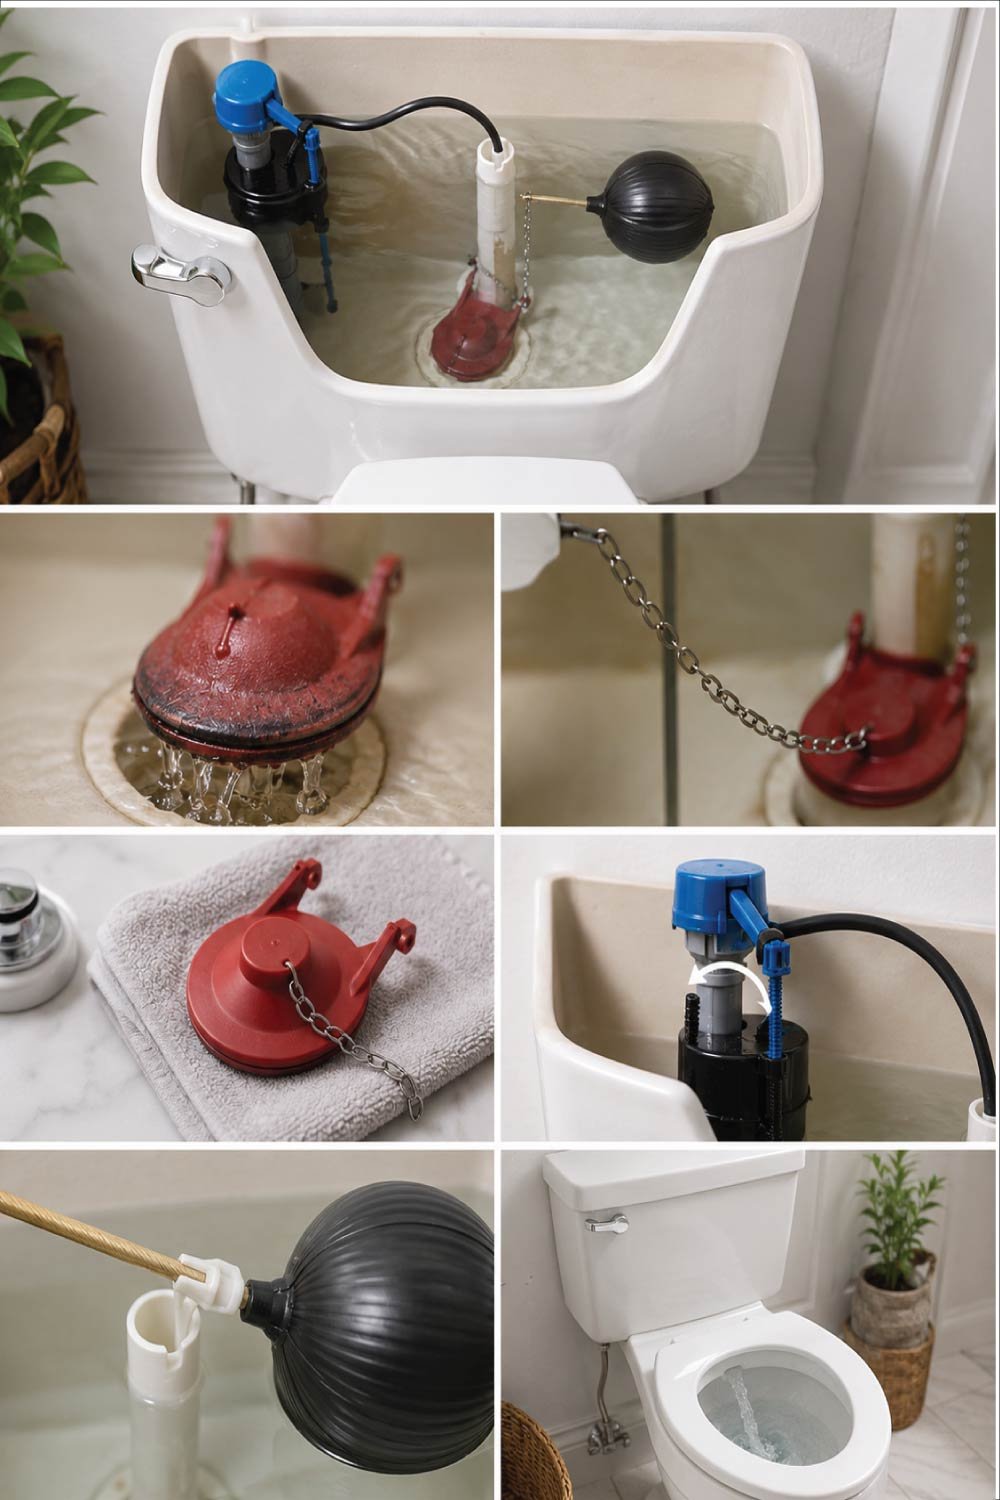
Step 1: Inspect the flapper
Open the tank lid and flush the toilet. Watch the flapper at the bottom.
- If it doesn’t close fully → replace it
- If it closes slowly → clean or adjust it
Step 2: Adjust or replace flapper
- Turn off the water supply under the tank
- Flush to empty the tank
- Disconnect the flapper from the chain
- Remove it from the pegs
- Install a new flapper if needed
- Reattach chain with slight slack
Step 3: Check chain length
2. Toilet Tank Not Filling Properly
A toilet tank that fills slowly or not at all usually indicates issues with water supply or internal fill valve components. This problem affects flushing performance and can result in repeated incomplete flushes. Identifying the exact cause helps restore normal water flow and tank efficiency quickly.
Causes:
Tank filling problems usually occur due to water supply restrictions, valve blockages, or damaged float mechanisms affecting proper water intake and regulation.
- Partially closed shut-off valve
- Blocked fill valve
- Low water pressure
- Damaged float mechanism
How to Fix It:
This section guides you through checking water supply, cleaning internal parts, and replacing faulty components to restore proper tank filling function effectively.
Step 1: Check water supply
Ensure the main water supply valve is fully open for proper tank refilling.
Make sure the shut-off valve (near the wall) is fully open.
Step 2: Clean the fill valve
Remove debris buildup inside the fill valve to restore normal water flow and performance.
Turn off water supply
Remove the fill valve cap
Rinse out debris or sediment
Reassemble and test
Step 3: Replace fill valve (if needed)
Install a new fill valve when cleaning does not restore proper water filling performance.
If cleaning doesn’t work:
Remove old fill valve
Install a universal replacement
Adjust float height so water stops about 1 inch below overflow tube
3. Weak or Incomplete Flush
A weak or incomplete flush reduces toilet efficiency and often results from low water levels, blocked pathways, or improper flapper operation. This issue prevents waste from clearing properly and may require adjustments to water flow or cleaning of internal bowl channels to restore strong flushing performance.

Causes:
Weak flushing usually occurs due to insufficient water pressure, blockage in internal channels, or improper tank component adjustments affecting water release strength.
- Low water level in tank
- Partially closed flapper
- Blocked rim jets in bowl
- Clogged siphon jet
How to Fix It:
This section explains how to restore flushing power by adjusting water level, checking flapper movement, and cleaning blocked water channels inside the toilet system.
Step 1: Adjust water level
Increase tank water level to ensure enough force for proper flushing performance.
The water should sit about 1 inch below the overflow tube. Adjust float upward if needed.
Step 2: Check flapper opening
Ensure flapper opens fully during flushing for maximum water release and pressure.
Make sure the flapper lifts fully when you flush. Adjust chain if necessary.
Step 3: Clean rim holes
Remove mineral deposits from rim holes to improve water flow and flushing strength.
Mineral buildup can block water flow:
Use a small brush or wire
Clean holes under the toilet rim
Also Read:
4. Water Leaking Into the Toilet Bowl
Water leaking into the toilet bowl is often a sign that internal tank components are not sealing properly, especially the flapper assembly. This issue can waste significant water and increase utility bills if ignored. Understanding the causes and repair steps helps restore proper flushing performance and prevents continuous running or trickling sounds.
Causes
Several mechanical and sealing issues inside the toilet tank can lead to continuous water leakage into the bowl, most commonly involving worn or misaligned flapper components and buildup around the valve seat.
- Worn flapper seal
- Dirty flapper seat
- Misaligned flapper
How to Fix It
Fixing a leaking toilet bowl typically involves cleaning sealing surfaces, replacing worn parts, and ensuring correct alignment of internal components to restore a proper watertight seal inside the tank.
Step 1: Clean the flapper seat
Start by removing mineral buildup that prevents proper sealing.
Mineral deposits can prevent sealing. Wipe the area with a cloth.
Step 2: Replace flapper
Replace the flapper if cleaning does not stop leakage completely.
If cleaning doesn’t help:
Turn off water
Remove old flapper
Install a matching replacement
Ensure tight seal when closed
Step 3: Check alignment
Ensure proper positioning so the flapper seals the valve opening correctly.
Make sure flapper sits directly over the valve opening.
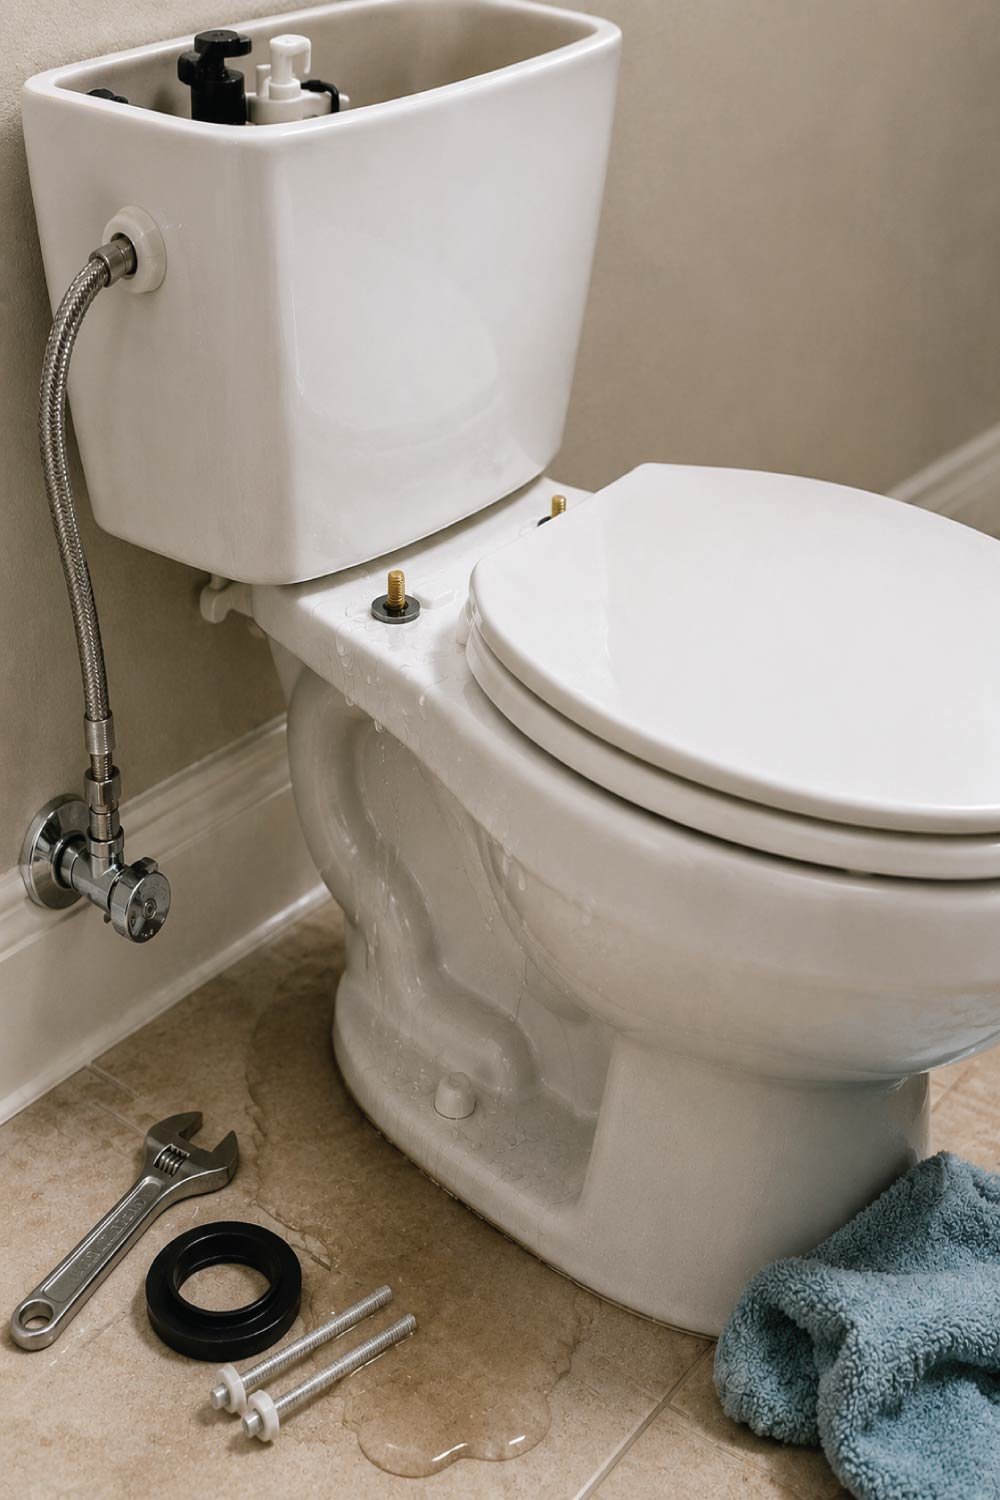
5. Toilet Tank Leaking on the Floor
A toilet tank leaking onto the floor is a serious plumbing issue that can quickly damage bathroom flooring and surrounding structures. This type of leak often comes from worn seals, loose hardware, or cracked components. Prompt identification and repair are essential to prevent costly water damage and maintain safe bathroom conditions.
Causes
Leaks from the toilet tank reaching the floor are usually caused by failing seals, loose connections, or structural damage to tank components that allow water to escape externally rather than remaining contained.
- Loose tank bolts
- Cracked tank or gasket failure
- Faulty supply line connection
How to Fix It
Repairing a floor leak requires careful inspection of bolts, seals, and water supply connections, followed by tightening or replacing damaged parts to restore a secure and watertight tank assembly.
Step 1: Check tank bolts
Tighten tank bolts carefully to stop minor leaks without damaging porcelain.
Inside the tank, tighten bolts slightly from underneath. Do not overtighten—porcelain can crack.
Step 2: Replace tank-to-bowl gasket
Replace the gasket between tank and bowl to restore proper sealing.
Turn off water
Empty tank
Remove tank carefully
Replace rubber gasket
Reinstall tank securely
Step 3: Inspect supply line
Check supply line connections for drips and replace if necessary.
If water drips near the base, tighten or replace the supply hose.
Also Read:
6. Strange Noises from Toilet Tank
Unusual noises coming from a toilet tank, such as hissing, gurgling, or whistling, often indicate problems with water flow, valve performance, or pressure irregularities. These sounds can signal that internal components are wearing out or becoming obstructed, and addressing them early helps prevent more serious plumbing issues.
Causes
Noises inside the toilet tank are commonly caused by worn fill valves, partial blockages, or inconsistent water pressure that disrupt normal water flow and tank refilling processes.
- Fill valve wear
- Partially blocked valve
- Water pressure fluctuations
How to Fix It
Resolving tank noise typically involves cleaning or replacing the fill valve, removing sediment buildup, and ensuring steady water pressure for smooth and quiet tank operation.
Step 1: Clean fill valve
Remove sediment buildup inside the fill valve to reduce noise issues.
Sediment often causes noise. Clean internal parts thoroughly.
Step 2: Replace fill valve
Replace the fill valve if cleaning does not eliminate the noise completely.
If noise continues, replacing the fill valve is the best solution.
Tools You May Need
Basic toilet repair tasks require only a small set of common household tools that are easy to use and widely available. Having the right equipment on hand makes repairs faster, safer, and more efficient, reducing the risk of damage to delicate components and ensuring proper installation of replacement parts.
- Adjustable wrench
- Screwdriver
- Replacement flapper
- Replacement fill valve
- Sponge or towel
- Bucket
Step-by-Step Safety Tips
Before starting any toilet repair work, following basic safety precautions is essential to prevent water spills, component damage, or accidental breakage. Proper preparation ensures a smoother repair process and helps protect both the bathroom environment and the individual performing the maintenance work.
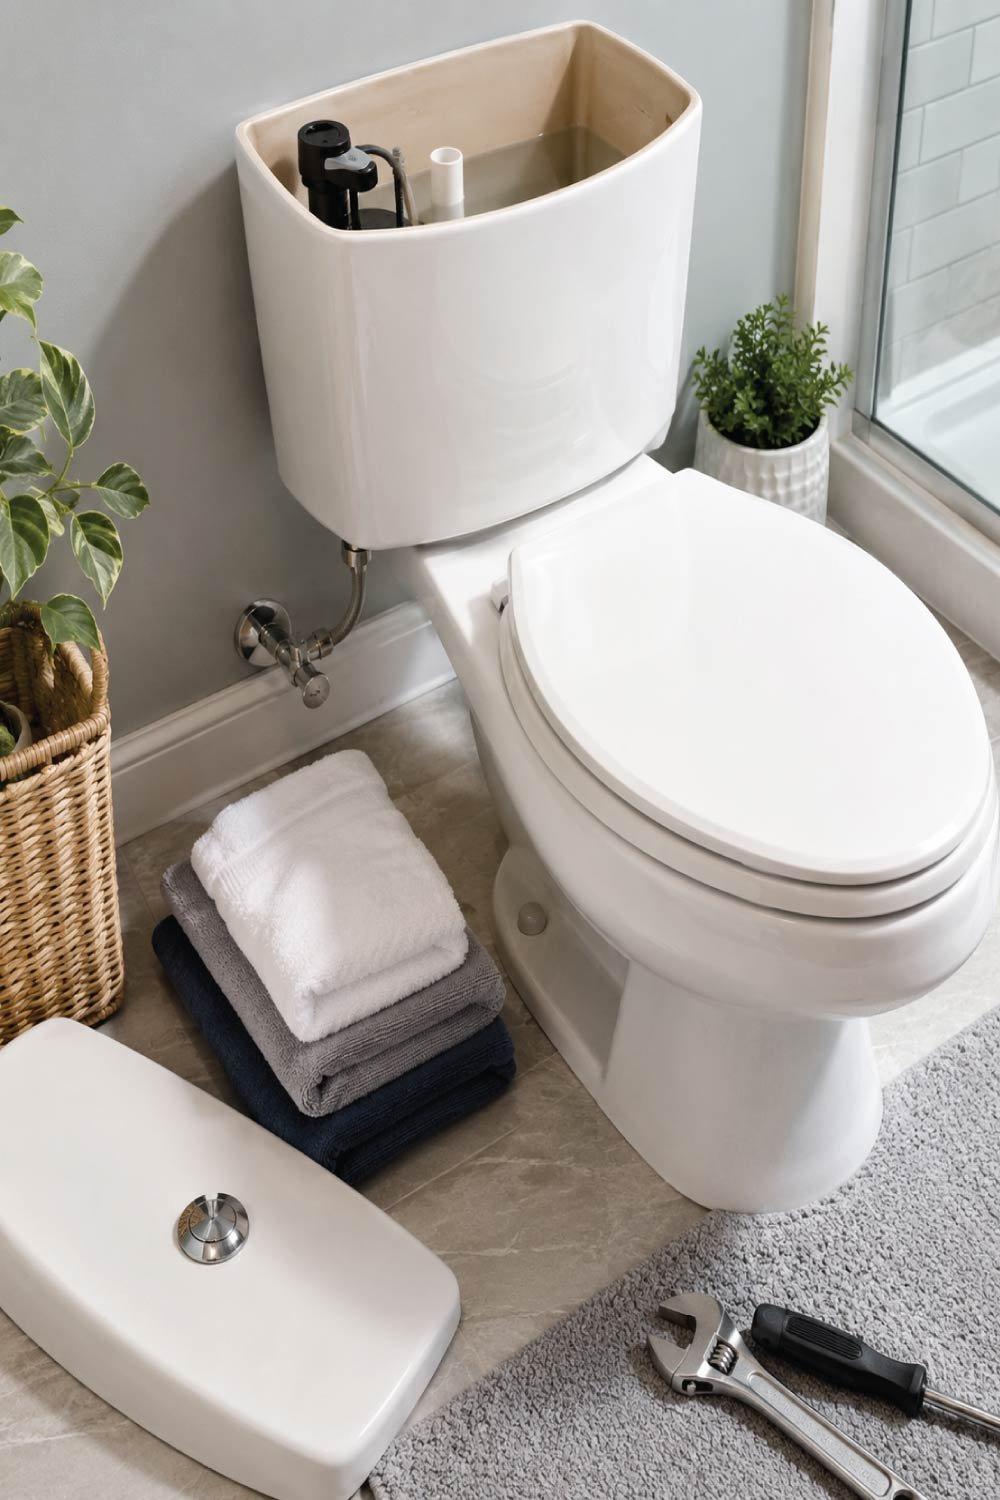
- Always turn off the water supply
- Flush to empty the tank
- Keep towels nearby for spills
- Avoid overtightening plastic or porcelain parts
- Work slowly to avoid breaking fragile components
Also Read:
When to Replace Instead of Repair
Deciding between repairing or replacing a toilet depends on its age, condition, and repair history. While many issues can be fixed easily, some problems indicate that the toilet system is nearing the end of its useful life. In such cases, replacement is often more cost-effective and reliable than repeated repairs.
- Toilet is over 15–20 years old
- Cracks appear in tank or bowl
- Repairs keep failing repeatedly
- Water usage is very inefficient
Modern toilets are more water-efficient and can save money long-term.
Preventing Future Toilet Tank Problems
Preventing toilet tank issues requires consistent maintenance and simple care habits that reduce wear on internal parts. Regular inspections and timely replacements help avoid leaks, noise, and flushing problems. A proactive approach ensures the toilet system stays efficient, reliable, and less likely to develop costly repairs over time.
- Check inside tank every 6 months
- Replace flapper every 2–3 years
- Clean mineral buildup regularly
- Avoid harsh chemical cleaners inside tank
- Fix small leaks immediately
Regular maintenance keeps everything running smoothly.
Also Read:
Final Thoughts
Toilet tank issues may seem annoying, but most of them are simple mechanical problems that can be solved in under an hour. Whether it’s a running toilet, weak flush, or leaking tank, understanding how each component works makes troubleshooting much easier.
With a few basic tools and careful attention, you can fix most toilet tank problems yourself and avoid unnecessary plumbing costs.