
Cold air sneaking in through your windows can quickly turn a comfortable home into a chilly, unpleasant space—especially during winter or cold nights. You may notice curtains gently moving, sudden temperature drops near seating areas, or even higher electricity bills as heaters work overtime. The good news is that you don’t always need expensive repairs or professional help to fix it.
In most cases, cold air leaks from windows are caused by small gaps, worn sealing, or minor structural shifts. And the solution is often surprisingly simple. In this guide, you’ll learn why this happens, how to identify the exact problem areas, and most importantly, how to stop cold air instantly using practical, low-cost fixes you can do yourself.
Why Cold Air Comes Through Windows
Before jumping into fixes, it’s important to understand why windows start letting in cold air in the first place. Even a well-built home can develop weak points over time. Windows are constantly exposed to sunlight, rain, heat, and cold, which slowly affect their structure and sealing ability. Once these small weaknesses appear, outside air finds its way indoors easily, especially during winter or windy conditions.
- Windows are exposed to constant weather changes, which weakens sealing materials over time
- Small structural shifts create tiny openings that are not easily visible
- Aging materials lose flexibility and stop blocking air effectively
- Even high-quality windows can develop gaps without regular maintenance
- Cold drafts usually enter through multiple minor leak points, not just one
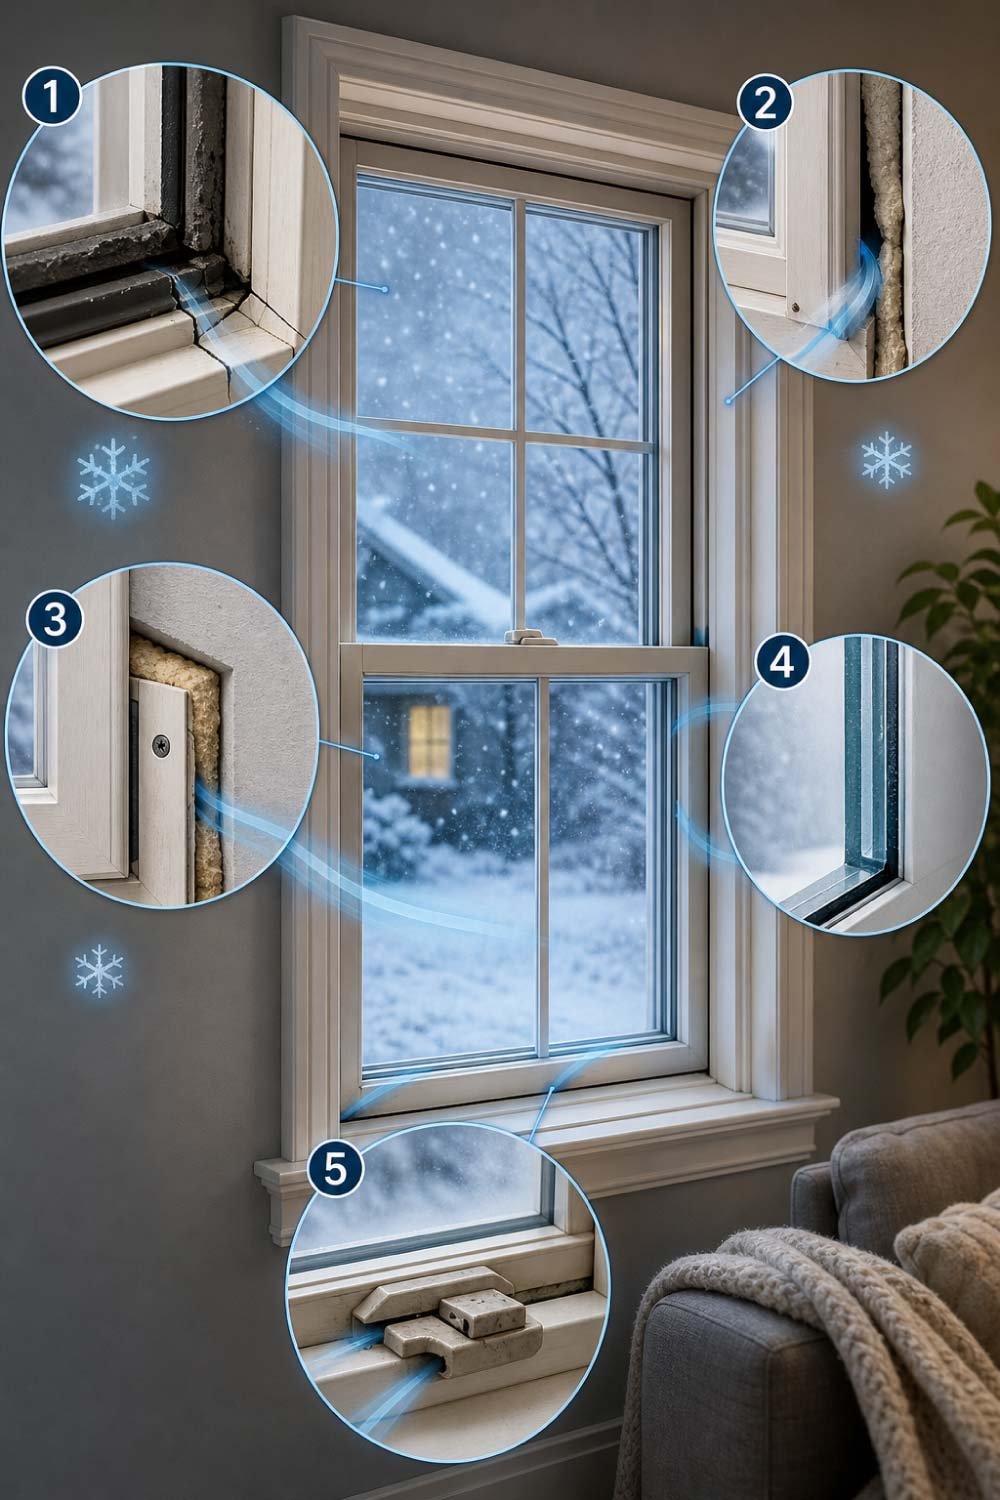
1. Worn or Damaged Seals
Window seals play a critical role in keeping outdoor air outside. These seals are usually made from rubber or foam, which naturally degrade over time. When they become brittle or start peeling away, they can no longer create a tight barrier. Even a very small break in the seal allows continuous airflow, making rooms noticeably colder.
- Rubber or foam weather stripping loses elasticity with age
- Cracks and peeling create direct pathways for air leakage
- Even tiny gaps allow constant cold drafts into the room
- Old seals cannot adjust to frame movement or pressure changes
- Replacing seals restores proper insulation quickly
2. Small Frame Gaps
Window frames naturally expand and contract due to temperature changes throughout the year. Over time, this repeated movement can create small but noticeable gaps between the wall and the frame. These gaps are often invisible but still large enough for cold air to pass through, especially in windy weather.
- Temperature changes cause natural expansion and shrinking of materials
- Long-term movement leads to separation between frame and wall
- Even microscopic gaps can affect indoor temperature comfort
- Air leaks often increase during extreme weather conditions
- Sealing these gaps improves energy efficiency significantly
3. Poor Installation
If a window was not installed correctly from the beginning, it may never fully seal properly. Misalignment, uneven fitting, or missing insulation during installation can leave permanent gaps. These issues are often hidden behind trim or paint, making them harder to detect until cold air becomes noticeable indoors.
- Improper alignment during installation creates permanent leakage points
- Missing insulation materials reduce overall sealing performance
- Uneven fitting allows continuous air movement around edges
- Installation errors often worsen over time without correction
- Professional adjustment may be needed for severe cases
4. Old or Thin Glass
Older windows, especially single-pane glass, offer very little protection against outdoor temperatures. Unlike modern insulated glass, thin glass does not trap heat or block cold effectively. As a result, rooms with older windows often feel colder even when the frame is properly sealed.
- Single-pane glass provides minimal thermal insulation
- Heat escapes easily through thin glass surfaces
- Cold air transfer increases in winter months
- Modern double-glazed windows significantly improve insulation
- Upgrading glass reduces energy loss and improves comfort
5. Loose Locking Mechanism
A window that doesn’t close tightly due to a loose or faulty locking mechanism will always allow air leakage. Even if the frame and glass are in good condition, improper locking prevents a full seal. This creates small openings around edges where cold air can easily enter.
- Weak locks prevent proper window closure pressure
- Gaps form around corners and edges when not sealed tightly
- Regular use can loosen locking components over time
- Air leakage increases when wind pressure is strong
- Repairing locks restores full sealing effectiveness
Understanding the cause helps you choose the right fix instead of wasting time on ineffective solutions.
How to Find Where the Cold Air Is Coming From
Identifying the exact source of air leaks is essential before applying any fix. Instead of guessing, simple household methods can help you detect even small drafts. These tests are quick, safe, and do not require any special equipment, making them ideal for everyday homeowners.
- Helps you locate exact leakage points instead of guessing
- Saves time and prevents unnecessary repairs
- Allows targeted sealing for better results
- Can be done using simple household items
- Improves overall effectiveness of insulation efforts
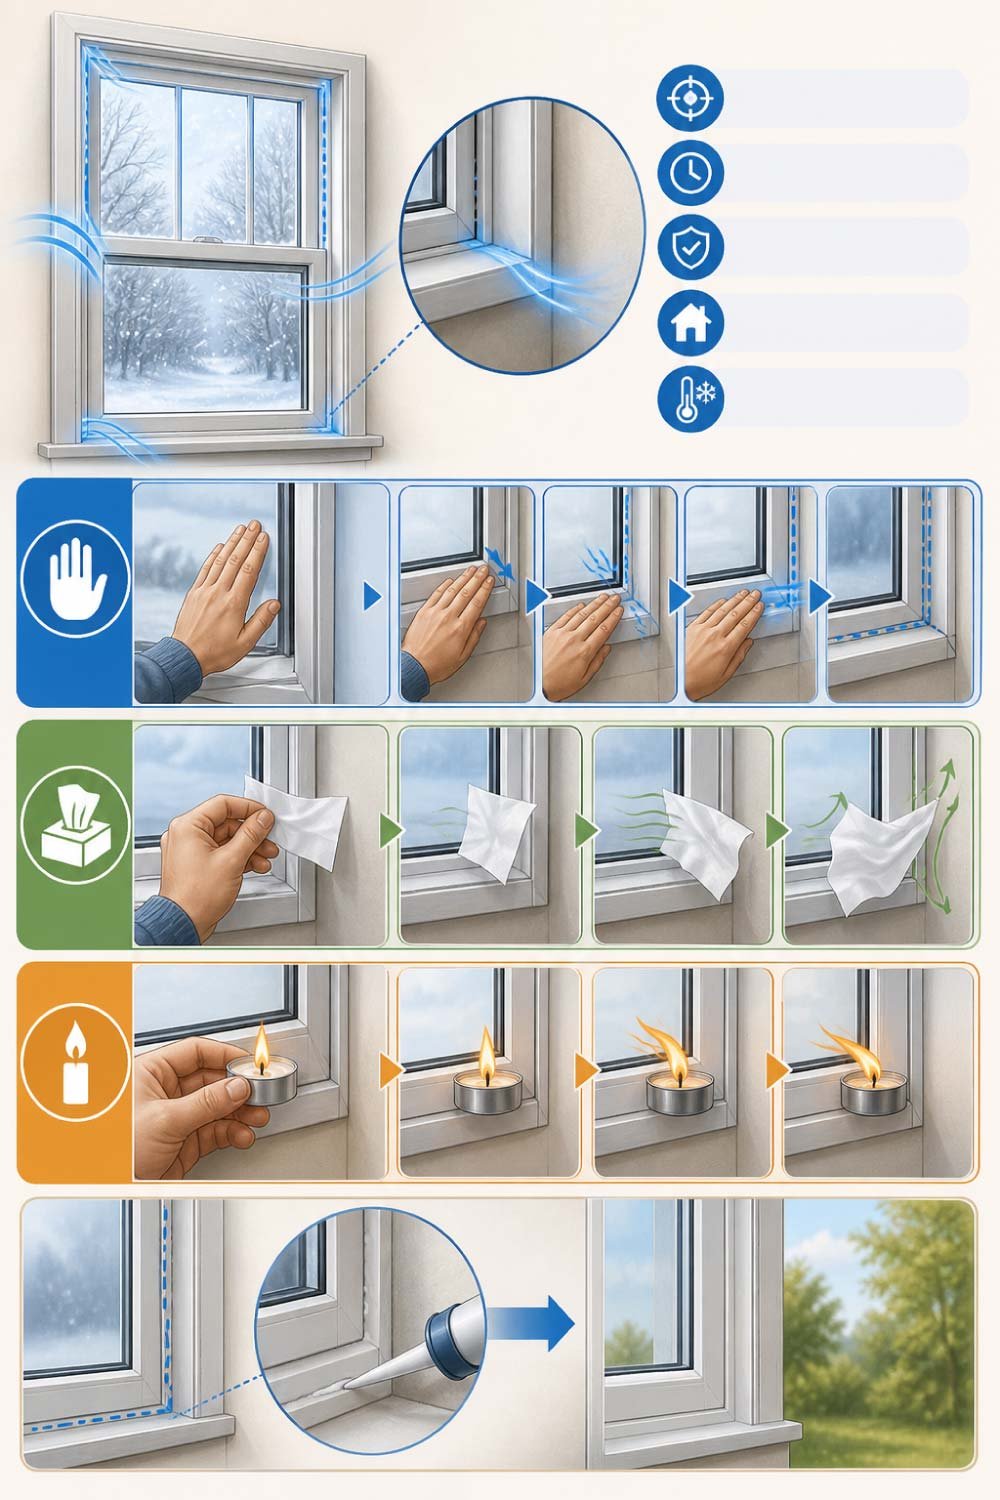
Hand Test Method
The hand test is the simplest way to detect air leaks around windows. By slowly moving your hand along the edges of a closed window, you can easily feel temperature changes or light air movement. This method works best on windy days when drafts are stronger.
- Move your hand slowly along all window edges
- Feel for any cold air movement or drafts
- Works best when outdoor wind pressure is high
- Helps quickly locate problem areas without tools
- Easy and safe for any type of window
Tissue or Paper Test
A thin tissue or paper strip can clearly show air movement around window gaps. When held near potential leak points, even a small draft will cause it to flutter. This makes it a reliable and visual method for detecting hidden air leaks.
- Hold lightweight tissue near closed window edges
- Observe movement caused by air pressure changes
- Clearly shows even small air leaks
- Works well for precise detection around corners
- Simple and highly effective household method
Candle or Lighter Test (Carefully)
A small flame can help detect air movement more accurately than other methods. When placed near a leak, the flame will flicker or bend due to airflow. However, this method must be used carefully to avoid safety risks.
- Use a small candle or lighter near sealed window edges
- Watch for flame flickering or movement
- Indicates strong or weak air leakage points
- Provides highly accurate detection results
- Must be performed with extreme caution
Once you identify the leak spots, you can apply targeted fixes instead of guessing.
Also Read:
The Instant Fix: Seal Window Gaps at Home
Once you’ve identified where cold air is entering, the next step is to seal those gaps effectively. The good news is that you don’t need expensive tools or professional help. These simple home methods can quickly improve insulation and reduce drafts, making your room noticeably warmer in a short time.
- Affordable solutions that require minimal tools
- Easy to apply for beginners
- Provides immediate improvement in comfort
- Can be done in under an hour
- Helps reduce energy loss effectively
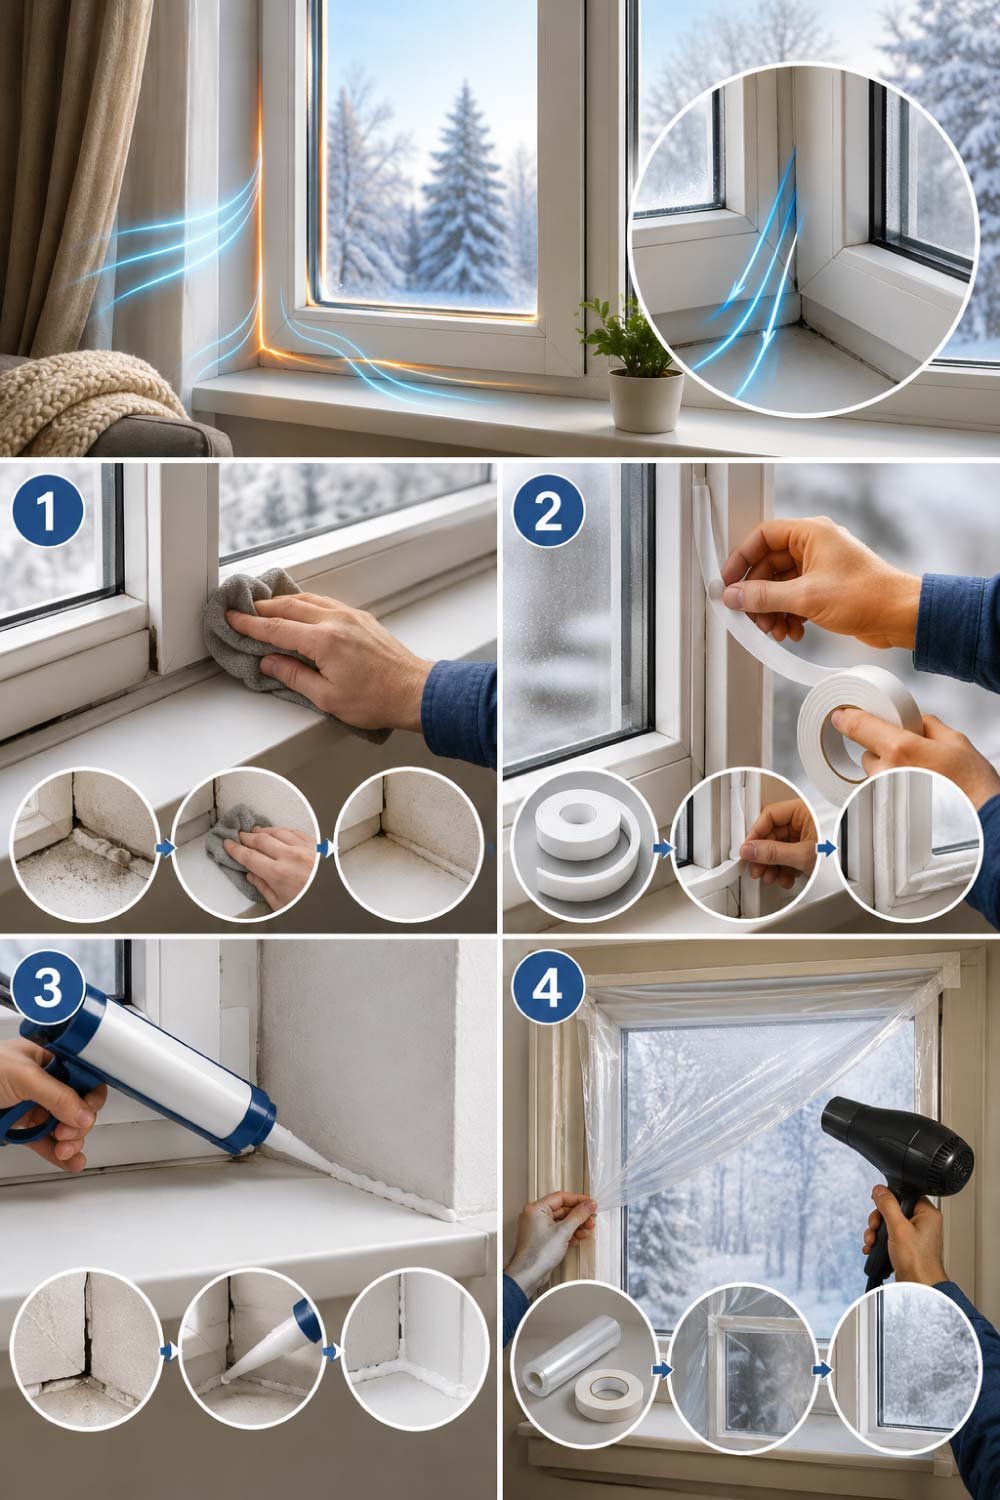
Step 1: Clean the Window Edges
Proper cleaning is essential before applying any sealing material. Dust, dirt, or moisture can prevent adhesives from sticking properly. A clean surface ensures long-lasting results and improves the effectiveness of weatherproofing materials.
- Wipe window frames using a dry or slightly damp cloth
- Remove dust, grease, and loose particles completely
- Ensure the surface is fully dry before proceeding
- Improves adhesion of tapes and sealants
- Increases durability of applied fixes
Step 2: Use Weather Stripping Tape
Weather stripping tape is one of the easiest and most effective ways to block air leaks. It is designed to compress when the window is closed, forming a tight seal that prevents drafts from entering.
- Measure window edges before cutting tape
- Apply tape along all gaps and corners
- Press firmly to ensure proper adhesion
- Foam compresses to block air completely
- Ideal for quick and temporary insulation improvement
Step 3: Seal Small Cracks With Silicone Caulk
For smaller but persistent cracks, silicone caulk offers a durable sealing solution. It remains flexible after drying, allowing it to withstand temperature changes without breaking or shrinking.
- Apply thin bead of silicone along visible cracks
- Smooth surface for even coverage
- Let it dry completely for strong sealing
- Works well for long-term gap protection
- Resistant to moisture and weather changes
Step 4: Use Window Insulation Film (Extra Layer Protection)
Window insulation film adds an additional barrier that traps air and improves thermal efficiency. It is especially useful for older windows where heat loss is more significant.
- Cut film according to window size
- Attach using double-sided tape around frame
- Use hairdryer to tighten and smooth surface
- Creates insulating air pocket inside window
- Great for improving winter comfort indoors
Also Read:


Final Thoughts
Cold air coming through windows can feel frustrating, but it is usually caused by small, fixable issues. You don’t need expensive repairs or complicated tools to solve it. With simple materials like weather stripping tape, silicone sealant, and insulation film, you can block drafts instantly and make your home noticeably warmer.
The key is identifying the exact leak points and applying the right fix. Once sealed properly, you’ll notice immediate improvements in comfort and energy efficiency.
A well-sealed window doesn’t just stop cold air—it transforms your home into a warmer, quieter, and more efficient space.