
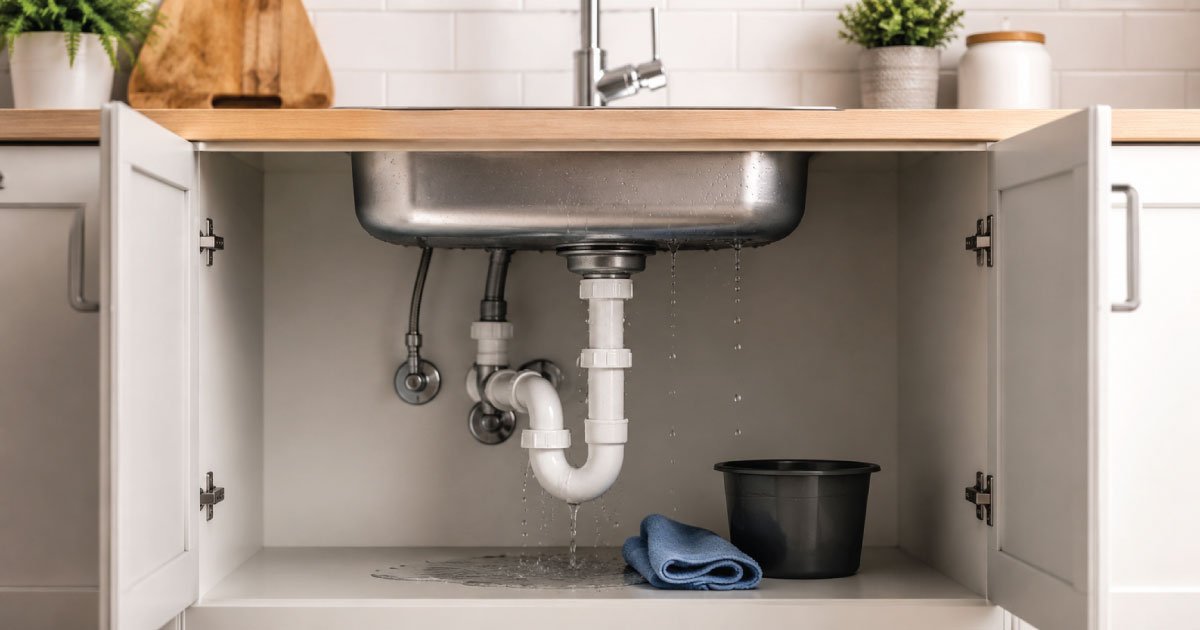
A leaking kitchen sink is one of the most common household plumbing problems and fortunately, one of the most fixable. Whether it is a slow drip under the cabinet or water pooling around the faucet base, ignoring a sink leak can lead to mold, cabinet damage, higher water bills, and even structural issues over time. The good news is that most kitchen sink leaks can be repaired with basic tools, a little patience, and the right guidance.
This comprehensive guide will walk you through how to identify the source of a kitchen sink leak, understand why it is happening, and fix it correctly. You don’t need professional plumbing experience just careful attention to detail and a willingness to follow each step.
Table of Contents
ToggleCommon Signs of a Kitchen Sink Leak
Kitchen sink leaks are not always immediately visible, and in many cases they develop slowly over time before becoming obvious. Early detection is important because hidden leaks can damage cabinets, flooring, and even encourage mold growth. Paying attention to subtle warning signs helps you catch the problem before it becomes more expensive to repair.
Before you begin any repair, it’s important to confirm that you actually have a leak and determine where it’s coming from. Some leaks are obvious, while others are subtle.
Common warning signs include:
- Water pooling under the sink cabinet
- A musty or moldy smell beneath the sink
- Dripping sounds when the water is off
- Loose or wobbly faucet
- Water stains on cabinet walls or flooring
- Reduced water pressure at the faucet
If you notice any of these symptoms, it’s time to investigate further.
Step 1: Identify the Source of the Leak
Finding the exact source of a kitchen sink leak is the most important step because different areas require completely different repair methods. Leaks can come from multiple points under or around the sink, and correctly diagnosing the issue helps avoid unnecessary part replacement or repeated repairs.
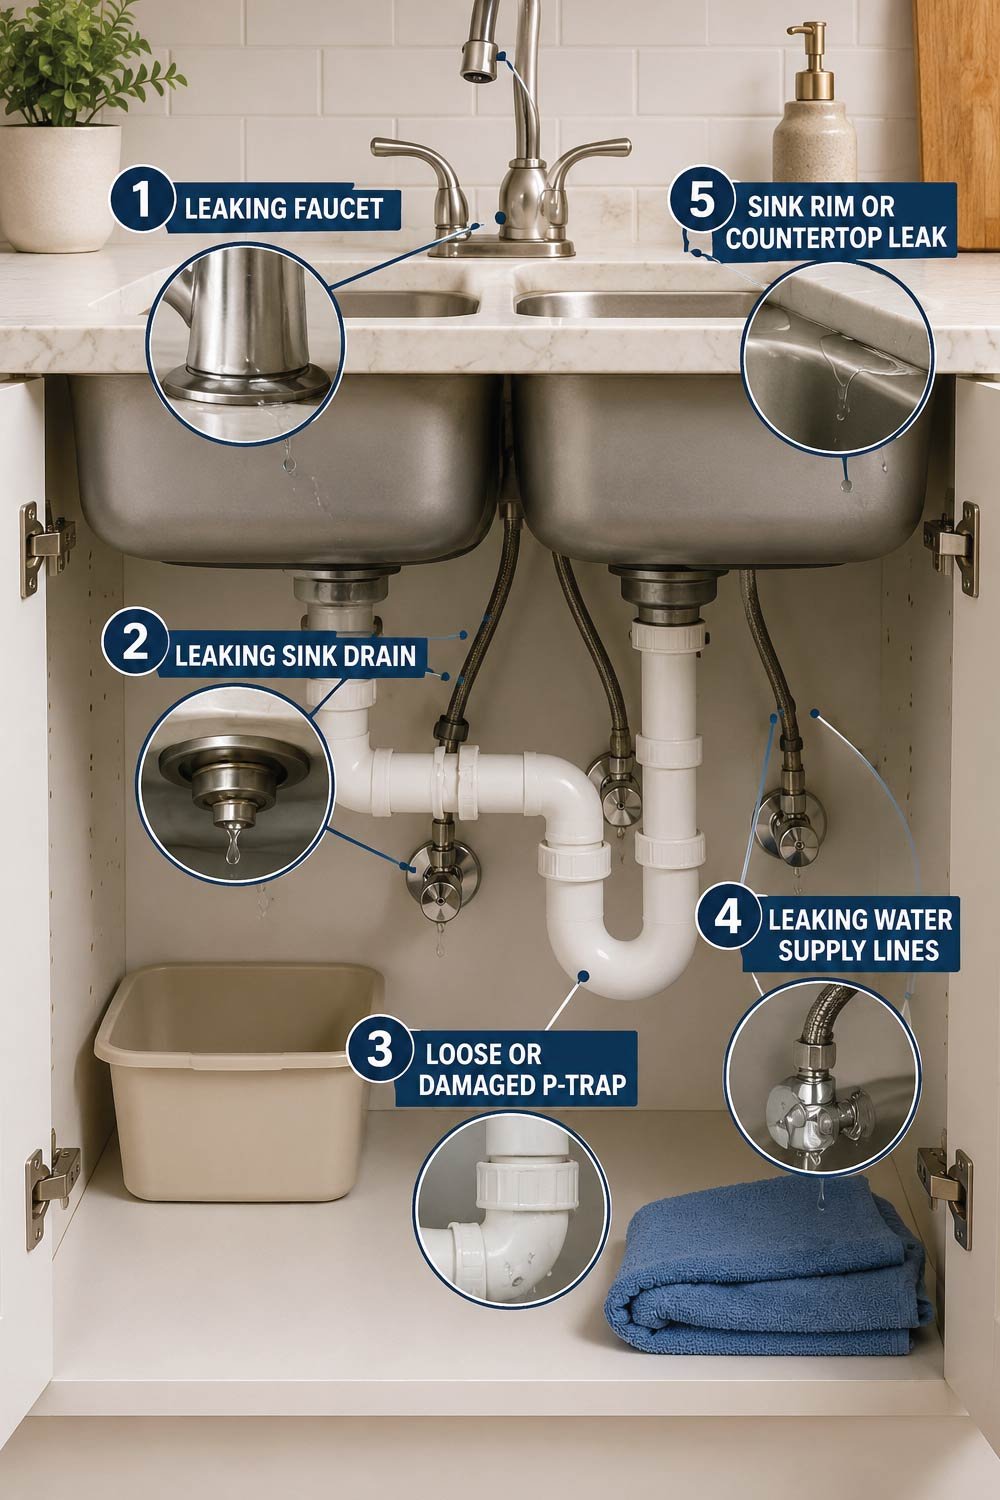
Kitchen sink leaks typically come from one of five main areas. Pinpointing the exact location will save you time and prevent unnecessary repairs.
1. Leaking Faucet
A faucet leak usually indicates worn internal components such as washers, cartridges, or O-rings that no longer create a proper seal when the handle is turned off.A faucet that drips even when turned off usually indicates worn internal components, such as washers, cartridges, or O-rings.
2. Leaking Sink Drain
Drain leaks often occur where the sink connects to the drain assembly, especially at the flange or strainer, where sealing material may degrade over time.Water leaking directly beneath the sink bowl often comes from the drain flange, strainer, or tailpiece.
3. Loose or Damaged P-Trap
The P-trap is a curved pipe designed to hold water and prevent sewer gases from entering your home, but its slip joints can loosen or wear out and start leaking.The curved pipe under the sink (called the P-trap) commonly leaks at slip joints if they loosen or if washers wear out.
4. Leaking Water Supply Lines
Flexible supply hoses are under constant pressure and can develop cracks, corrosion, or loose fittings, especially in older plumbing systems.Flexible hoses connecting the faucet to shut-off valves can crack, corrode, or loosen over time.
5. Sink Rim or Countertop Leak
Leaks around the sink edges usually point to failed caulking or sealant that allows water to seep between the sink and countertop.Water seeping around the sink edges usually indicates failed caulk or sealant.Dry the area completely, then run water and watch closely to see where moisture first appears.
Step 2: Gather the Necessary Tools and Materials
Having the right tools prepared before starting a kitchen sink repair helps make the process faster, cleaner, and more efficient. Most repairs do not require advanced equipment, but basic plumbing tools ensure you can safely remove, tighten, or replace components without damaging fittings or connections.
Most kitchen sink repairs require only basic tools. Having everything ready before you start will make the process smoother.
Common Tools
- Adjustable wrench
- Basin wrench (for faucet nuts)
- Screwdrivers (flathead and Phillips)
- Bucket or towel
- Plumber’s tape (Teflon tape)
- Flashlight
Common Replacement Materials
- Rubber washers or O-rings
- Faucet cartridge (model-specific)
- Plumber’s putty or silicone sealant
- Replacement supply lines
- Slip-joint washers
Step 3: Turn Off the Water Supply
Shutting off the water supply is a critical safety step before starting any sink repair. It prevents accidental flooding and allows you to work on plumbing components without pressure in the system. Even small leaks can become major water damage if this step is skipped.
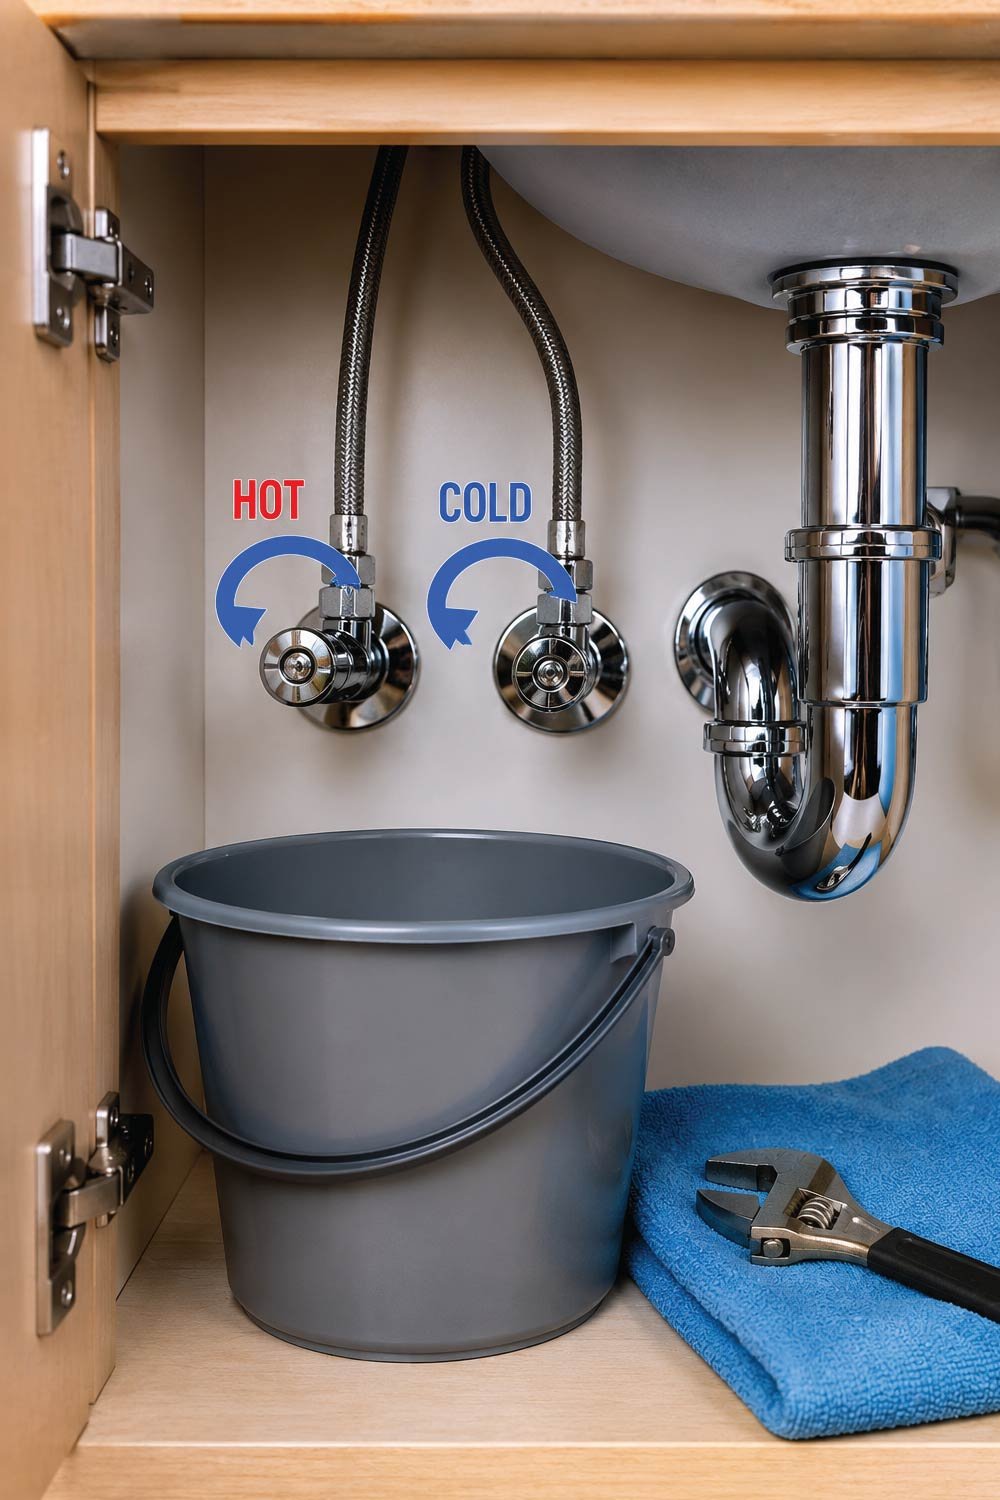
Before making any repair, turn off the water.
- Locate the hot and cold shut-off valves under the sink.
- Turn both valves clockwise until fully closed.
- Open the faucet to relieve pressure and drain any remaining water.
- Place a bucket under the sink to catch residual drips.
Skipping this step can lead to flooding and unnecessary mess.
Also Read:
Fixing Common Kitchen Sink Leaks
Kitchen sink leaks can originate from different components, so each repair method targets a specific problem area. Understanding which part is failing ensures you apply the correct fix rather than replacing unrelated parts. The following solutions cover the most common leak sources found in kitchen sinks.
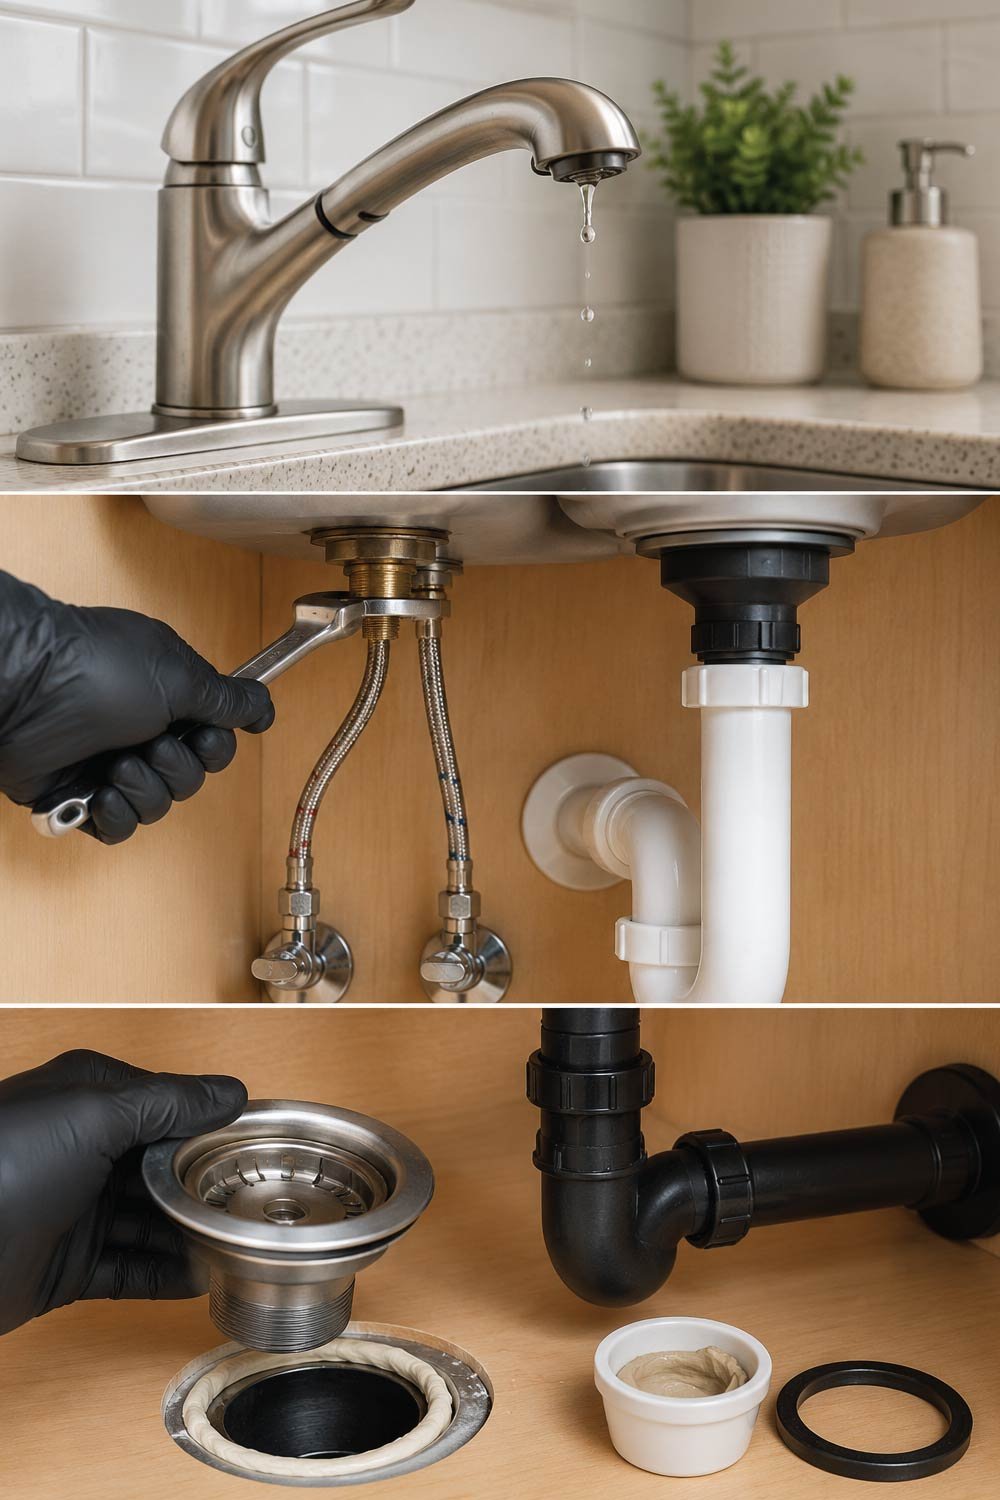
Fix 1: Repairing a Leaking Faucet
A leaking faucet usually results from worn internal seals that fail to fully stop water flow when the handle is closed. Over time, constant pressure and movement degrade these small components, causing persistent dripping that can waste water and increase utility costs.A dripping faucet is often caused by worn internal parts.
How to Fix It:
- Remove the decorative cap or handle screw.
- Take off the faucet handle.
- Remove the cartridge, stem, or valve assembly.
- Inspect washers and O-rings for wear or cracking.
- Replace damaged parts with exact matches.
- Reassemble the faucet and test.
Tip: Bring the old cartridge or washer to the hardware store to ensure the correct replacement.
Fix 2: Fixing a Leak at the Faucet Base
Leaks around the faucet base are usually caused by failed sealing material beneath the fixture. When caulk or putty deteriorates, water can seep into the sink deck or cabinet below, leading to hidden moisture damage if not repaired quickly and properly.If water pools around the base of the faucet, the seal beneath it has likely failed.
How to Fix It:
Disconnect the supply lines.
Loosen the mounting nuts beneath the sink.
Lift the faucet from the sink.
Clean old putty or sealant from the base.
Apply fresh plumber’s putty or silicone.
Reinstall and tighten securely.
Allow sealant to cure as recommended before using the sink.
Also Read:
Noisy Door Driving You Crazy? Make It Silent in Seconds (Simple Fix Guide)
Fix 3: Repairing a Leaking Sink Drain
Drain leaks typically occur when sealing material dries out or when connections become loose over time. Since the drain system handles constant water flow, even small gaps can lead to noticeable dripping under the sink that may worsen if not properly resealed.
Leaks at the drain are often caused by dried-out putty or loose connections.
How to Fix It:
- Loosen the slip nut connecting the drain pipe.
- Remove the drain assembly from above the sink.
- Clean off old plumber’s putty.
- Apply fresh putty under the drain flange.
- Reinstall and tighten evenly.
- Wipe away excess putty.
Test by filling the sink with water and releasing it all at once.
Fix 4: Fixing a Leaking P-Trap
The P-trap is one of the most common areas where kitchen sink leaks occur, but it is also designed to be easily removable for quick maintenance. Since it relies on slip joints and rubber washers instead of permanent seals, small leaks can often be repaired without replacing the entire assembly, making it a simple and cost-effective fix.The P-trap is designed to be removable and easy to repair.
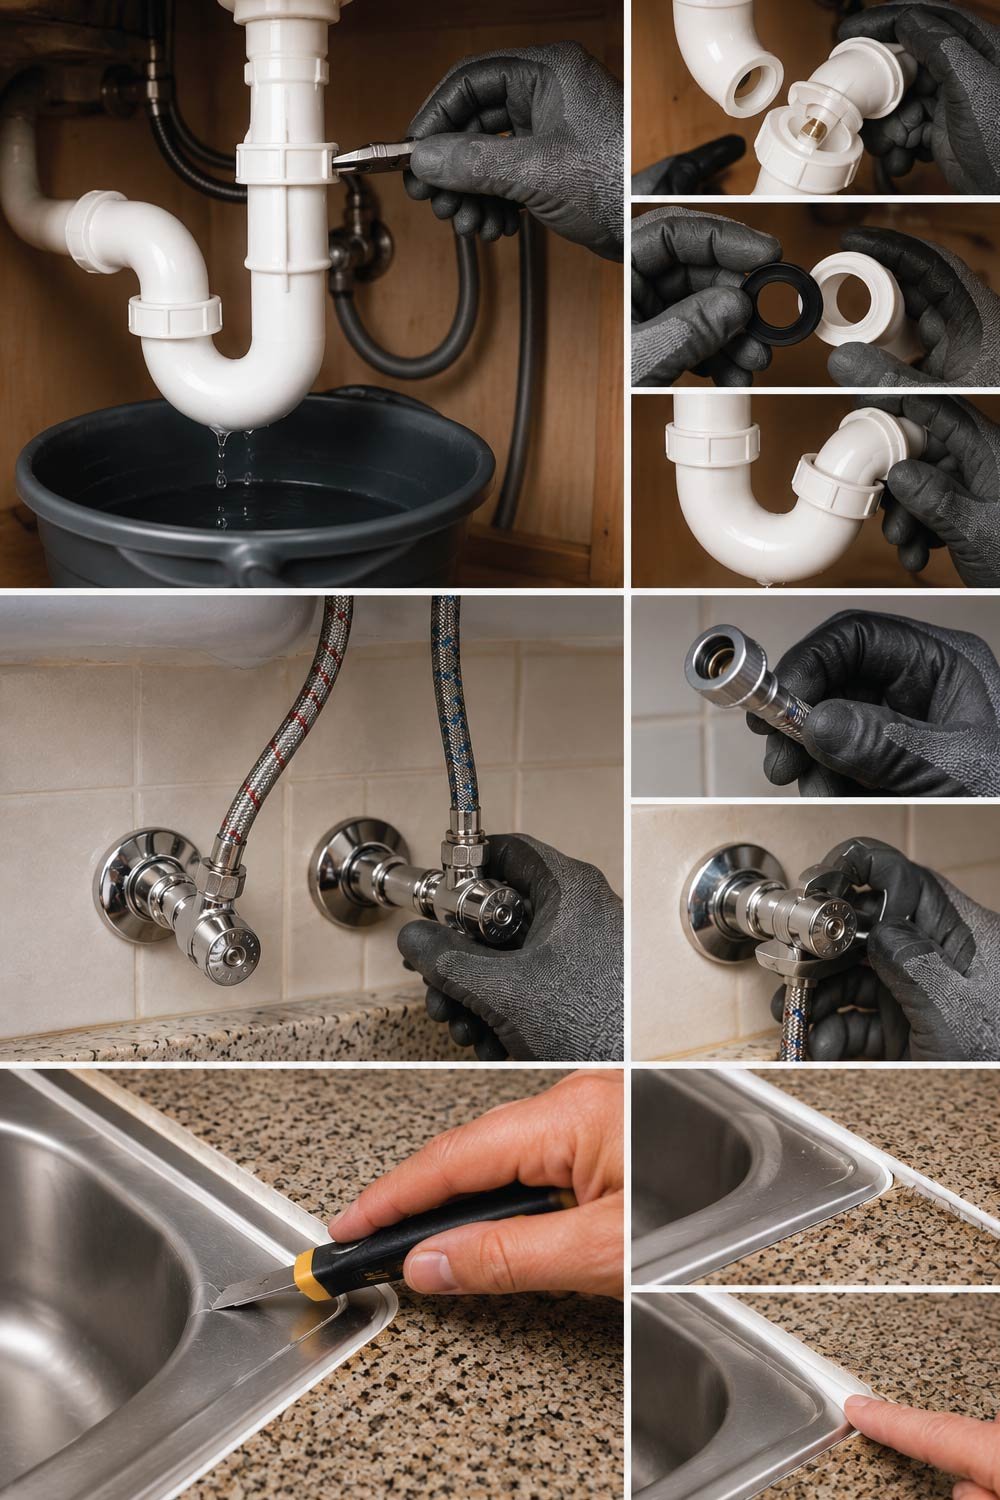
How to Fix It:
- Place a bucket underneath the trap.
- Loosen slip nuts by hand or with pliers.
- Remove the trap and inspect washers.
- Replace worn washers if necessary.
- Reassemble and hand-tighten.
- Add a slight wrench turn if needed do not overtighten.
Overtightening can crack plastic fittings.
Fix 5: Replacing Leaking Water Supply Lines
Water supply lines are under constant pressure, which makes them more likely to fail over time compared to other sink components. Because they are inexpensive and widely available, replacing them is usually the most reliable solution when leaks appear, especially in older or corroded plumbing systems.
Supply lines are inexpensive and easy to replace.
How to Fix It:
- Disconnect the old supply line from the shut-off valve and faucet.
- Install a new braided stainless steel line.
- Hand-tighten, then add a quarter turn with a wrench.
- Turn the water back on slowly and check for leaks.
Avoid reusing old supply lines they fail more often than other components.
Fix 6: Sealing a Leaking Sink Rim
Leaks around the sink rim are usually caused by deteriorated caulk that no longer forms a waterproof barrier between the sink and countertop. Over time, moisture, cleaning chemicals, and general wear break down the seal, allowing water to seep into the surrounding surfaces and potentially cause structural damage if left untreated.
If water leaks around the edge of the sink, the caulk has likely deteriorated.
How to Fix It:
- Remove old caulk using a scraper or utility knife.
- Clean and dry the area thoroughly.
- Apply a continuous bead of silicone caulk.
- Smooth with a wet finger or caulk tool.
- Allow to cure for at least 24 hours.
This fix also helps prevent countertop damage.
Also Read:
Step 4: Test Your Repair Thoroughly
Testing ensures that every repair you performed is working correctly and that no hidden leaks remain. This step is important because some leaks only appear under water pressure or after a few minutes of use. Careful inspection after reassembly helps confirm a complete and successful repair.
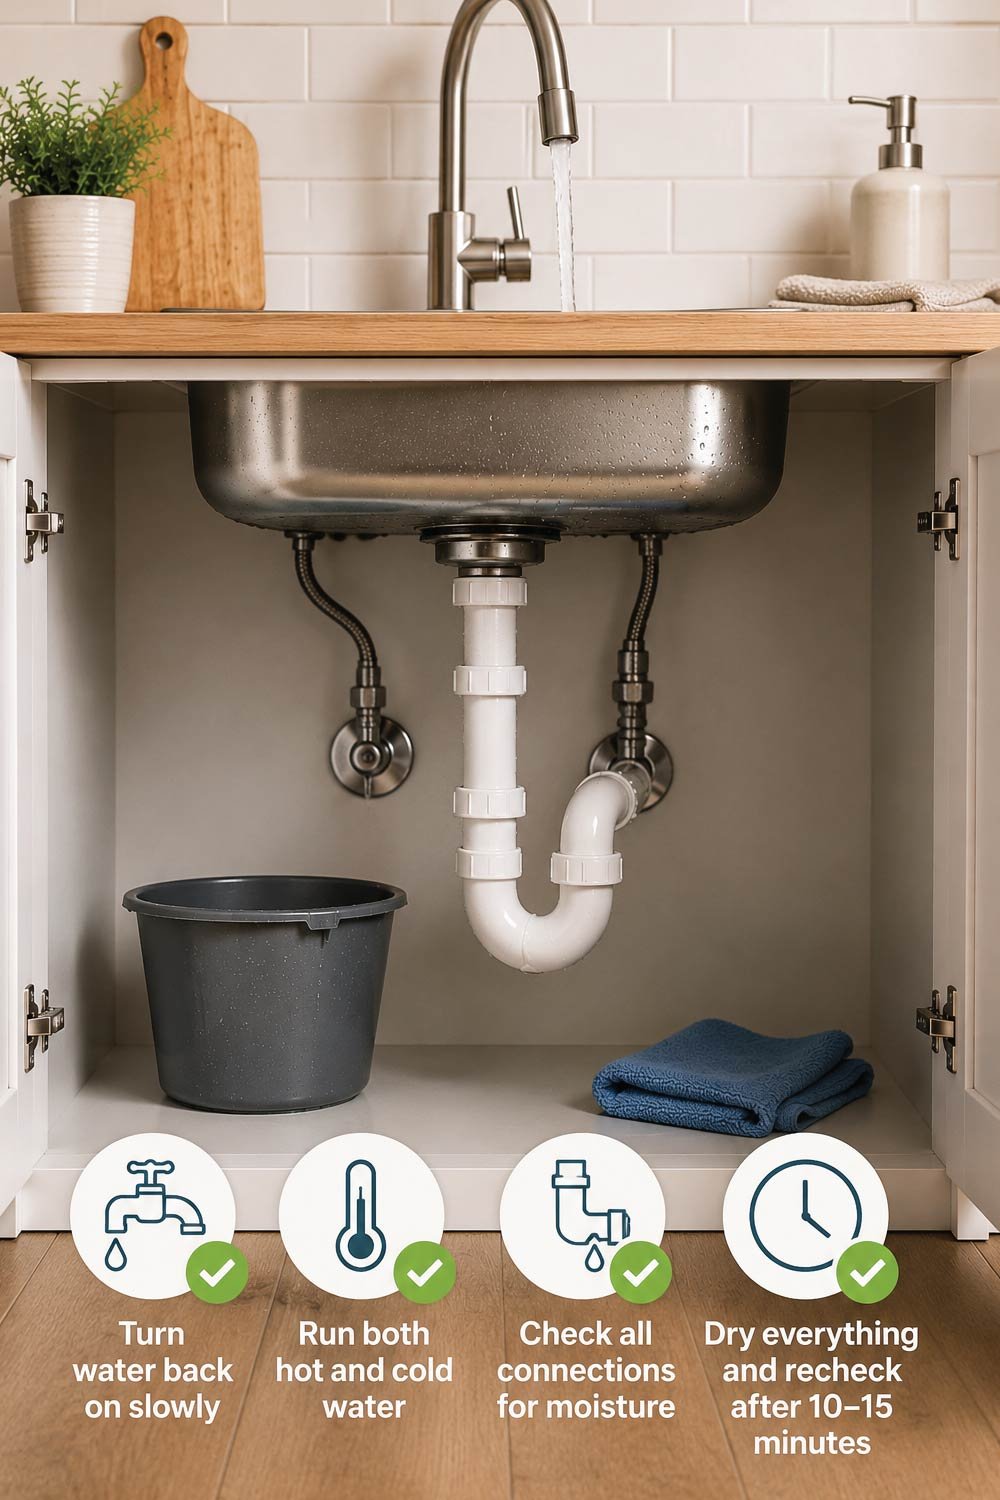
After completing any repair:
- Turn water back on slowly
- Run both hot and cold water
- Check all connections for moisture
- Dry everything and recheck after 10–15 minutes
If you see no drips or damp spots, your repair is successful.
Common Mistakes to Avoid
Many kitchen sink repairs fail not because of complexity, but because of small mistakes during installation or reassembly. Avoiding these errors ensures a longer-lasting fix and reduces the chance of repeat leaks or unnecessary damage to fittings and plumbing connections.
- Overtightening fittings (causes cracks and leaks)
- Mixing mismatched washers or parts
- Skipping plumber’s tape on threaded joints
- Ignoring small leaks that worsen over time
- Forgetting to check for leaks after reassembly
Taking your time prevents repeat repairs.
Also Read:
Bathroom Mold Problem? Remove It Fast and Stop It Coming Back
When to Call a Professional Plumber
While many sink leaks can be fixed with basic tools, some situations involve deeper plumbing issues that require professional expertise. Attempting complex repairs without experience may worsen the damage or lead to hidden leaks inside walls or cabinets.
- Persistent leaks after multiple attempts
- Corroded pipes or fittings
- Water damage inside walls or cabinets
- Leaks involving garbage disposals or dishwasher connections
Knowing your limits can save money and prevent larger issues.
Preventing Future Kitchen Sink Leaks
Preventive maintenance is the most effective way to avoid recurring sink leaks and expensive repairs. Regular inspection and timely replacement of worn parts help maintain a reliable plumbing system and reduce the risk of sudden failures or hidden water damage.
- Inspect under the sink every few months
- Tighten loose fittings early
- Replace aging supply lines proactively
- Avoid hanging heavy items on plumbing
- Clean drains regularly to prevent pressure buildup
Routine maintenance extends the life of your plumbing system.
Final Thoughts
Fixing a kitchen sink leak may seem intimidating at first, but most leaks are straightforward once you understand where they come from and how the components work together. With basic tools, careful observation, and step-by-step repairs, you can stop leaks, protect your home, and avoid unnecessary plumbing costs.
A dry cabinet, a quiet faucet, and peace of mind are well worth the effort.