

If you’ve ever felt a sudden draft near your window while sitting comfortably inside your home, you already know how annoying and costly window air leaks can be. That small stream of air might not seem like a big deal at first, but over time it can affect your comfort, increase your electricity bills, and even reduce the energy efficiency of your home.
The good news is that sealing window gaps is one of the easiest home fixes you can do yourself—no advanced tools, no professional help, and no expensive renovation required. In most cases, you can fix the problem in under an hour.
This guide will walk you through why window gaps happen, how to detect them, and the fastest and most effective ways to seal them properly so your home stays comfortable all year round.
Table of Contents
ToggleWhy Window Gaps Let Air In
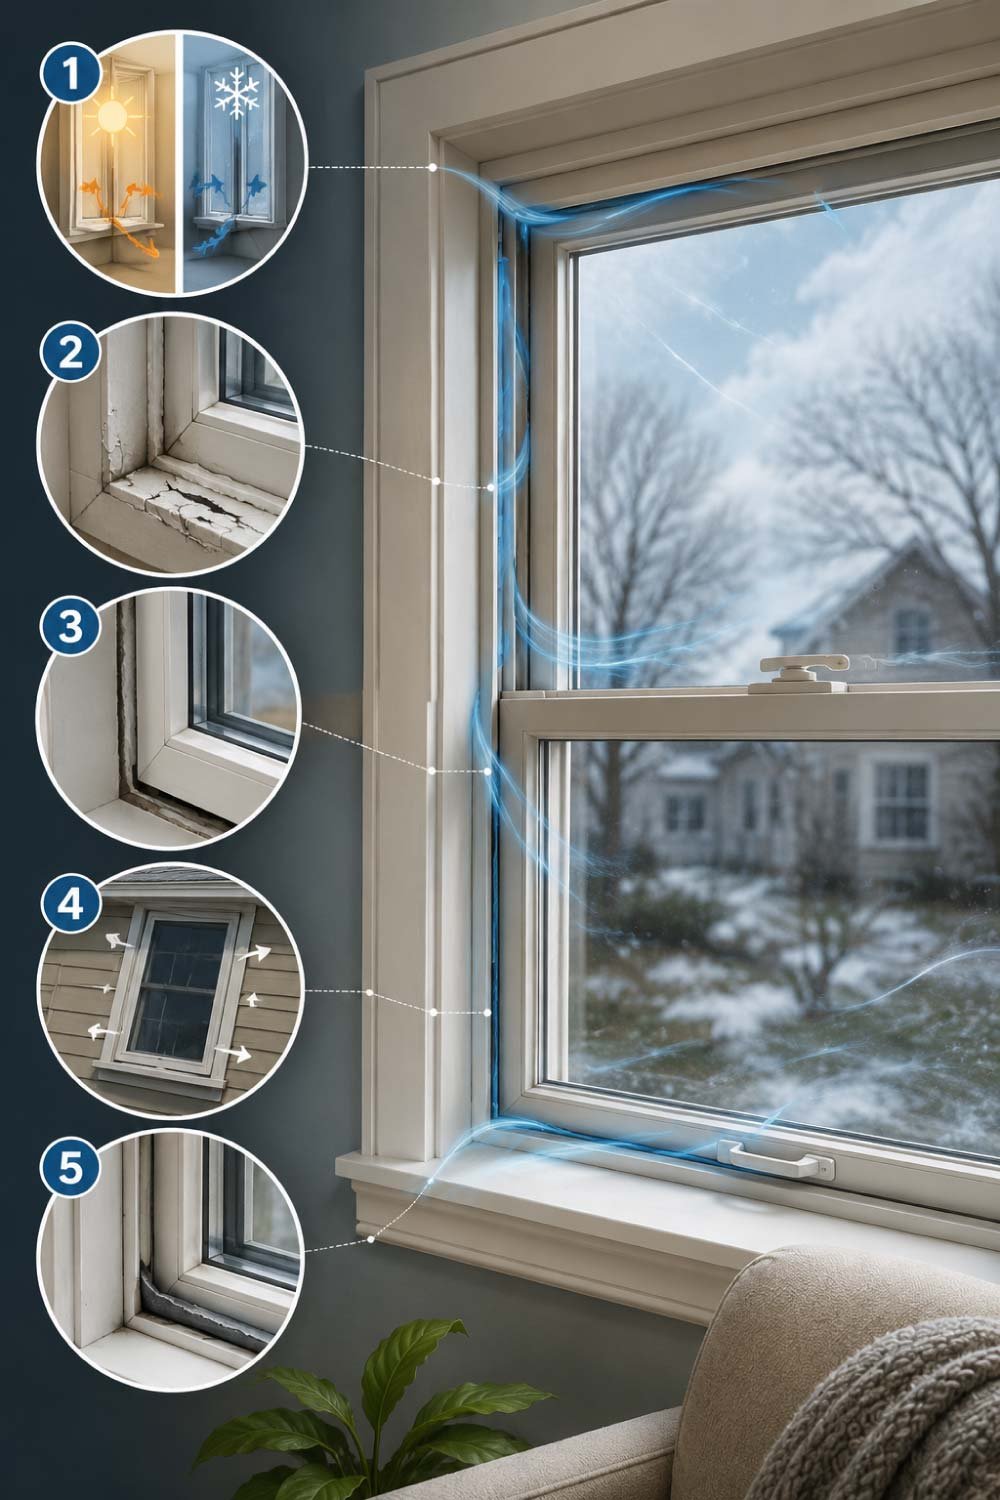
Window gaps are a very common issue in homes, even in recently built properties. These small openings often develop slowly due to structural movement, aging materials, and environmental changes. While they may look minor, they can significantly affect indoor comfort and energy efficiency over time.
Here are the main reasons:
1. Temperature Changes
Windows naturally react to changing weather conditions throughout the year. Heat causes materials to expand, while cold causes them to contract. Over time, this repeated movement weakens seals and slightly loosens the frame alignment, creating small but noticeable air gaps.
2. Old or Dried Sealant
Sealants like caulk and rubber gaskets are not permanent. With time, exposure to sunlight, dust, and moisture causes them to dry out and lose flexibility. Once they crack or peel, they stop blocking outside air effectively, allowing drafts to enter easily.
3. Poor Installation
If a window is not installed with proper alignment or sealing from the beginning, small gaps can exist around the frame. These installation flaws may not be noticeable at first, but they become more obvious as the building settles and weather exposure increases.
4. House Settling
Every building shifts slightly over time due to soil movement and structural weight distribution. This natural settling process can misalign window frames, causing small separations between the wall and frame that allow air to pass through.
5. Worn Weather Stripping
Weather stripping is designed to block air around movable window parts. However, constant opening and closing gradually wears it down. Once it becomes thin, cracked, or loose, it can no longer form a tight seal against outside air.
Even a tiny gap can let in a surprising amount of air, especially during windy or extreme weather conditions.
How to Tell If Your Windows Are Leaking Air
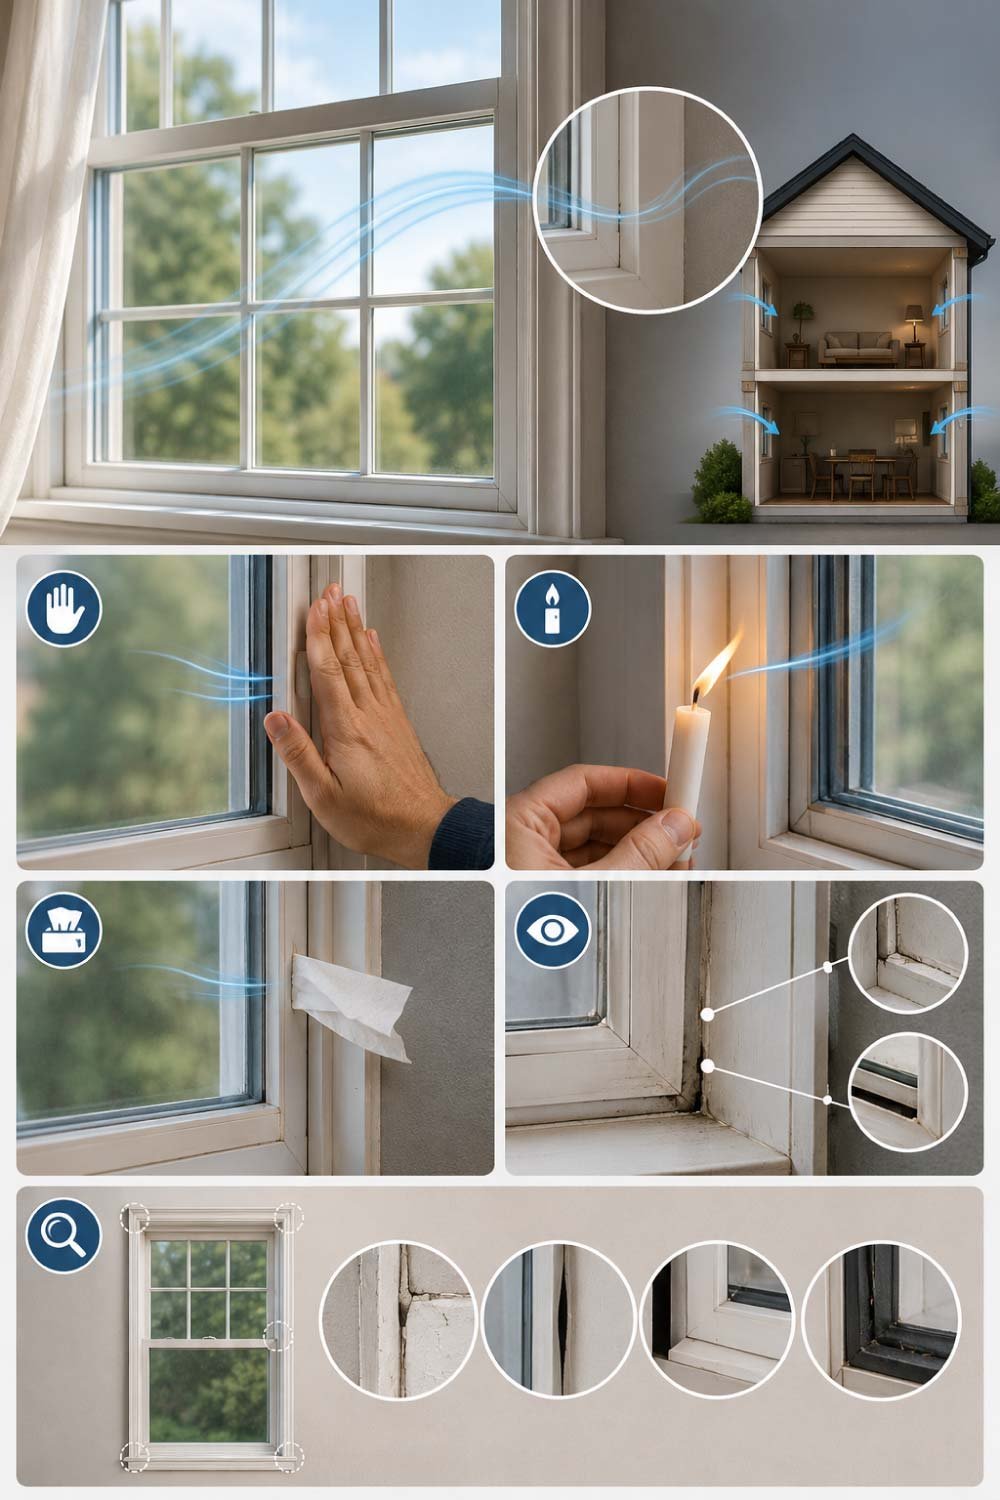
Before attempting any repairs, it’s important to identify exactly where air is entering your home. Air leaks are often subtle and not visible to the eye, so simple detection methods can help you confirm the problem areas quickly and accurately.
Here are some simple methods:
1. The Hand Test
On a windy day, slowly move your hand around the edges of the window frame. If you feel a cool or moving draft, it indicates that outside air is entering through a gap in that specific area.
2. Candle or Lighter Test
Carefully hold a lit candle near the edges of the window frame. If the flame starts flickering or bending, it means air is moving in or out through a leak nearby. This method is very effective for pinpointing small gaps.
3. Tissue Paper Test
Place a light tissue or thin paper near suspected areas of the window. If it moves without any indoor airflow or fan activity, it clearly shows that air is passing through a hidden gap.
4. Visual Inspection
Carefully examine the window frame and surrounding areas for visible signs of damage or wear.
Look closely for:
- Cracked or missing caulk around edges
- Small gaps between the frame and wall
- Loose or misaligned window panes
- Damaged rubber sealing strips
Once you locate the problem areas, you’re ready for repair.
Quick Fix Methods for Window Gaps
Once you’ve identified the air leaks, the good news is that most window gaps can be fixed without replacing the entire window. Simple sealing and insulation techniques can restore comfort, reduce drafts, and improve energy efficiency in your home.
Method 1: Silicone Caulk (Best Permanent Fix)
Silicone caulk is one of the most reliable and long-lasting solutions for sealing window gaps. It creates a flexible, airtight barrier that adapts to temperature changes without cracking or shrinking over time.
What You Need:
- Silicone sealant (clear or white)
- Caulking gun
- Utility knife or scraper
How to Apply:
- Clean the area thoroughly (remove dust, old paint, and loose material).
- Cut the nozzle of the caulk tube at a 45-degree angle for smooth application.
- Apply a steady, continuous bead along the gap.
- Smooth it using a wet finger or finishing tool for a clean seal.
- Allow it to dry completely (usually 12–24 hours).
Why It Works:
Silicone forms a strong yet flexible seal that adjusts with seasonal expansion and contraction, preventing future air leaks effectively.
Also Read:
How to Fix a Leaky Faucet: A Complete Step-by-Step Guide for Homeowners
Method 2: Weather Stripping (For Movable Windows)
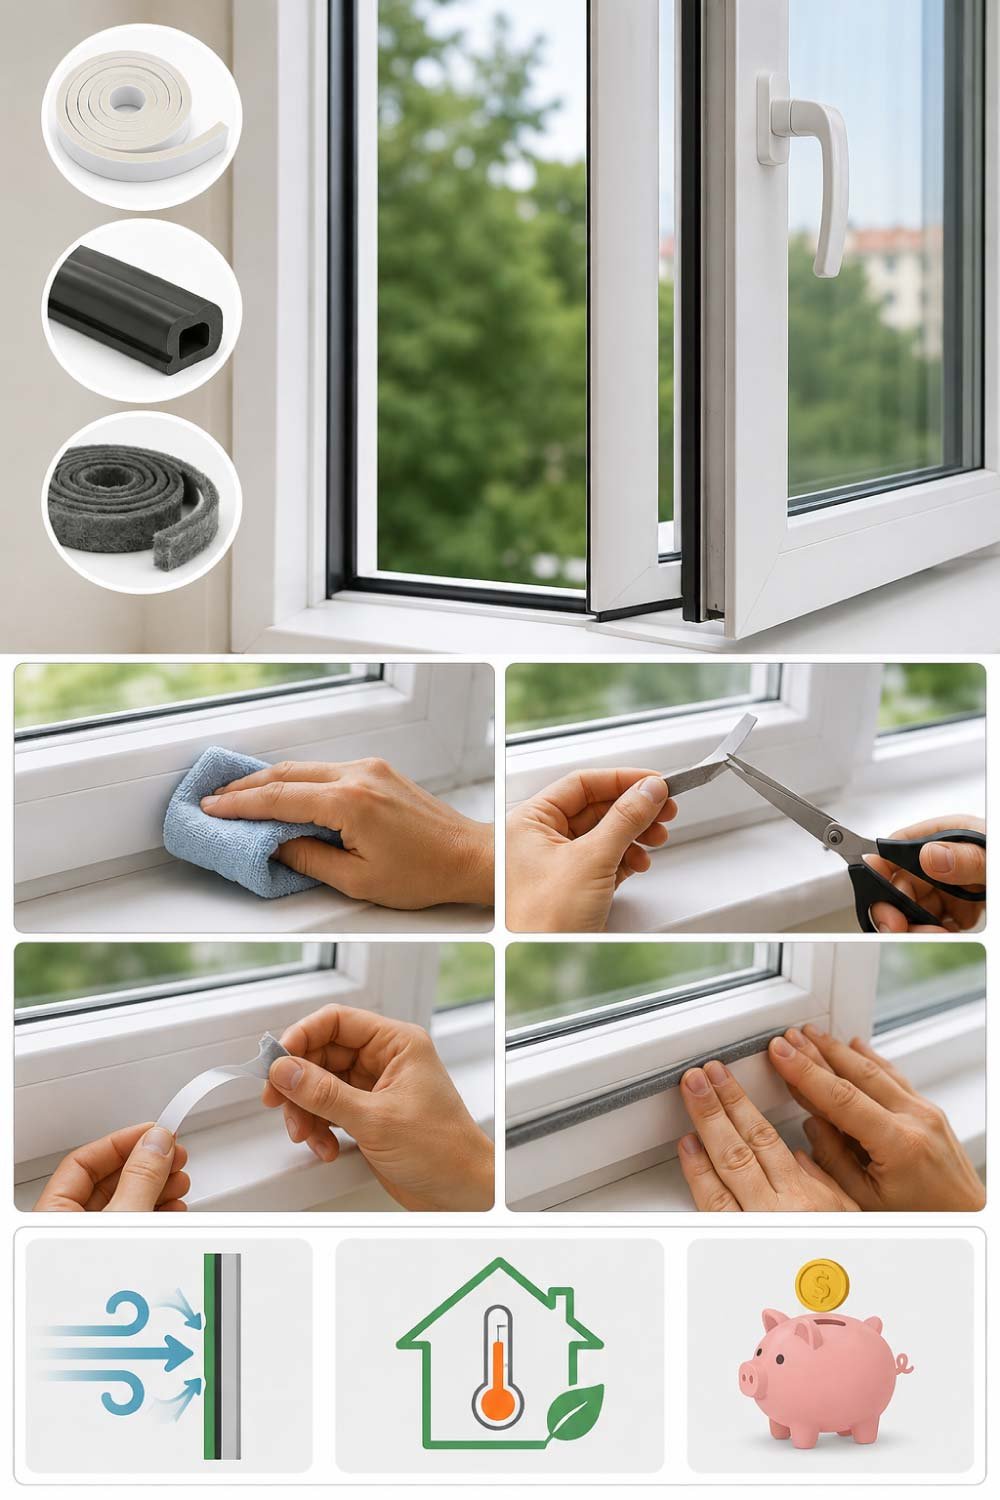
Weather stripping is ideal for windows that open and close frequently. It seals the gaps around movable parts and helps stop air leakage instantly without affecting window operation.
Types:
- Foam tape
- Rubber strips
- Felt strips
How to Install:
- Clean the edges of the window frame properly.
- Measure the required length and cut the strip accordingly.
- Peel off the adhesive backing carefully.
- Press firmly along the edges for a secure fit.
Benefits:
- Blocks air instantly and improves insulation
- Very affordable and easy to install
- Works well for sliding, casement, and hinged windows
Method 3: Foam Sealant for Large Gaps
When window gaps are too large for caulk or weather stripping, expanding foam sealant becomes the most effective solution. It is designed to fill deep cracks and irregular spaces where air leakage is significant. Once applied, it expands to fill every corner, creating a strong insulating barrier that blocks drafts and improves energy efficiency.
Steps:
- Shake the foam can well before use
- Insert the nozzle deep into the gap
- Spray lightly, as the foam expands significantly
- Allow it to expand and fully dry
- Trim excess foam once hardened
- Cover with paint or sealant for a neat finish
Best For:
- Deep and wide gaps
- Construction or installation flaws
- Older buildings with structural movement issues
Also Read:
Method 4: Acrylic Caulk (Paintable Option)
Acrylic caulk is a practical choice for indoor window gaps where appearance matters. Unlike silicone, it can be painted over, making it ideal for walls and frames that need a seamless finish. It works best for small cracks and minor air leaks while blending smoothly with interior paint.
Advantages:
- Can be painted after drying
- Easy to apply and clean
- Suitable for small cracks and finishing work
Application:
- Apply in the same way as silicone caulk
- Smooth the bead evenly along the gap
- Allow it to dry fully before painting over it
This method is especially useful when you want repairs to remain visually invisible.
Also Read:
Method 5: Temporary Fix (Plastic Film or Tape)
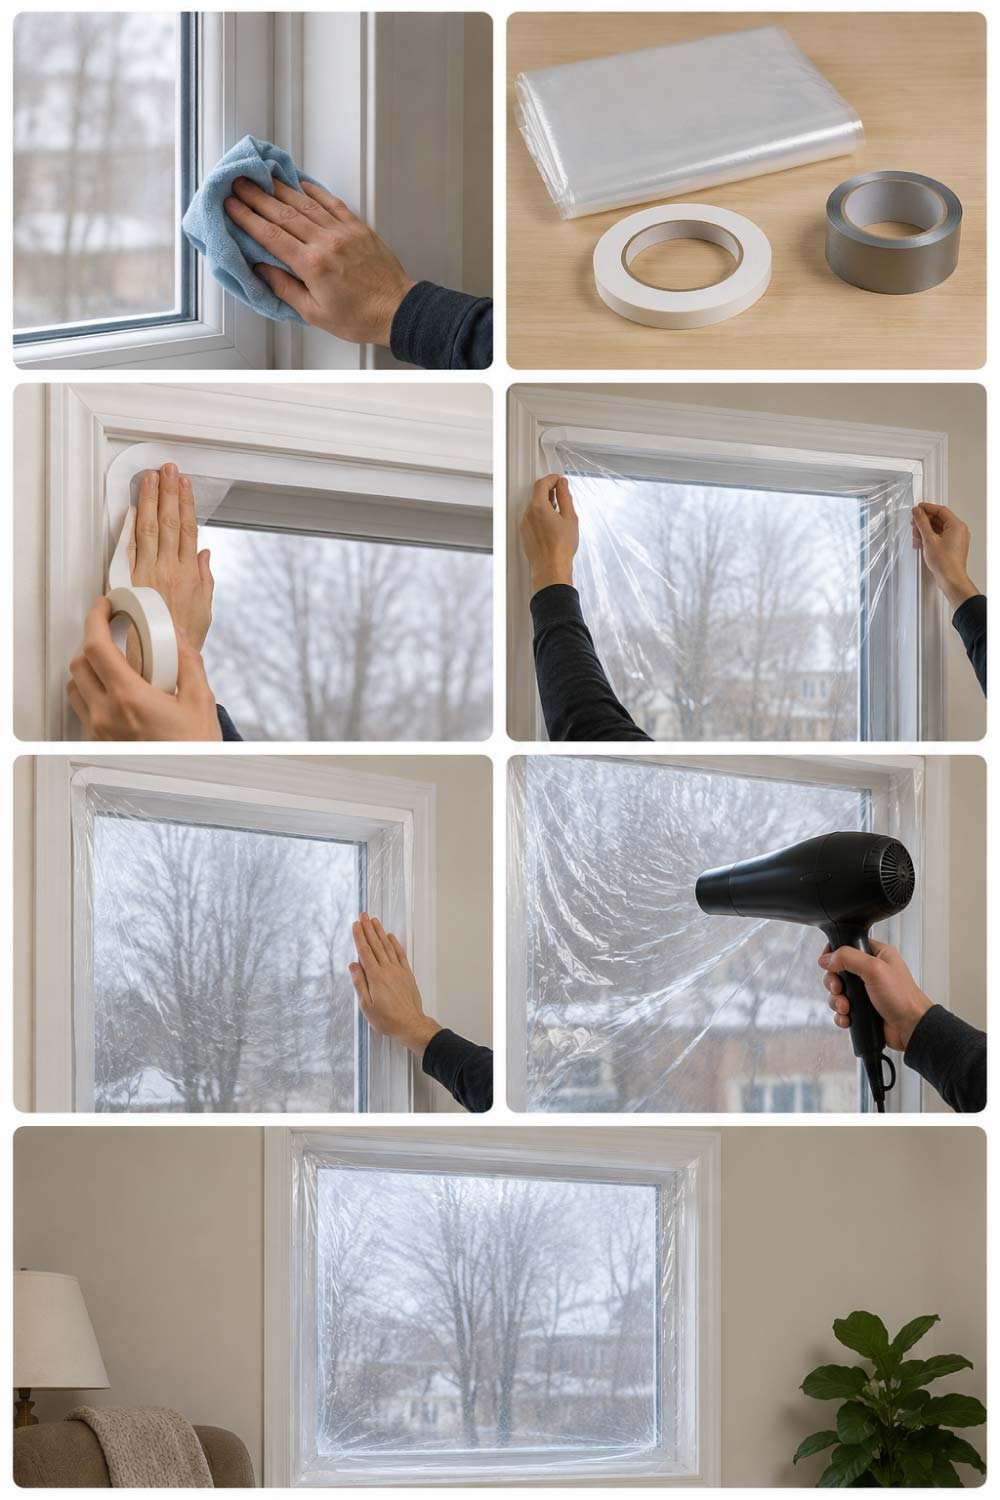
For quick seasonal protection, especially during winter, a temporary sealing method can be very helpful. It is not a permanent solution but works well for reducing drafts and keeping indoor temperatures stable for short periods.
What You Need:
- Window sealing plastic film kit OR
- Heavy-duty insulation tape
Steps:
- Clean the window frame thoroughly
- Apply double-sided tape around the edges
- Carefully stick the plastic film over the frame
- Use a hairdryer to shrink and tighten the film for a sealed finish
Note:
This method is best for temporary insulation and should be replaced with a permanent fix when possible.
Also Read:
Common Mistakes to Avoid
Many window sealing efforts fail not because of bad materials, but because of simple application mistakes. Avoiding these errors ensures your repairs last longer and perform better.
1. Not Cleaning the Surface
Dust, oil, or moisture prevents sealants from bonding properly. Always clean and dry the surface before applying any material.
2. Using the Wrong Sealant
Different gaps require different materials. Using indoor sealant outdoors or rigid materials on flexible joints can lead to early failure.
3. Leaving Old Caulk Behind
Old, cracked caulk should always be removed. New sealant won’t stick properly over damaged layers.
4. Overfilling Gaps
Excess foam or caulk creates uneven surfaces and may weaken adhesion instead of improving it.
5. Ignoring Small Cracks
Even tiny openings can allow continuous air leakage over time, increasing energy loss and discomfort.
Benefits of Sealing Window Gaps
Properly sealing window gaps improves more than just insulation. It enhances overall home comfort, efficiency, and protection in multiple ways.
1. Lower Energy Bills
Sealed windows reduce heat loss in winter and keep cool air inside during summer, helping your HVAC system run more efficiently.
2. Better Comfort
No more annoying cold drafts or uneven room temperatures, making your living space more comfortable year-round.
3. Reduced Dust and Noise
Well-sealed windows block outdoor dust, pollution, and noise, improving indoor air quality and peace.
4. Improved Home Value
Maintained and properly sealed windows contribute to better property condition and long-term value.
5. Moisture Protection
Good sealing prevents rainwater seepage, reducing the risk of dampness, mold, and wall damage.
Also Read:
How Often Should You Check Windows?

Regular inspection is key to preventing small issues from turning into costly repairs. Window seals naturally wear down over time due to weather and usage, so routine checks help maintain efficiency and comfort.
It’s a good idea to inspect your windows at least:
- Once before winter
- Once before summer
- After heavy rain or storms
Regular maintenance helps you catch small issues before they become expensive repairs.
Final Thoughts
Window gaps may seem like a small inconvenience, but they can quietly affect your comfort, energy usage, and overall home environment. The good news is that fixing them is simple, affordable, and completely doable without professional help.
Whether you use silicone caulk for a permanent seal, weather stripping for movable parts, or foam for larger gaps, each method can significantly improve your home’s insulation.
A few minutes of repair work today can save you money and discomfort for years to come. If you’ve been feeling unwanted drafts lately, now is the perfect time to take action and seal those gaps fast.
Also Read: