

A damaged wall can make even a clean and well-decorated room look old and neglected. Cracks, holes, peeling paint, damp patches, and uneven surfaces are common problems in homes, especially in older buildings or places exposed to moisture and daily wear. The good news is that most wall damage can be repaired and painted over without hiring a professional if you follow the right process.
This guide will walk you through everything you need to know about repairing and painting a damaged wall, from identifying the type of damage to applying the final coat of paint. Whether you are refreshing a bedroom, living room, or office space, these steps will help you achieve a smooth, professional-looking finish.
1. Understanding the Type of Wall Damage
Before starting any painting work, it is essential to identify the exact type of wall damage. Different issues require different repair techniques, and proper identification ensures long-lasting results without recurring problems after painting.
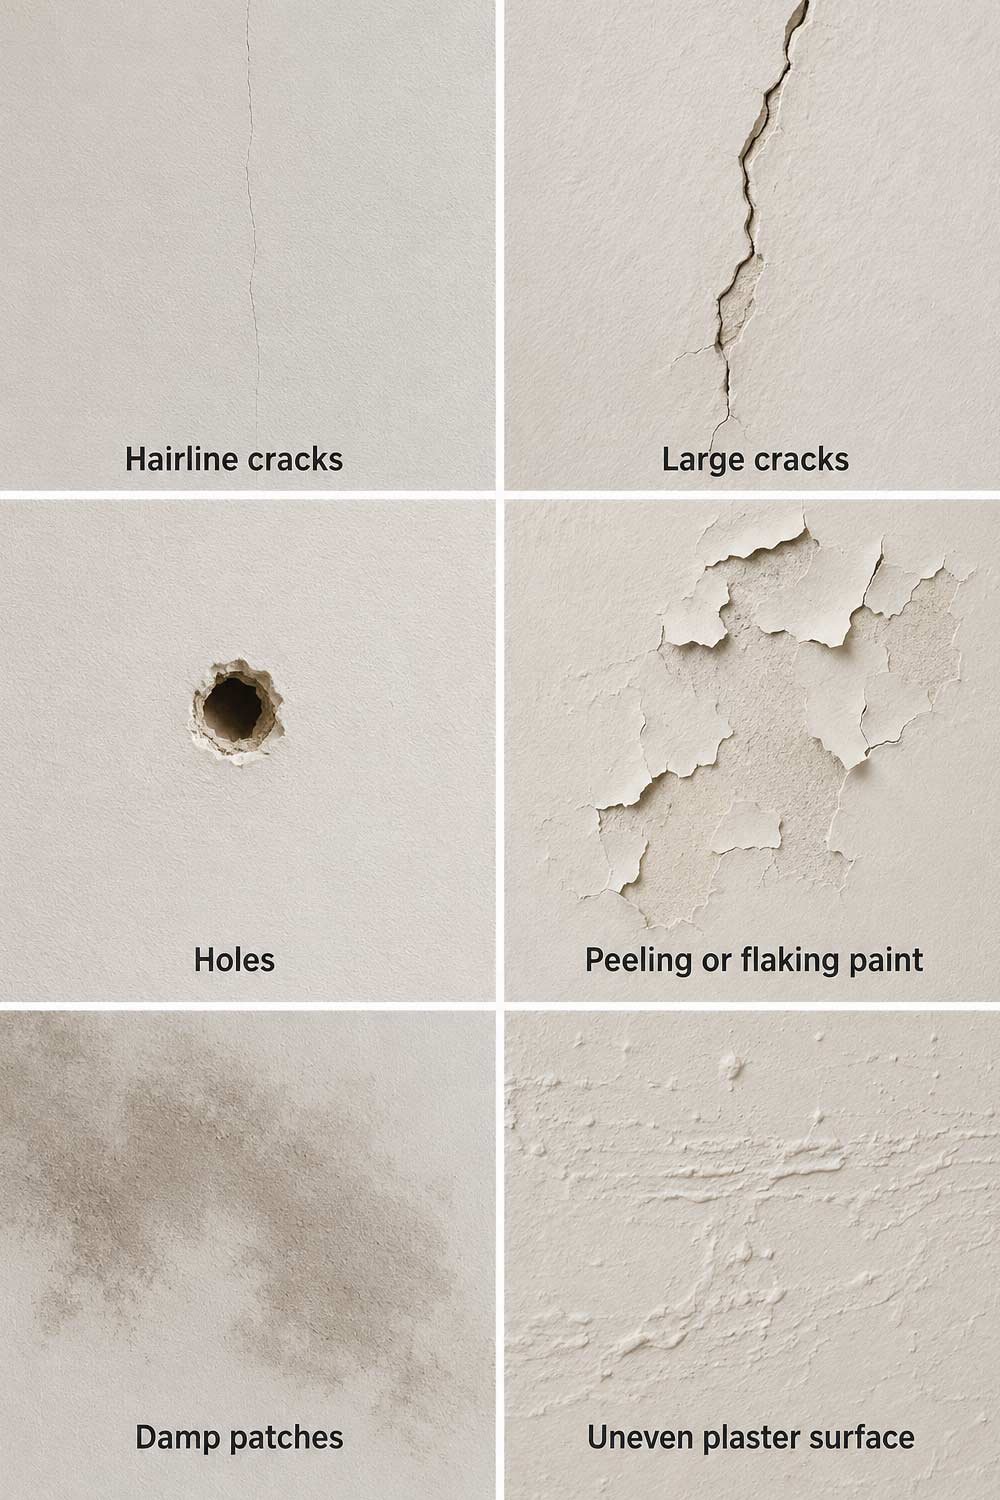
Common Types of Wall Damage
Recognizing these common issues helps you choose the right repair method and avoid future paint failure.
- Hairline cracks: Small, thin cracks often caused by natural settling of the building.
- Large cracks: Deeper structural cracks that may need more filling and reinforcement.
- Holes: Usually caused by nails, screws, or accidental impact.
- Peeling or flaking paint: Often caused by moisture or poor surface preparation.
- Damp patches: Indicate water leakage or humidity issues.
- Uneven plaster surface: Old or poorly finished walls may have bumps or dips.
Identifying the issue correctly ensures that your repair work lasts longer and doesn’t reappear under the new paint.
2. Tools and Materials You Will Need
Having the right tools and materials ready before starting makes the entire process more efficient. It helps avoid interruptions and ensures a smoother workflow from preparation to final painting.
Basic Tools
These tools are essential for surface preparation and paint application. Using the correct tools ensures better results and less effort.
- Putty knife or scraper
- Sandpaper (medium and fine grit)
- Paint roller and brush
- Paint tray
- Cleaning cloth or sponge
- Dust mask
Repair Materials
Proper repair materials ensure that cracks, holes, and damaged surfaces are fixed effectively before painting begins.
- Wall filler or putty (for cracks and holes)
- Primer (important for damaged areas)
- Wall paint (interior emulsion or acrylic)
- Waterproof sealant (if dealing with damp areas)
Having everything ready will make the process smoother and faster.
3. Preparing the Wall Surface
Preparation is the most critical stage of painting a damaged wall. A properly prepared surface ensures that the paint adheres well and provides a smooth, long-lasting finish.
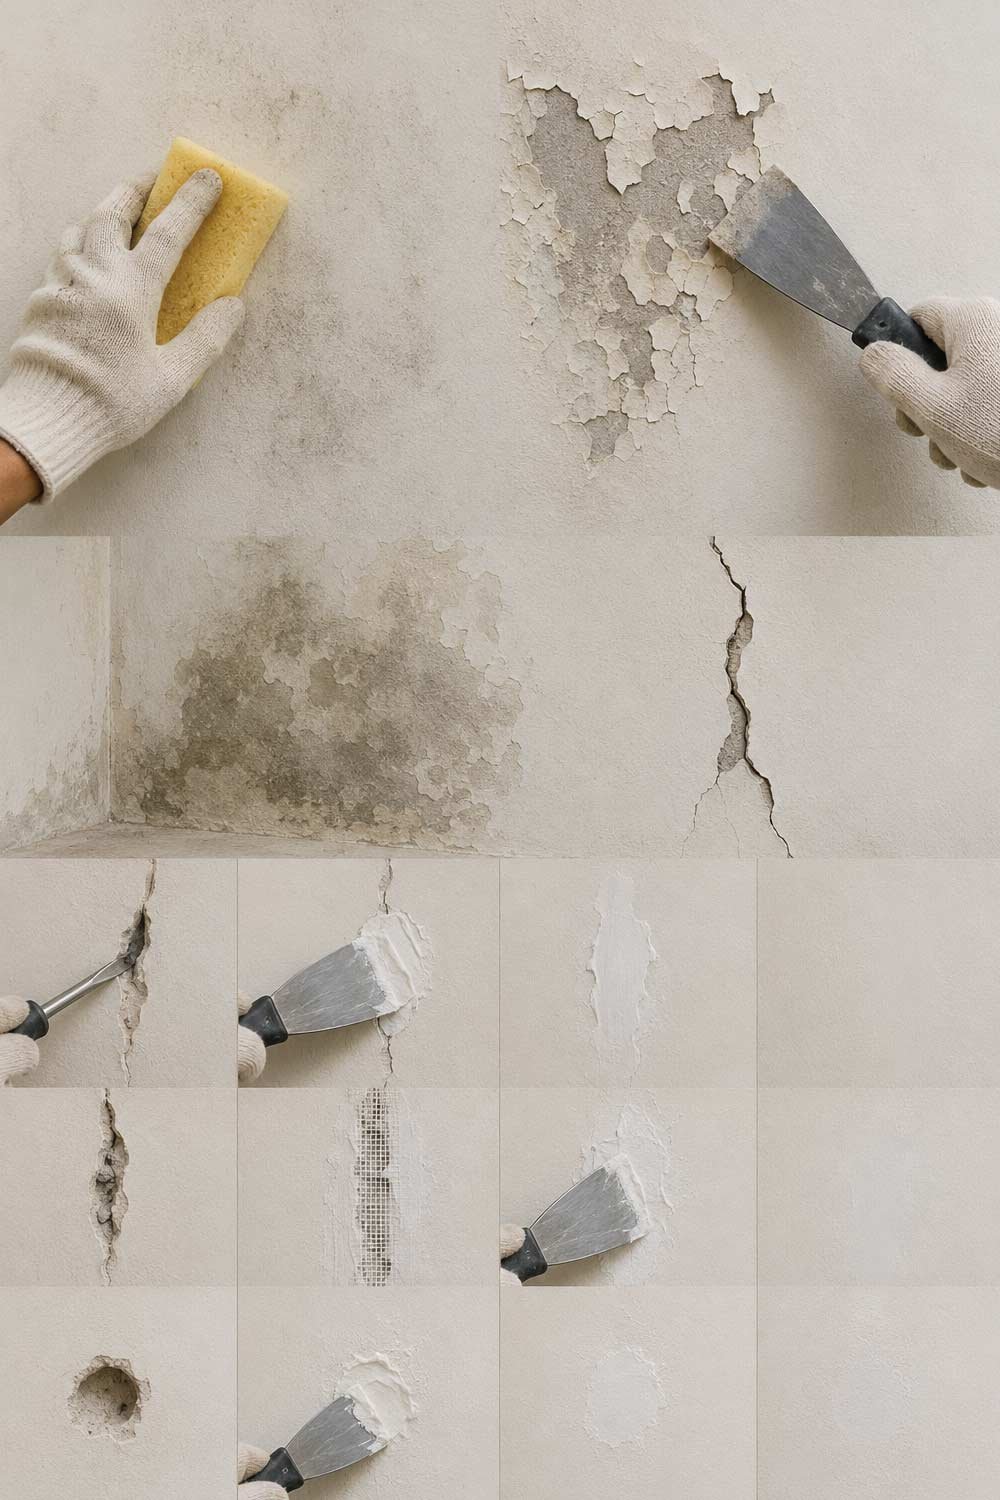
Step 1: Clean the Wall
Cleaning removes dust and grease that can prevent paint from sticking properly. A clean surface is essential for strong adhesion.
Start by removing dust, dirt, and grease. Use a damp sponge or cloth with mild soap if necessary. Let the wall dry completely before moving forward.
Step 2: Remove Loose Paint and Debris
Removing weak or peeling layers ensures that the new paint sits on a solid base. Skipping this step can cause peeling later.
Use a scraper or putty knife to remove any flaking paint or loose plaster. Do not leave anything that is weakly attached, as it will ruin the final finish.
Step 3: Check for Moisture
Moisture problems must be resolved before painting. Ignoring dampness will lead to paint failure and repeated repairs.
If you notice damp patches, fix the source of moisture first. Painting over damp walls will cause the paint to peel again quickly.
4. Repairing Cracks and Holes
After cleaning and preparing the surface, repairing all visible damage ensures a smooth base for painting. Proper filling prevents cracks and holes from reappearing.
For Small Cracks
Small cracks require proper filling to prevent them from expanding over time. Careful application ensures a seamless finish.
- Widen the crack slightly using a scraper so filler can go deeper.
- Apply wall filler using a putty knife.
- Press the filler firmly into the crack.
- Smooth the surface and let it dry.
For Larger Cracks
Larger cracks need more attention and sometimes reinforcement to ensure durability and strength.
- Clean out all loose material.
- Apply filler in layers if the crack is deep.
- You may need mesh tape for extra strength.
- Allow proper drying time between layers.
For Holes
Filling holes properly prevents weak spots and ensures an even wall surface before painting.
- Remove dust inside the hole.
- Fill with wall putty using a putty knife.
- Press firmly to avoid air gaps.
- Level the surface with surrounding wall.
After repairs, allow at least 6–12 hours (or as recommended on the filler product) for drying.
Also Read:
Home Water Leak Detection: How to Find Hidden Leaks Before They Cause Serious Damage
5. Sanding the Surface
Sanding is essential to achieve a smooth and professional-looking finish. It helps blend repaired areas with the rest of the wall, ensuring uniform paint application.
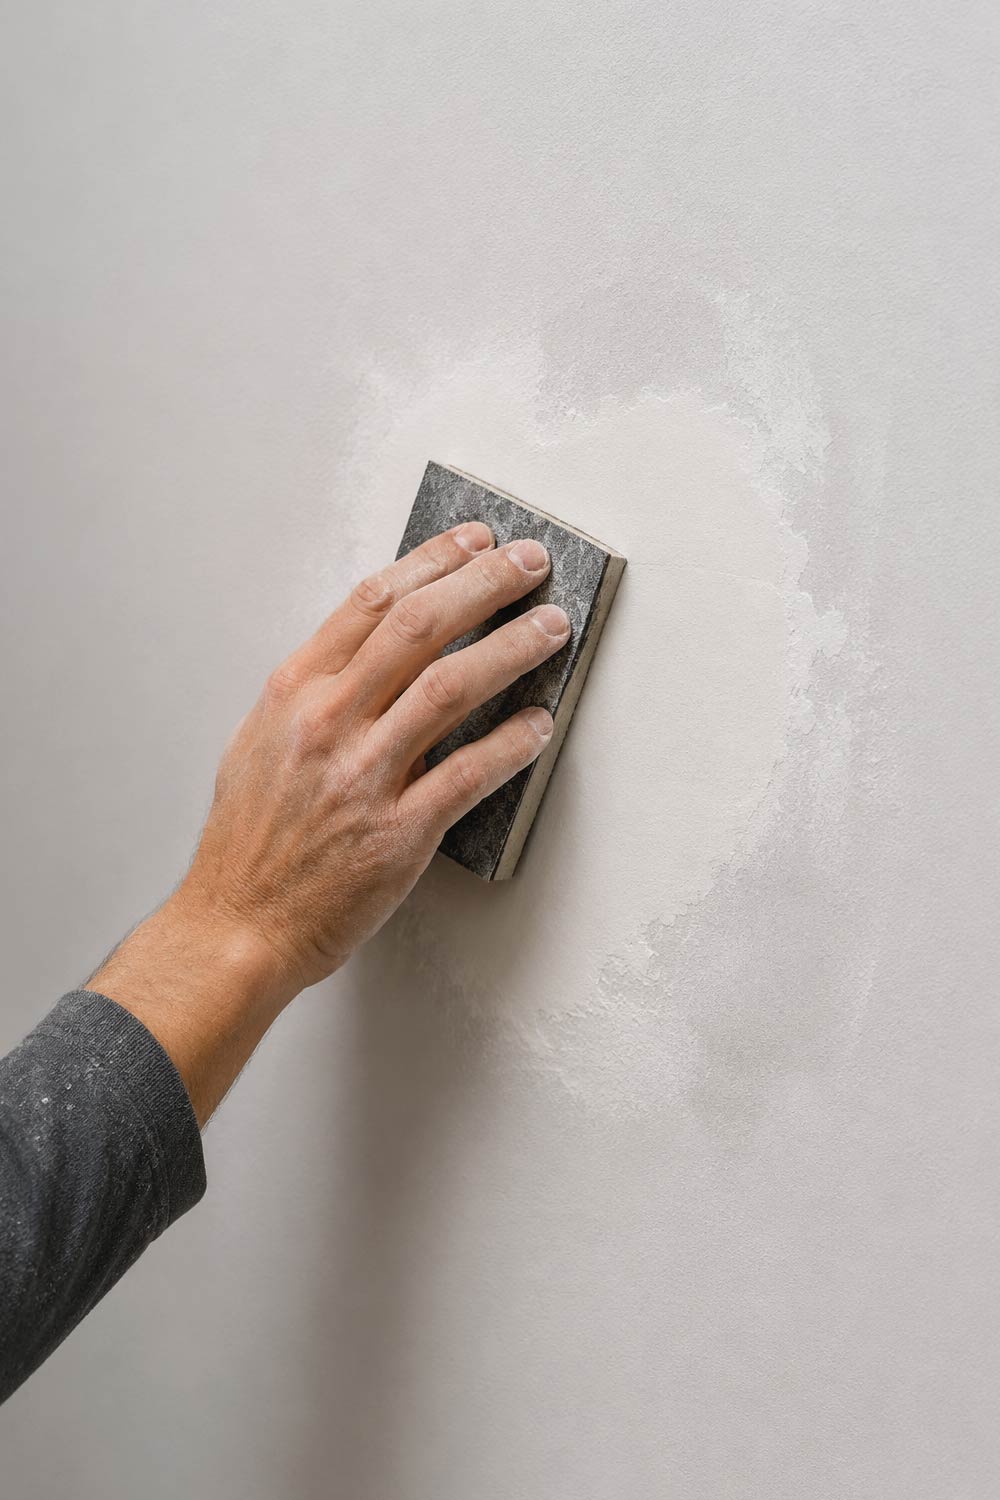
Sanding Steps
A proper sanding process removes unevenness and prepares the surface for painting. It also improves paint adhesion and final appearance.
- Use medium-grit sandpaper first to level the repaired areas.
- Follow with fine-grit sandpaper for a smooth surface.
- Make sure edges blend into the surrounding wall.
- Wipe off all dust with a clean cloth.
A properly sanded wall ensures that paint spreads evenly without visible patches.
6. Applying Primer
Primer plays a crucial role in preparing the wall for painting, especially when dealing with repaired or damaged surfaces. Skipping this step can lead to uneven paint and reduced durability over time.
Why Primer Is Important
Primer creates a uniform base that helps paint adhere better and last longer. It also ensures that repaired areas blend seamlessly with the rest of the wall.
- Seals repaired areas
- Improves paint adhesion
- Prevents uneven color absorption
- Increases paint durability
Apply a thin, even coat of primer using a roller or brush. Focus more on repaired areas, but cover the entire wall for best results. Let it dry completely before painting.
Also Read:
Sink Trap Cleaning Guide: How to Clean a P-Trap and Fix Slow Drains
7. Choosing the Right Paint
Selecting the right paint type is essential for achieving a clean and professional finish. The finish you choose affects both the appearance and maintenance of the wall.
Common Options
Different finishes offer different benefits. Choosing the right one depends on the condition of your wall and the desired look.
- Matte finish: Good for hiding imperfections
- Satin finish: Slight sheen, easier to clean
- Gloss finish: Very shiny, highlights wall flaws (not ideal for damaged walls)
For damaged walls, matte or low-sheen paints are usually best because they help conceal minor imperfections.
8. Painting the Wall
Painting is the final step where all your preparation comes together. A proper technique ensures even coverage and a smooth, professional appearance.

Step 1: Cut in the Edges
Start by painting areas that are difficult to reach with a roller. This ensures clean edges and a neat finish.
Use a brush to paint corners, edges, and areas near the ceiling and floor.
Step 2: Use a Roller for Large Areas
Using a roller helps cover large surfaces evenly and efficiently. Proper technique prevents streaks and uneven patches.
- Dip roller into paint evenly
- Apply in “W” or “M” patterns
- Spread paint uniformly without overloading
Step 3: Apply Multiple Coats
Applying more than one coat ensures full coverage and a rich, consistent color across the wall.
- First coat may look uneven—this is normal
- Allow it to dry completely
- Apply a second coat for full coverage
If the wall was heavily damaged, a third coat may be needed for a perfect finish.
Also Read:
Emergency Plumbing Fixes: What to Do When Water Problems Strike
9. Drying and Finishing Touches
Allowing proper drying time is essential for a durable and smooth finish. Rushing this step can damage the paint and ruin your hard work.
After Painting
Careful inspection and patience ensure the final result looks clean and professional.
- Allow the wall to dry for at least 24 hours
- Avoid touching or placing furniture against it too soon
- Check for missed spots or uneven areas
If needed, do minor touch-ups with a small brush.
10. Common Mistakes to Avoid
Avoiding common mistakes can make a big difference in the quality of your paint job. Many issues arise from skipping steps or rushing the process.
Mistakes to Watch
Being mindful of these errors helps ensure a long-lasting and visually appealing finish.
- Skipping wall preparation
Painting over dirt or loose paint leads to peeling.
- Not using primer
Without primer, repaired areas may show through the paint.
- Painting over damp walls
This traps moisture and damages the paint layer.
- Applying thick coats
Thick paint layers take longer to dry and may drip or crack.
- Not sanding properly
Rough surfaces will always show under paint.
Also Read:
How to Fix a Slow Draining Sink: Simple DIY Methods That Actually Work
11. Tips for a Professional Finish
Achieving a professional-quality finish requires attention to detail and proper technique. Small improvements in your approach can significantly enhance the final result.
Pro Tips
Following these practical tips helps you achieve a smooth, clean, and durable paint finish.
- Always work in good lighting so you can see imperfections
- Use high-quality brushes and rollers
- Stir paint thoroughly before use
- Protect floors and furniture with plastic sheets
- Maintain consistent pressure while rolling paint
Small details make a big difference in the final look.
Also Read:
Conclusion
Painting a damaged wall is not just about applying new color—it is about restoring the surface properly so the finish lasts for years. By carefully cleaning, repairing cracks and holes, sanding, priming, and then painting with patience, you can transform even the most worn-out wall into a smooth and attractive surface.
The key is not rushing the process. Each step builds on the previous one, and skipping even a small part can affect the final result. With the right approach, tools, and a little effort, you can achieve a professional-quality finish on your own without hiring expensive labor.
If done correctly, your newly painted wall will not only look fresh but also stay durable and resistant to future damage.