
Plumbing problems are an unavoidable part of homeownership. A dripping faucet, clogged drain, or running toilet can quickly turn into a frustrating situation especially if it happens outside business hours. While major plumbing failures require professional help, many common plumbing repairs can be handled safely and effectively at home with basic tools and a little knowledge.
This DIY plumbing repair guide is designed for homeowners and beginners who want to fix everyday plumbing issues, save money, and gain confidence in maintaining their homes. You’ll learn how household plumbing works, what tools you need, how to repair common problems step by step, and how to prevent future issues.
Understanding Basic Home Plumbing Systems
Understanding how home plumbing works is important before attempting any repair, because it helps you identify issues correctly and avoid unnecessary damage. Most residential plumbing is divided into two connected systems that manage water supply and wastewater removal, and each operates differently, requiring a basic awareness to troubleshoot effectively and safely.
Water Supply System
Water Supply System: This system delivers clean pressurized water to home fixtures through a network of pipes and valves, ensuring consistent flow to sinks, toilets, and appliances whenever needed.
- Main water shut-off valve
- Hot and cold water supply lines
- Shut-off valves under sinks, toilets, and appliances
Any leak or problem here usually involves pressurized water.
Drainage System
Drainage System: This system removes wastewater from the home using gravity-fed pipes, traps, and vents, helping maintain hygiene by carrying used water away efficiently and preventing sewer gases from entering living spaces.
- Drain pipes
- P-traps (curved pipes under sinks)
- Vent pipes
Drain problems are usually caused by blockages or buildup rather than pressure.
Knowing which system you’re dealing with makes diagnosing problems much easier.
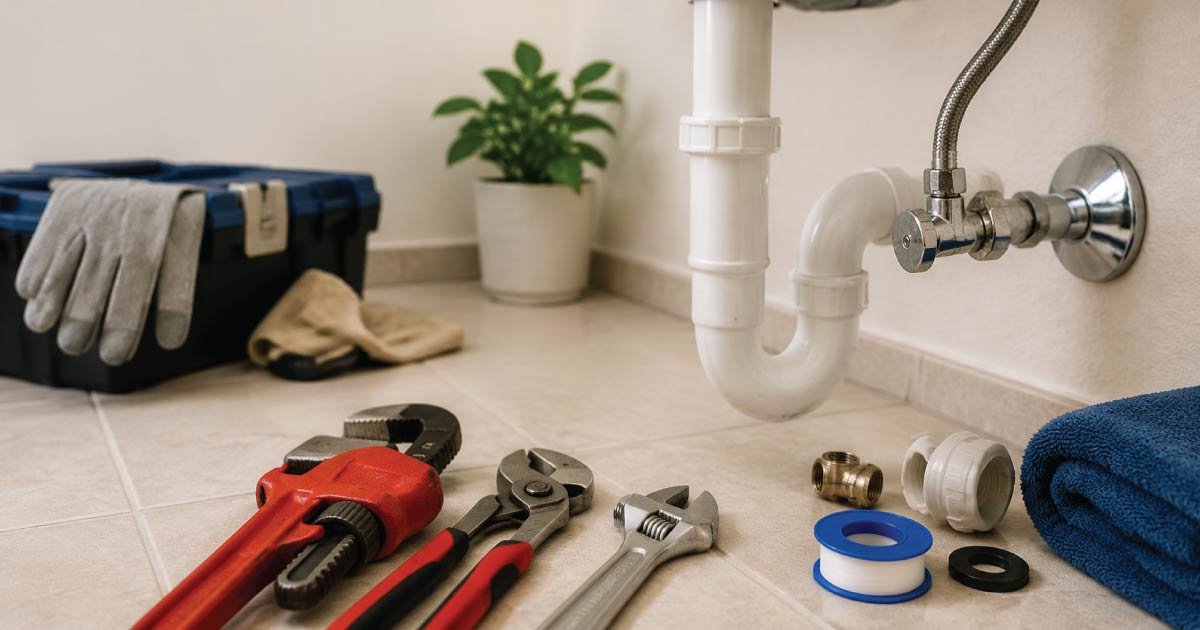
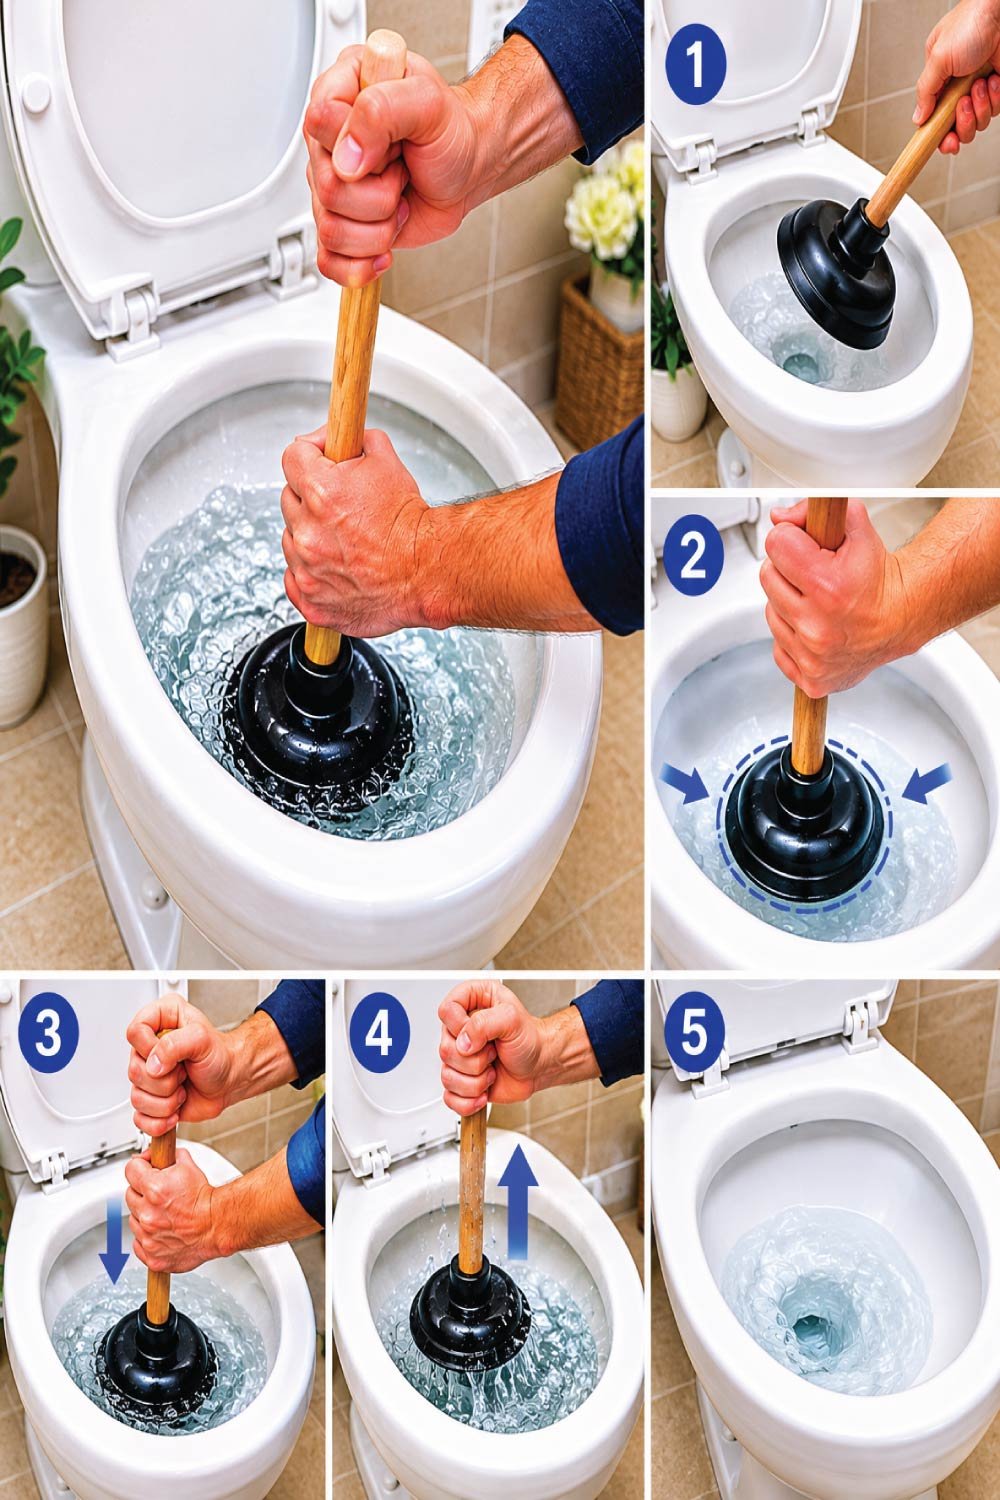
Essential Tools for DIY Plumbing Repair at Home
Having the right tools makes DIY plumbing repairs much easier and safer, even for beginners. Most common household plumbing issues can be fixed with a small, affordable toolkit that includes basic hand tools and simple accessories. With proper preparation, you can handle leaks, clogs, and minor repairs without calling a professional.
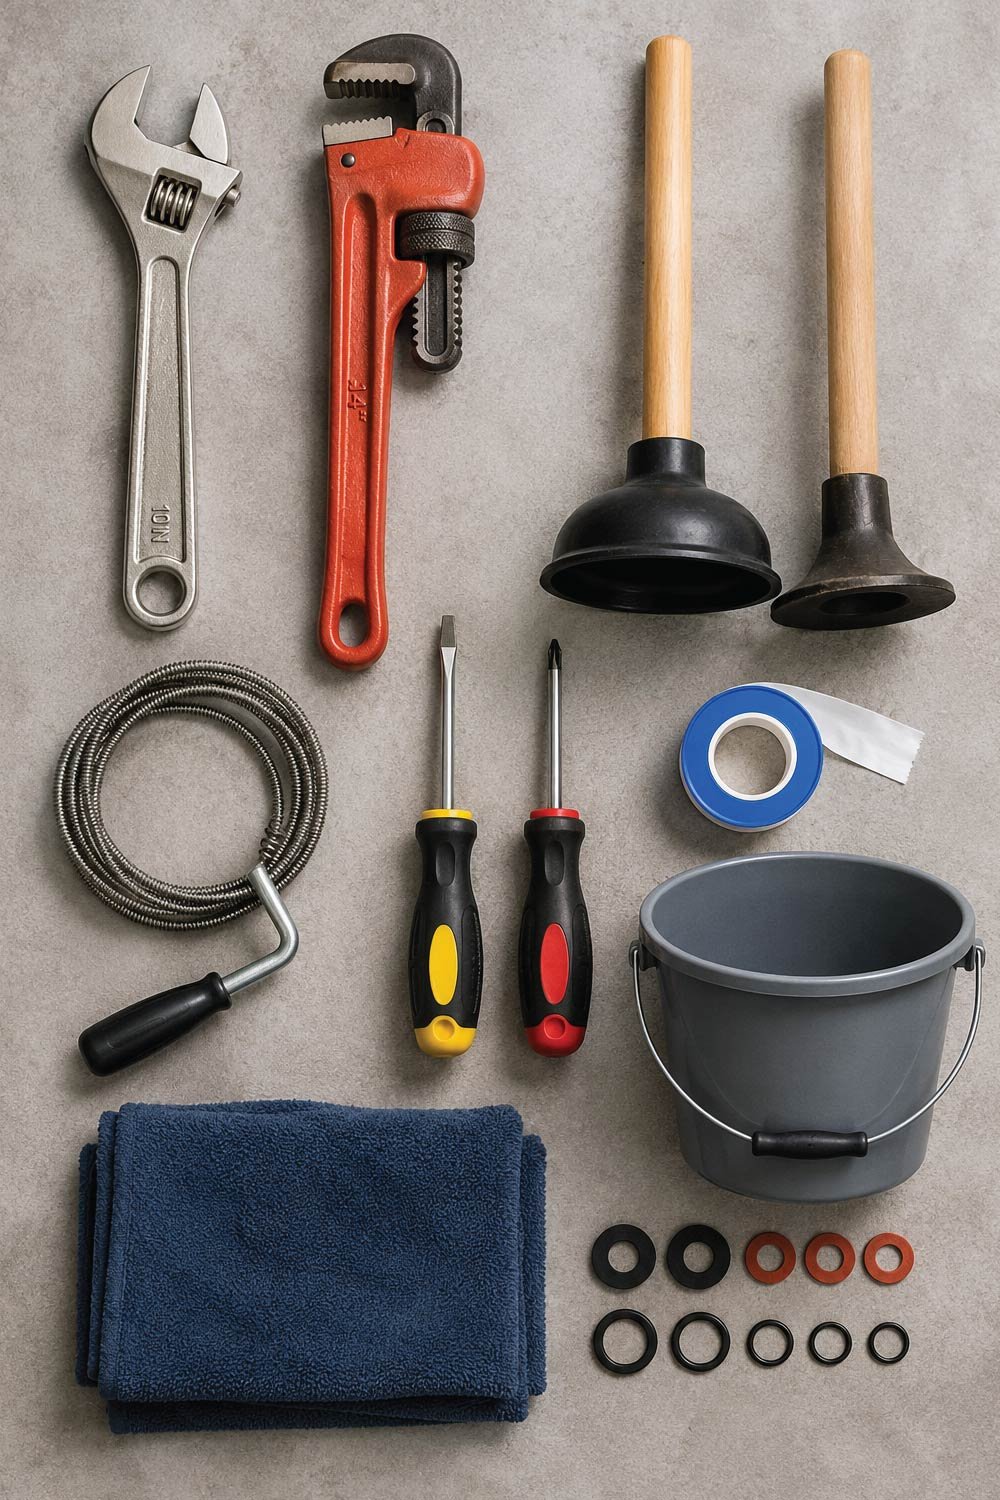
Must-Have Plumbing Tools
Must-Have Plumbing Tools: These essential tools help you handle everyday plumbing problems, from tightening fittings to clearing clogs, making them a must for any basic home repair toolkit.
- Adjustable wrench
- Pipe wrench
- Plunger (cup and flange types)
- Drain snake or auger
- Screwdrivers (flathead and Phillips)
- Plumber’s tape (Teflon tape)
- Bucket and old towels
- Replacement washers and O-rings
Keeping these tools handy allows you to act quickly when problems arise.
Safety Steps Before Starting Any Plumbing Repair
Safety should always come first when performing any plumbing repair, as water damage and electrical hazards can occur if proper precautions are ignored. Taking a few simple steps before starting work helps protect your home, prevents accidents, and ensures that repairs are completed smoothly without unnecessary risks or complications.
Always Do the Following
Always Do the Following: These safety measures reduce the risk of flooding, electric shock, and accidental damage, ensuring a controlled and safe environment before you begin any plumbing work.
- Turn off the water supply to the fixture or entire house.
- Release pressure by opening a faucet.
- Unplug nearby electrical devices.
- Wear gloves to protect your hands.
- Place a bucket under pipes to catch water.
These simple steps prevent flooding, water damage, and accidents.
Repairing Leaky Pipe Joints
Leaks at pipe joints are a common household plumbing issue that usually develop due to loose connections, aging seal materials, or repeated pressure changes in the system. These leaks often start small but can worsen over time if not addressed promptly, potentially causing water damage or increased utility bills if ignored.
DIY Repair Steps
DIY Repair Steps: These steps guide you through safely identifying the leak, tightening or resealing connections, and restoring proper joint sealing to stop water leakage effectively.
- Turn off the water supply.
- Dry the leaking area completely.
- Tighten the joint slightly with a wrench.
- If leaking continues, disassemble the joint.
- Apply plumber’s tape to threaded connections.
- Reassemble and test.
Compression fittings may require washer replacement.
Also Read:
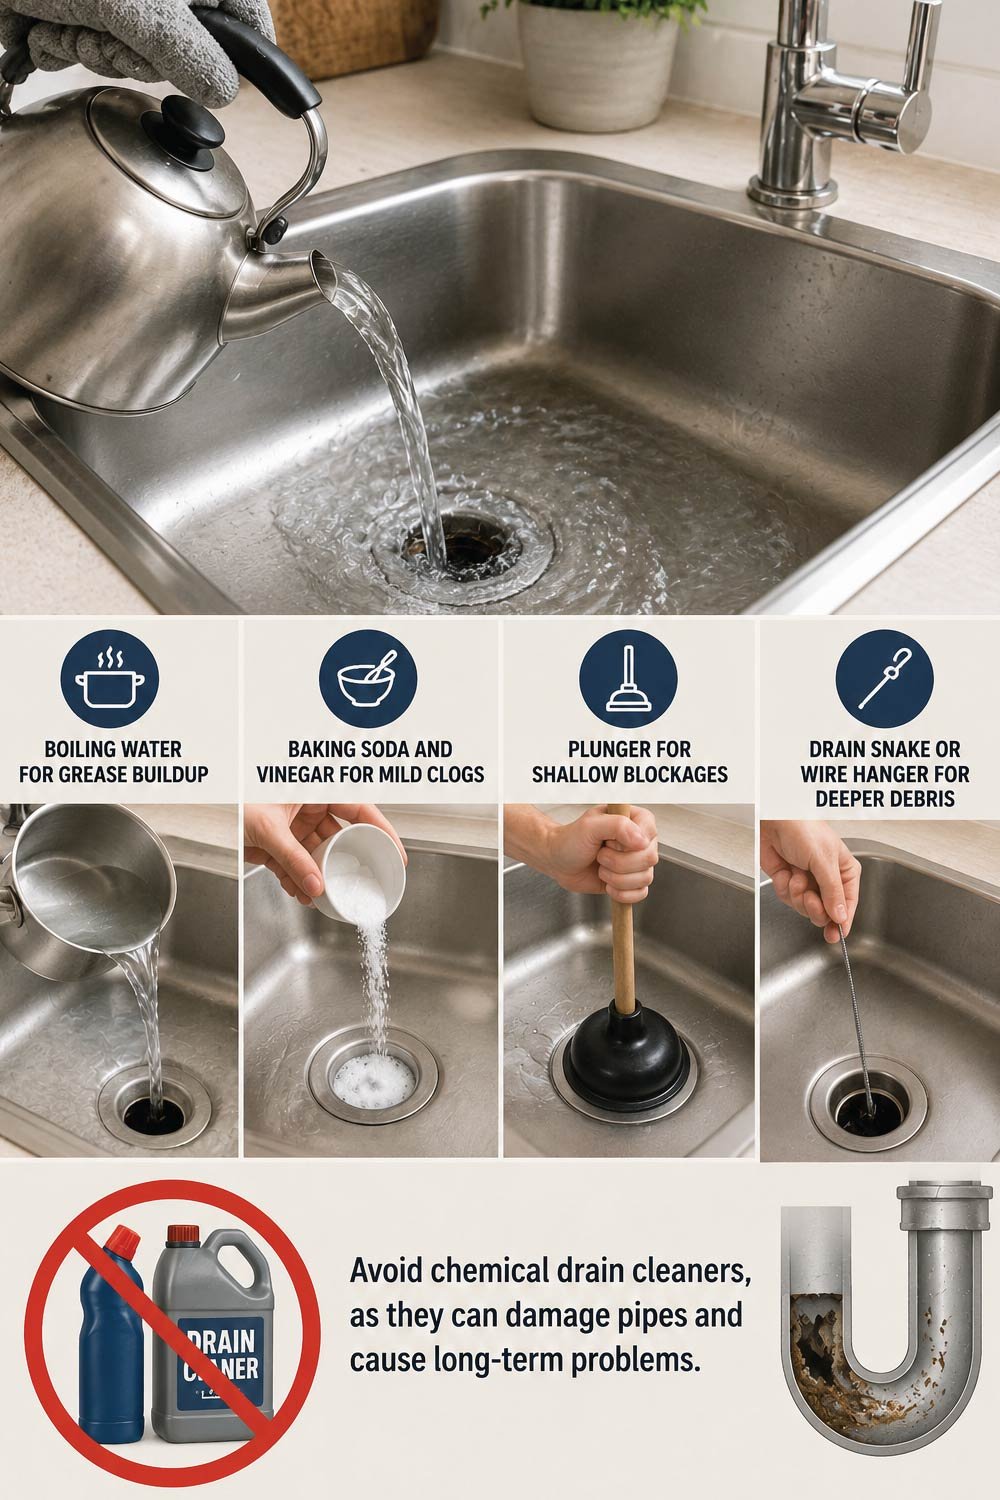
Cleaning or Replacing the P-Trap
The P-trap is an essential part of sink drainage systems that traps debris while also preventing sewer gases from entering the home. Over time, it can become clogged with grease, food particles, and other buildup, making cleaning or replacement necessary to restore proper drainage and hygiene.
Steps to Clean a P-Trap
Steps to Clean a P-Trap: This process helps remove trapped debris from the curved pipe section under the sink, improving drainage flow and eliminating persistent clogs effectively.
- Place a bucket under the trap.
- Loosen the slip nuts.
- Remove the trap carefully.
- Clean out debris and rinse thoroughly.
- Reinstall and check for leaks.
This method is highly effective for stubborn sink clogs.
Replacing a Showerhead
Replacing a showerhead is a simple home improvement task that can instantly improve water flow, fix leaks, and enhance shower efficiency. Most modern showerheads are designed for easy installation, allowing homeowners to complete the replacement without special tools or plumbing experience in just a few minutes.
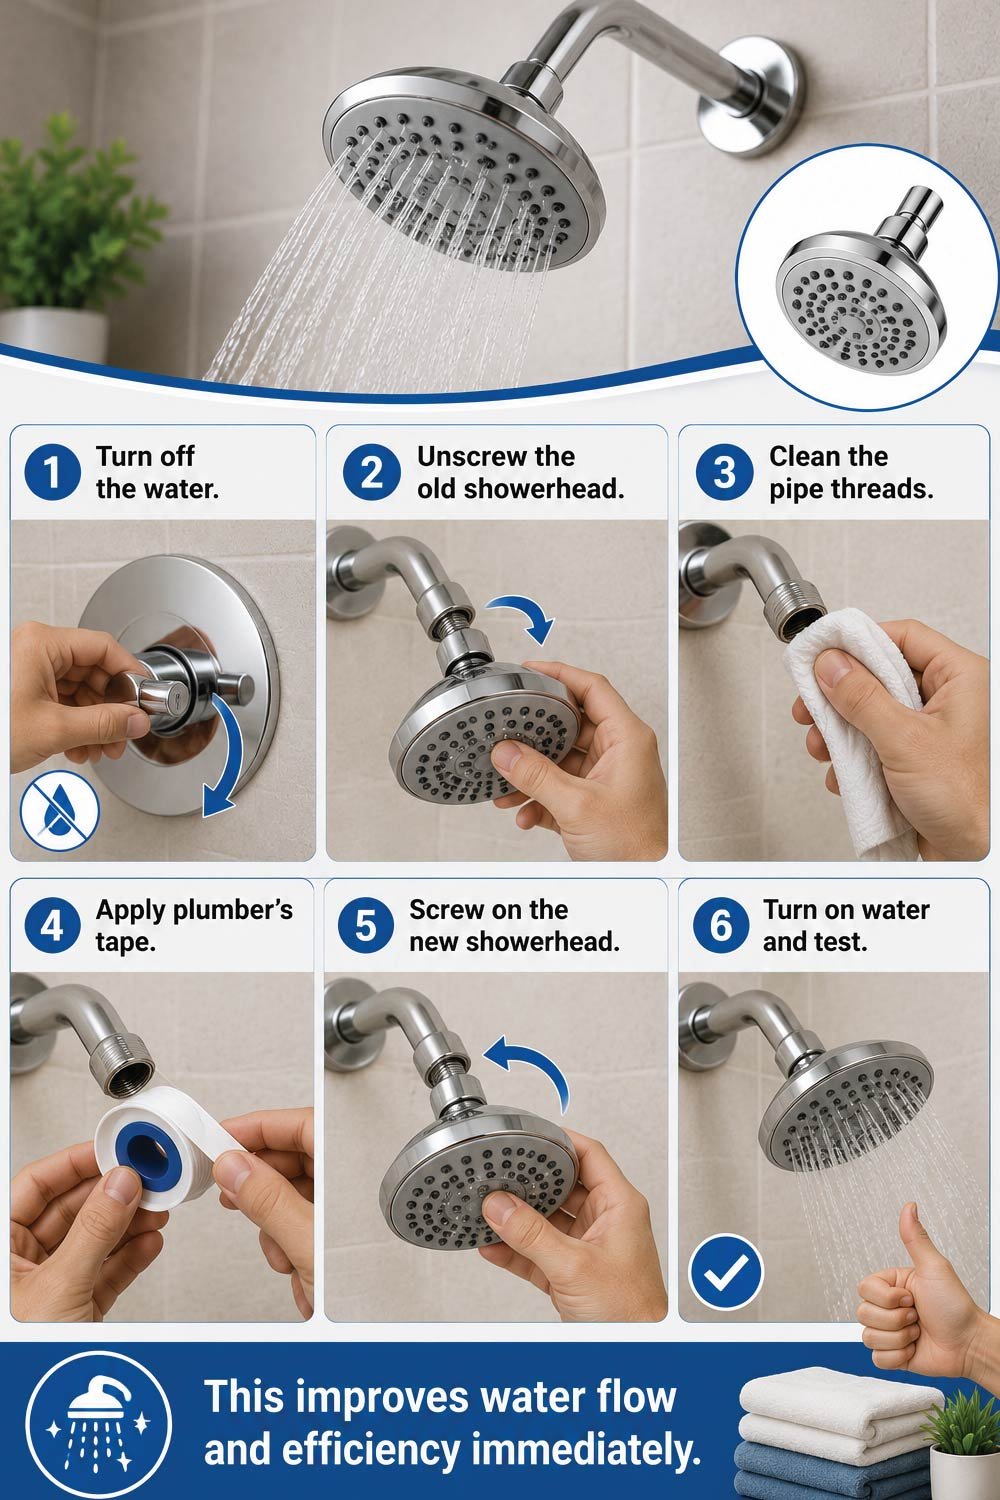
Steps
Steps: These instructions show how to safely remove an old showerhead, prepare the pipe threads, and install a new unit for improved water performance and efficiency.
- Turn off the water.
- Unscrew the old showerhead.
- Clean the pipe threads.
- Apply plumber’s tape.
- Screw on the new showerhead.
- Turn on water and test.
This improves water flow and efficiency immediately.
Also Read:
How to Fix Shower Water Flow: A Complete DIY Troubleshooting Guide
Fixing Low Water Pressure at Home
Low water pressure can be frustrating and may affect a single fixture or the entire home’s plumbing system. It is usually caused by buildup, partially closed valves, or hidden leaks that restrict normal water flow, and identifying the source is key to restoring proper pressure.
Possible Causes
Possible Causes: These common issues reduce water flow efficiency and can occur gradually over time due to mineral deposits, valve positions, or undetected plumbing leaks.
- Mineral buildup in aerators
- Partially closed shut-off valves
- Leaks in supply lines
DIY Solutions
DIY Solutions: These steps help restore normal water pressure by cleaning fixtures, checking valve positions, and inspecting visible plumbing lines for leaks or blockages.
- Remove and clean faucet aerators
- Check shut-off valves under sinks
- Inspect visible pipes for leaks
If low pressure affects all fixtures, professional help may be required.
Preventive Plumbing Maintenance Tips
Preventive plumbing maintenance is essential for avoiding costly repairs and extending the lifespan of your entire water system. Regular care helps identify small issues early, prevents blockages, and ensures efficient water flow throughout the home, reducing the risk of sudden plumbing failures.
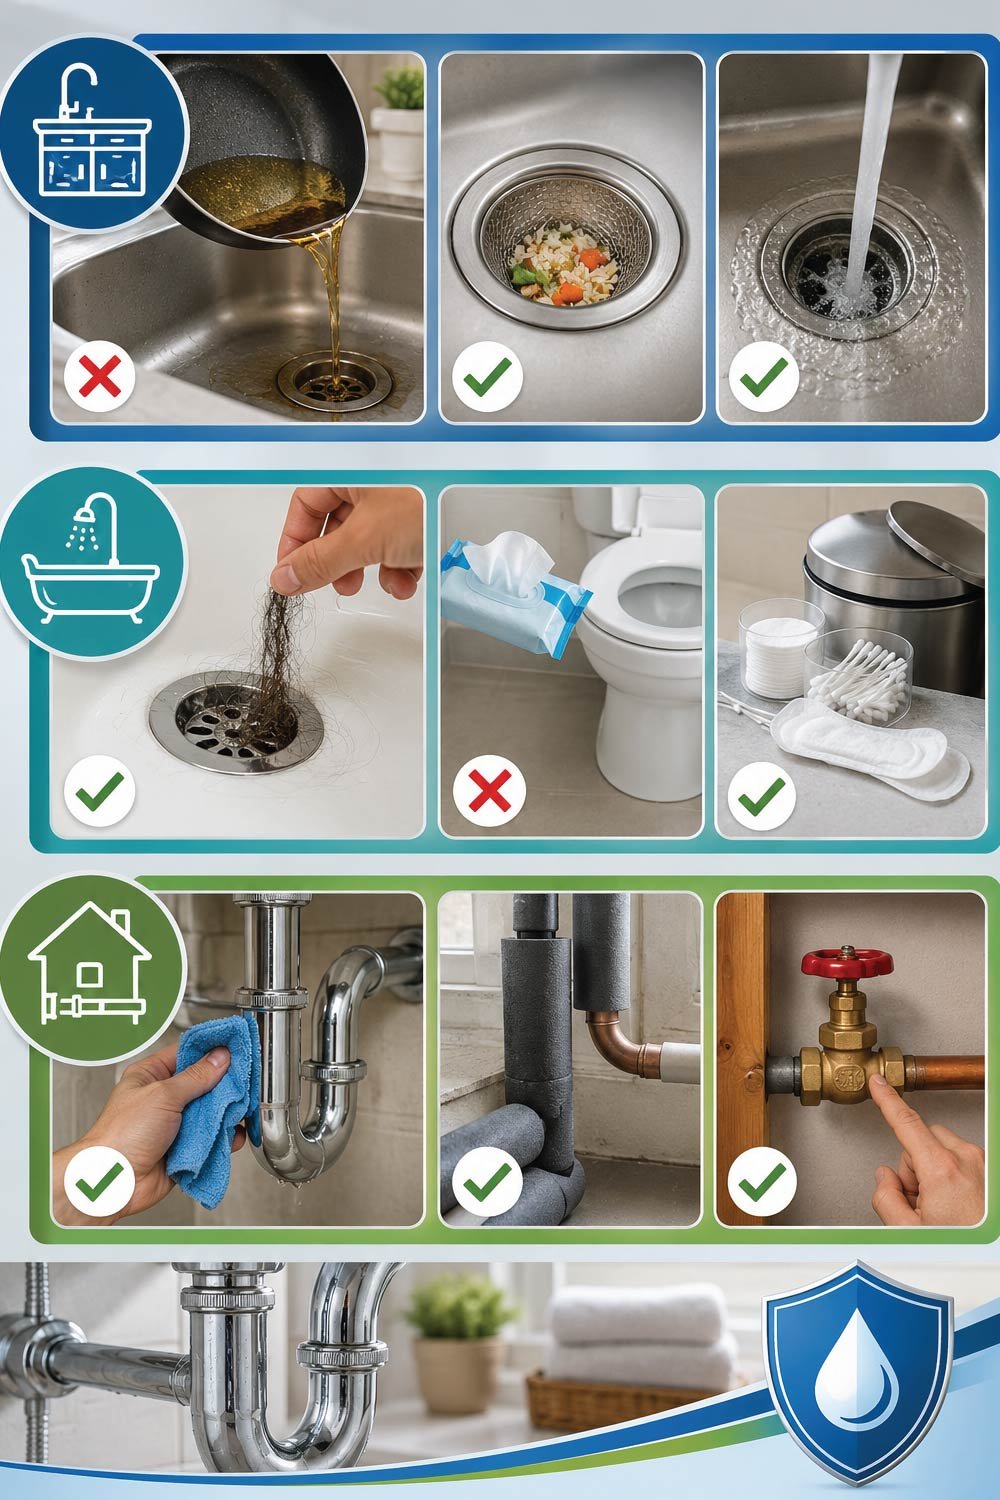
Kitchen Maintenance
Kitchen Maintenance: These simple practices help prevent grease buildup, clogs, and drain damage while keeping kitchen plumbing systems clean and functioning efficiently over time.
- Never pour grease down drains
- Use sink strainers
- Run hot water after washing dishes
Bathroom Maintenance
Bathroom Maintenance: These habits reduce the risk of clogs and pipe blockages by preventing hair buildup and improper waste disposal in bathroom drainage systems.
- Remove hair from drains weekly
- Avoid flushing wipes or hygiene products
Whole-House Maintenance
Whole-House Maintenance: These preventive checks help detect leaks early, protect pipes from temperature damage, and ensure the main water control system is always accessible and functional.
- Check for leaks monthly
- Insulate exposed pipes in winter
- Know the location of your main shut-off valve
Regular maintenance extends the life of your plumbing system.
Also Read:
How to Fix a Leaking Tap: A Complete Step-by-Step Guide (DIY)
When DIY Plumbing Repair Is Not Enough
Some plumbing problems go beyond basic DIY solutions and require professional expertise to avoid serious damage or safety risks. Recognizing these situations early is important because attempting complex repairs without proper tools or knowledge can worsen the issue and lead to higher repair costs or structural damage.
Warning Signs
Warning Signs: These conditions indicate serious plumbing failures that often involve hidden damage, system-wide issues, or health hazards requiring immediate professional attention.
- Burst or frozen pipes
- Sewage odors
- Water damage inside walls or ceilings
- Multiple drains backing up simultaneously
- No water supply to the home
Attempting complex repairs without training can cause more damage and higher costs.
Final Thoughts
Plumbing repair at home doesn’t have to be intimidating. With basic tools, proper preparation, and a clear understanding of common plumbing systems, many everyday plumbing issues can be fixed safely and affordably without professional help.
Start with simple repairs, follow safety guidelines, and take your time. Each successful DIY fix builds confidence and saves money. While not every plumbing problem should be handled alone, knowing what you can repair gives you control over your home and peace of mind.A well-maintained plumbing system protects your home, your budget, and your comfort and it all starts with learning the basics.