

A tiny kitchen doesn’t have to feel cramped, cluttered, or uninspiring. With a little creativity and some smart DIY solutions, you can transform even the smallest kitchen into a stylish and highly functional space.
I have personally dealt with a compact kitchen, and through trial and error, I discovered simple yet effective ideas that made a huge difference.
In this blog post, I will share 19 tiny kitchen makeover DIY ideas along with my personal experiences to help you upgrade your space without spending a fortune.
1. Paint Your Cabinets for a Fresh Look
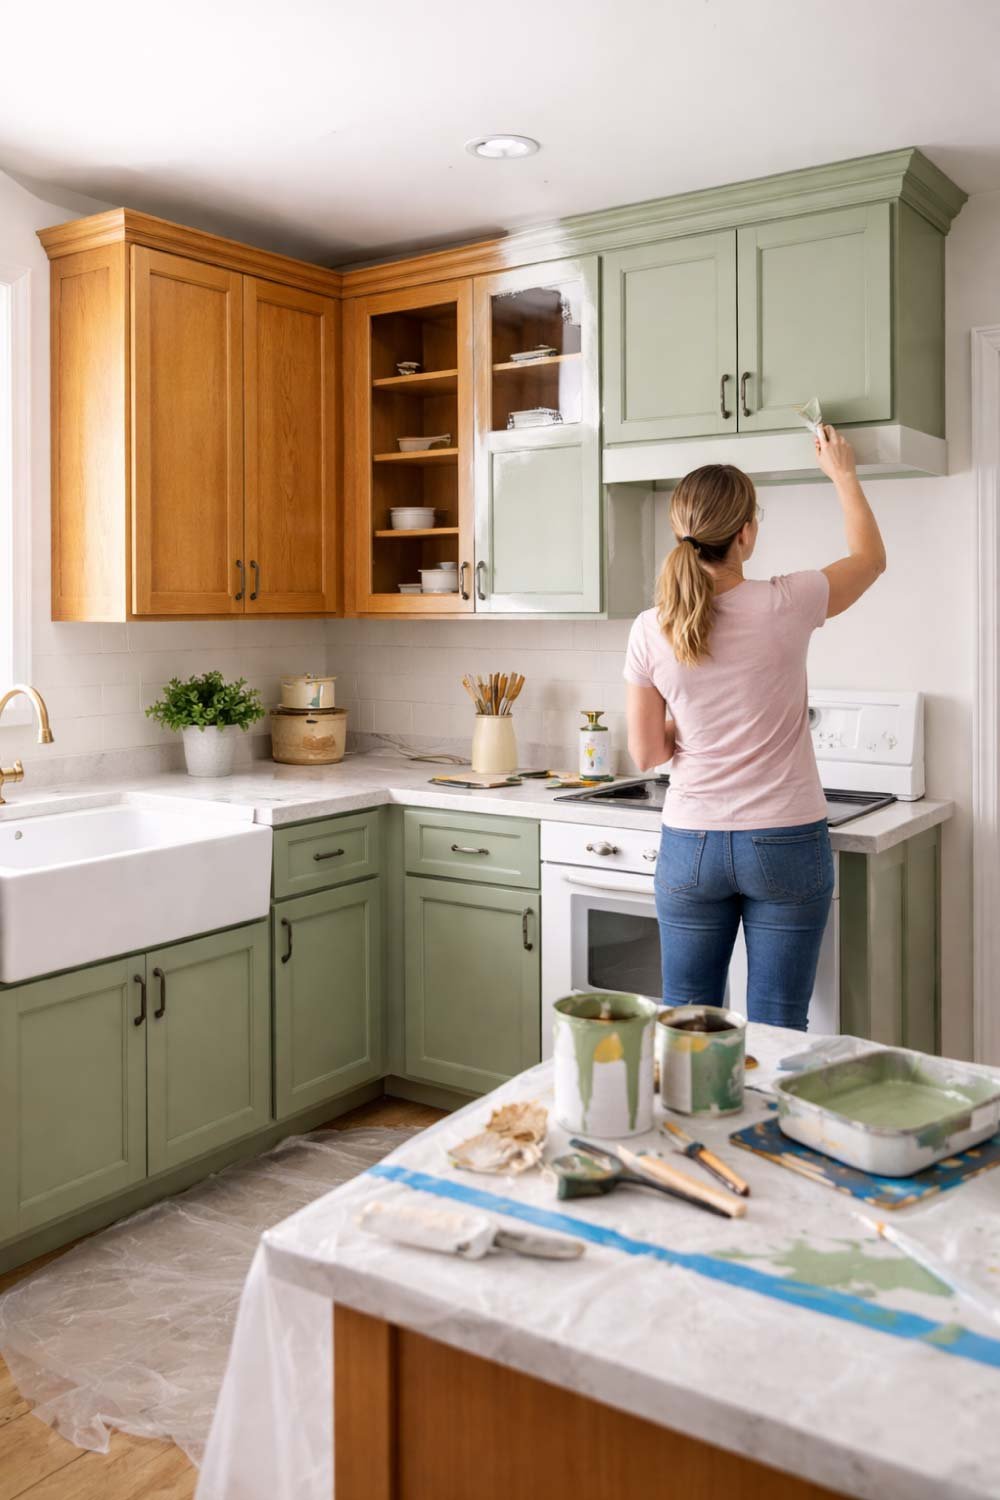
Painting your kitchen cabinets is one of the most transformative DIY projects you can undertake. It’s cost-effective, doesn’t require a full remodel, and can completely change the ambiance of your kitchen.
Whether your cabinets are outdated, scratched, or just looking dull, a fresh coat of paint can breathe new life into the space.
Choose the Right Color
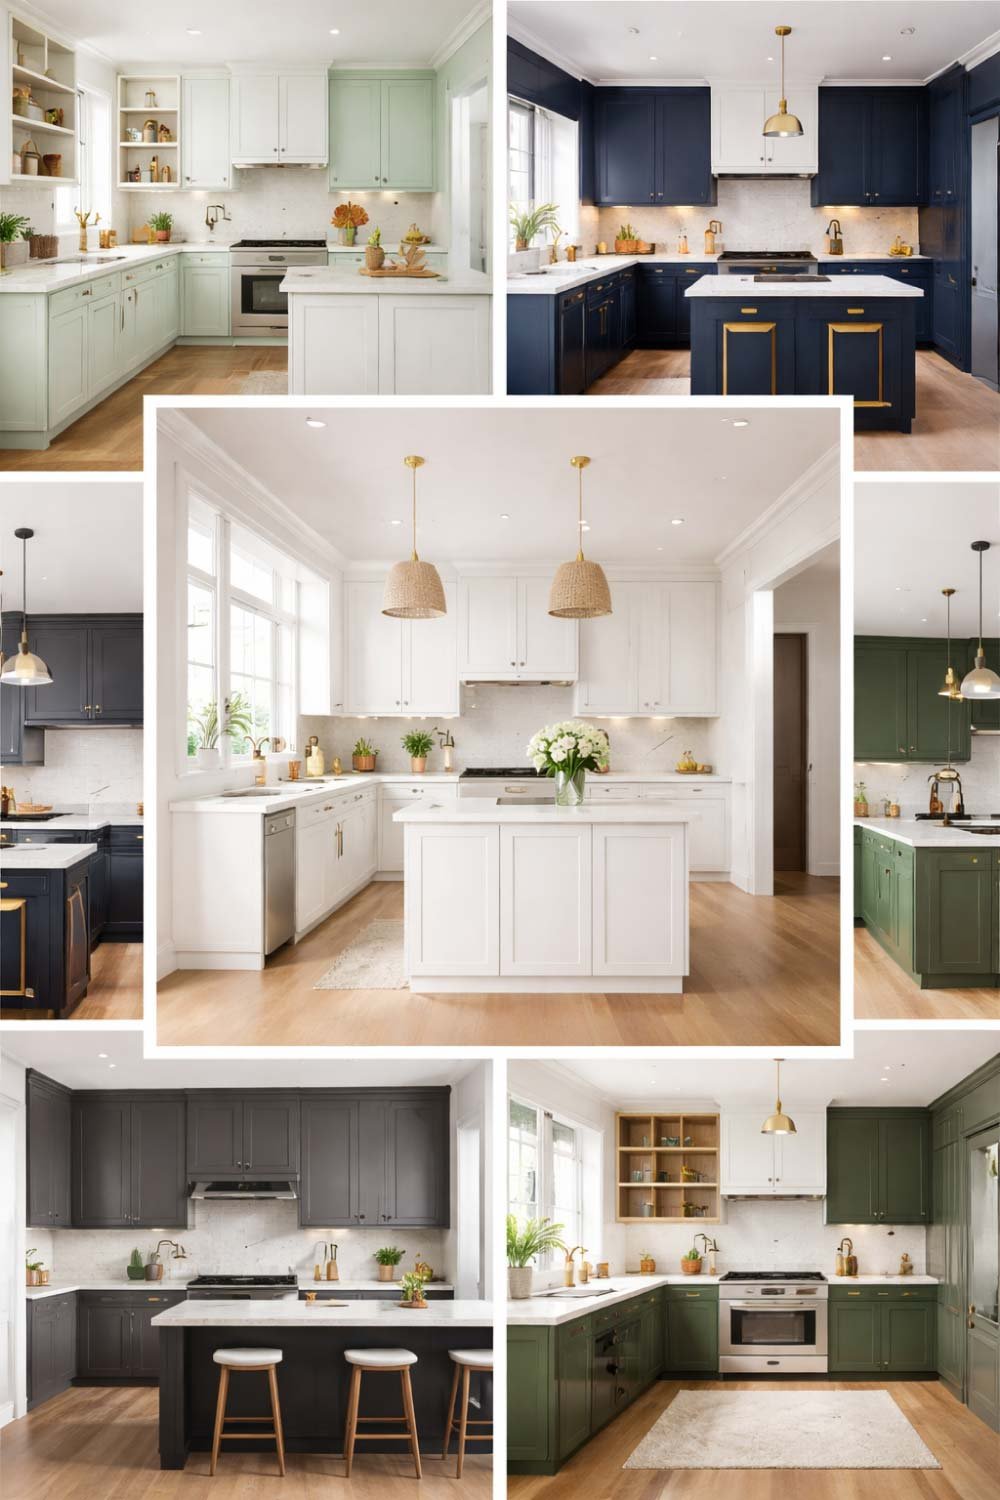
The color you choose will set the tone of your kitchen. Light colors such as white, cream, soft gray, or pastel shades can make your kitchen appear brighter and larger.
On the other hand, darker tones like navy, charcoal, or forest green create a dramatic, modern feel but can make smaller kitchens feel cozier—or slightly cramped if overdone.
My personal choice was white. I wanted to maximize the natural light in my kitchen and make the space feel airy. After painting, the room felt nearly twice as big!
Materials Needed
For a professional-looking finish, you’ll need:
- High-quality paint suitable for cabinets (semi-gloss or satin finish is best)
- Primer (especially if painting over dark wood or laminate)
- Sandpaper (medium and fine grit)
- Painter’s tape
- Screwdriver (to remove handles and doors)
- Paintbrushes and rollers
- Drop cloths to protect floors
Step-by-Step Process
Preparation: Remove all cabinet doors, drawers, and hardware. Label each piece so you can reassemble them correctly.
Cleaning: Wash the surfaces thoroughly to remove grease and dirt. A mixture of warm water and mild detergent works well. For stubborn stains, trisodium phosphate (TSP) is effective.
Sanding: Lightly sand the surfaces to help the primer and paint adhere. Start with medium grit, then finish with fine grit for a smooth surface.
Priming: Apply a thin coat of primer. This ensures even color and durability. Let it dry completely.
Painting: Use smooth, even strokes with your brush or roller. Two thin coats are better than one thick coat to avoid drips. Allow proper drying time between coats.
Reassembly: Once fully dry, reattach doors, drawers, and hardware. Enjoy your transformed kitchen!
Personal Experience
When I painted my old wooden cabinets white, the effect was immediate. The room felt larger, lighter, and more inviting. Even my husband noticed how much cleaner and modern the kitchen looked. The best part was the cost: instead of replacing all cabinets—which would have been thousands of dollars—I spent less than a hundred dollars on paint and supplies. It’s amazing what a bit of elbow grease can do.
Tips for Success
- Invest in quality brushes; they make a huge difference.
- Remove all hardware before painting. It’s easier and prevents messy edges.
- Paint in a well-ventilated area to help the finish dry evenly.
- Consider a high-quality sealant for extra durability, especially if you cook frequently.
Painting cabinets is a perfect combination of creativity, practicality, and DIY satisfaction. The visual impact alone is worth the effort.
Also Read:
2. Add Peel-and-Stick Backsplash
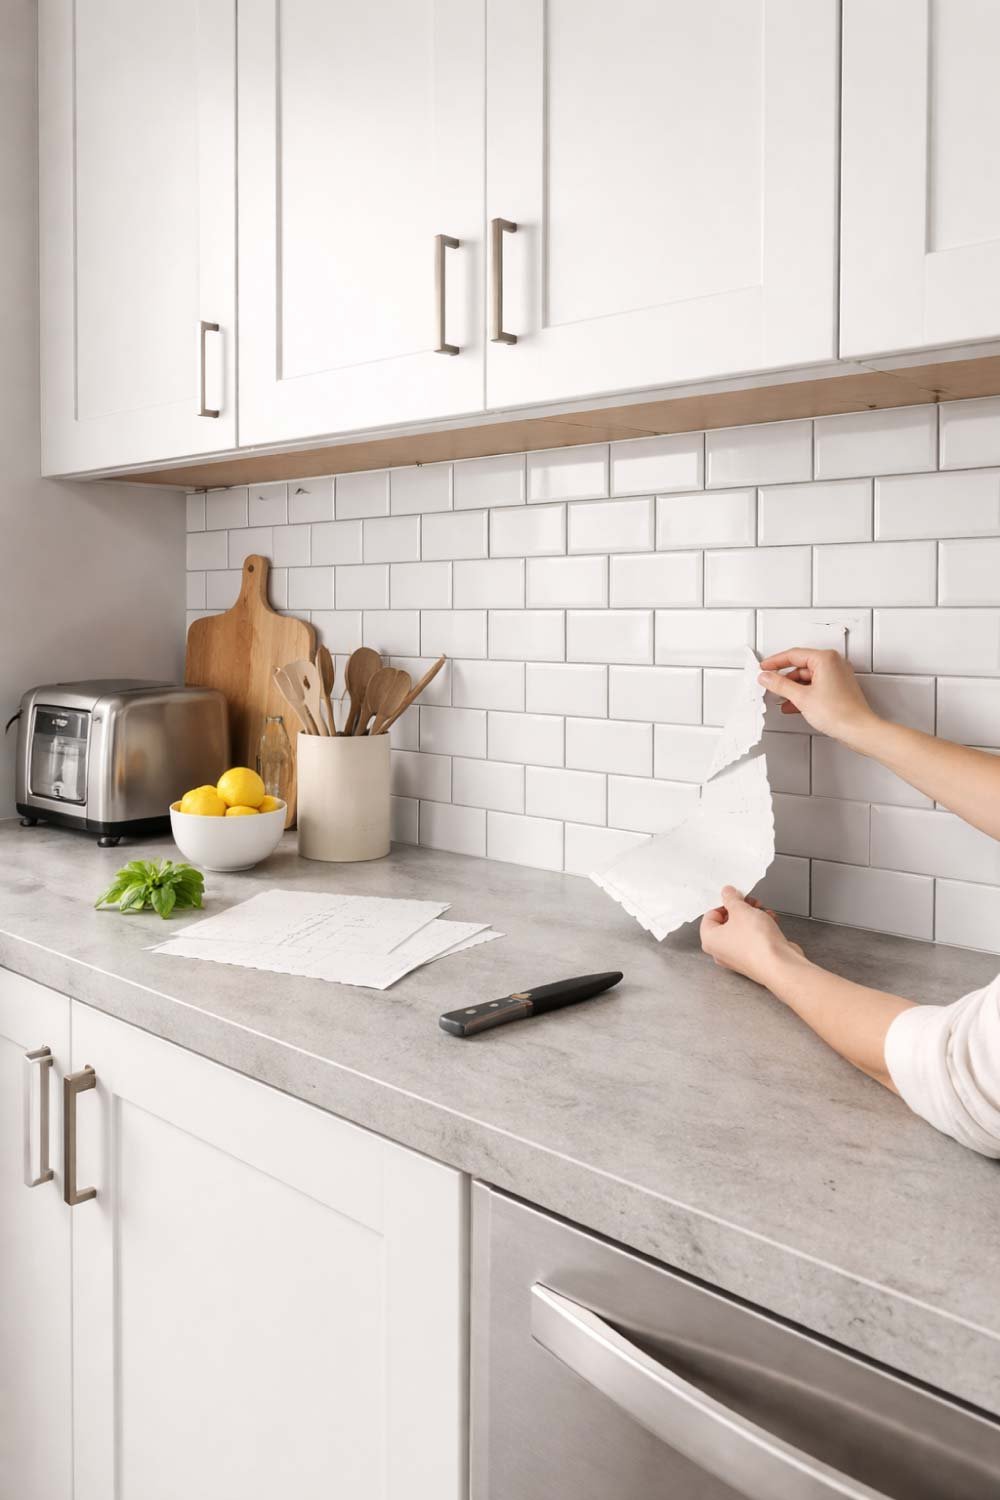
Peel-and-stick backsplashes are one of the easiest ways to upgrade a kitchen without a full renovation. They come in a variety of materials—vinyl, faux tile, and even metal—and mimic the look of expensive tile installations.
Benefits
Affordable: Traditional tile can be costly, both for materials and labor. Peel-and-stick alternatives are budget-friendly.
Easy Installation: No grout, messy mortar, or professional tools required.
Variety: From subway tiles to hexagonal patterns, there’s a design for every style.
Temporary: Ideal for renters or those who want flexibility.
Materials Needed
- Peel-and-stick tiles of your choice
- Measuring tape
- Level
- Pencil for marking
- Utility knife or scissors
- Ruler or straight edge
Step-by-Step Process
Measure Your Space: Measure the width and height of the area to cover. Purchase slightly more material than needed to account for cuts and mistakes.
Prepare the Wall: Clean the wall thoroughly. Remove grease, dust, and debris. A smooth, dry surface ensures tiles stick properly.
Plan Your Layout: Start in the center or a visually balanced spot. Mark guidelines with a pencil and level to keep tiles straight.
Apply Tiles: Peel off the backing and press the tile onto the wall, smoothing out air bubbles with your hand or a roller.
Trim Edges: Use a utility knife to trim tiles to fit around corners, outlets, and edges.
Finishing Touches: Once all tiles are applied, wipe them down with a damp cloth to remove any residue.
Personal Experience
I installed a subway-style peel-and-stick backsplash behind my stove and sink. The project took only a few hours, yet the result was stunning.
My kitchen instantly looked more modern and clean. I loved that I didn’t have to hire a professional or deal with messy grout. Even months later, it still looks brand new.
Tips for Success
- Make sure the wall is completely smooth; textured walls may reduce adhesion.
- Allow tiles to settle for 24 hours before cleaning aggressively.
- Start from the focal point of your kitchen, usually behind the stove or sink, for the most balanced look.
A peel-and-stick backsplash is an easy win for anyone wanting to refresh their kitchen quickly. The instant upgrade can dramatically improve the visual appeal and feel of your space.
Also Read:
3. Install Open Shelving
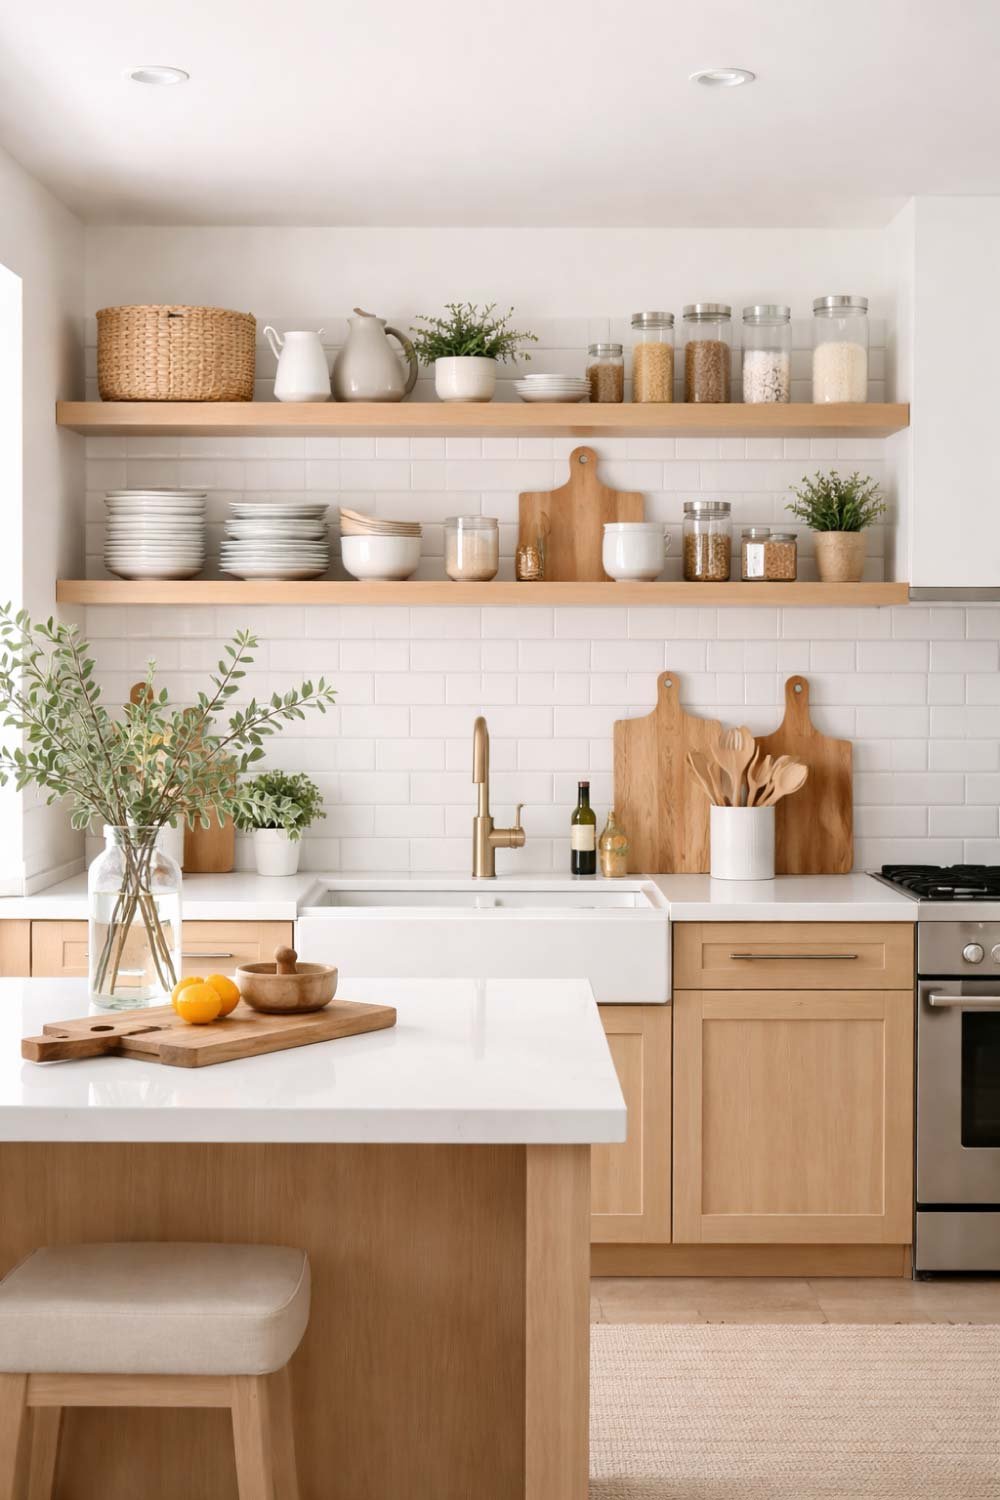
Open shelving has become a popular trend in kitchen design, and for good reason. Replacing upper cabinets with open shelves creates an airy, spacious feeling while making frequently used items easily accessible.
Benefits
Visual Space: Open shelves make small kitchens feel larger and less crowded.
Style: They allow you to display decorative dishes, plants, or cookbooks.
Functionality: Items are easily accessible without opening cabinet doors.
Materials Needed
- Wooden boards or pre-made shelves
- Wall anchors and brackets
- Drill
- Level
- Measuring tape
- Screws
Step-by-Step Process
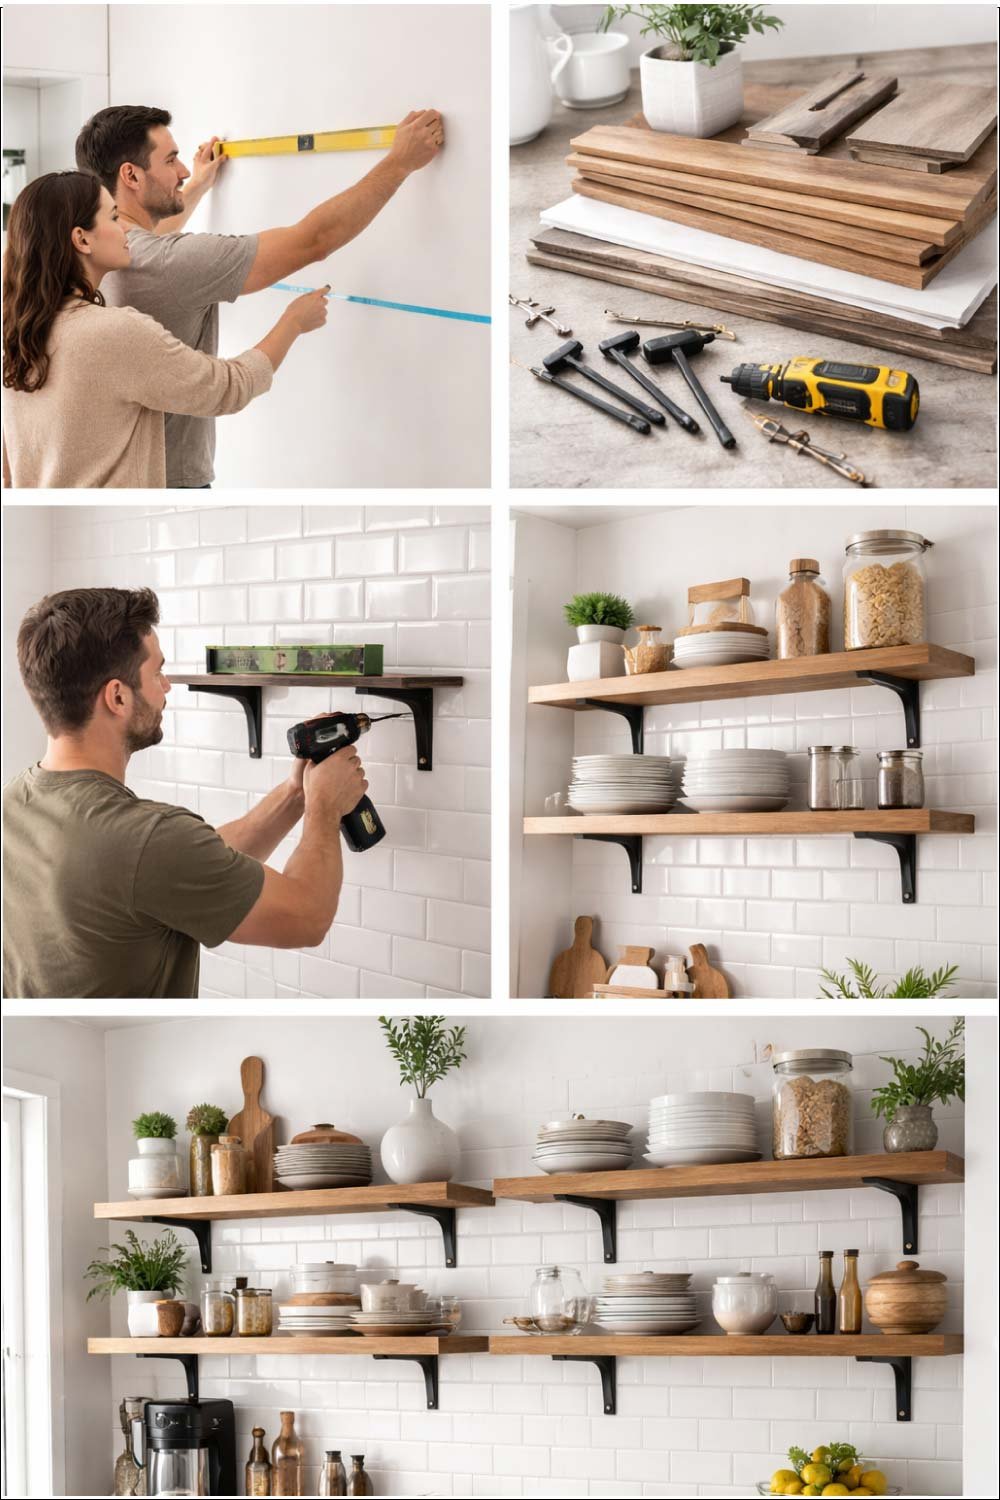
Plan Your Layout: Decide which walls will have shelves and at what height. Consider the reach and clearance above countertops.
Choose Your Materials: Solid wood adds warmth, while painted MDF or reclaimed wood can create a modern or rustic look.
Install Brackets: Mark positions on the wall using a level. Drill holes and secure brackets with appropriate wall anchors.
Mount Shelves: Place the boards onto brackets. Ensure they are level and secure.
Styling: Arrange dishes, jars, and decor in a way that looks organized but not cluttered. Group items by color or size for visual harmony.
Personal Experience
I replaced one upper cabinet in my kitchen with three wooden open shelves. Not only did it make the space feel less cramped, but it motivated me to keep my dishes tidy. Everything on display had to be organized, which reduced clutter. Friends who visited often commented on how modern and welcoming my kitchen felt.
Tips for Success
- Avoid overcrowding shelves; leave breathing space between items.
- Mix decorative and functional items for a balanced look.
- Consider adding LED strip lighting underneath shelves for ambiance.
Open shelving is a design choice that combines style, functionality, and practicality. With careful planning, it can instantly elevate your kitchen’s aesthetic while improving everyday workflow.
Also Read:
How to Fix a Hole in a Bedroom Door: The Complete Step-by-Step Guide
10. Add a Foldable Table
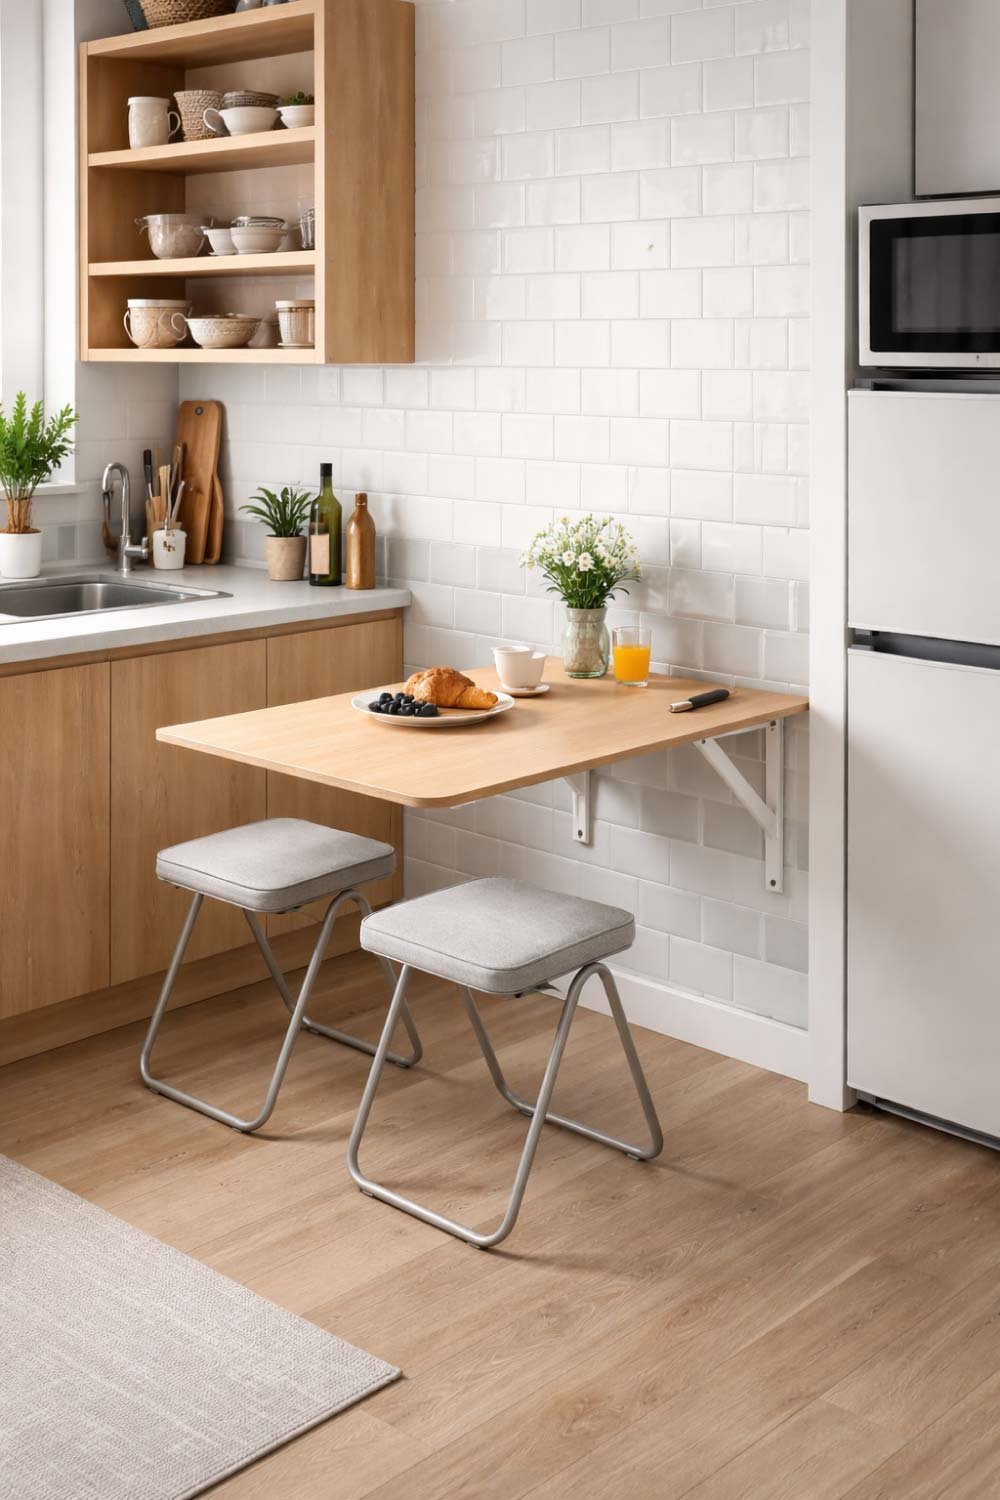
In tiny kitchens, space is always at a premium. A foldable table is a game-changer because it offers a functional surface without permanently taking up floor space.
Whether you need a spot for meal prep, dining, or even working on your laptop, a wall-mounted foldable table can adapt to your needs.
Benefits
Space-saving: Folds up against the wall when not in use.
Versatile: Can serve as a dining table, prep station, or mini workstation.
Easy Installation: Requires only a few brackets and screws.
Materials Needed
- Foldable wall-mounted table or wood board
- Foldable brackets or piano hinges
- Drill and screws
- Level and measuring tape
- Optional: Paint or wood stain for finishing
Step-by-Step Process
Measure Your Space: Determine the height and width based on your available wall space and desired seating area.
Choose Materials: You can buy a pre-made foldable table or build one from a wood plank. For a polished look, paint or stain the wood to match your kitchen décor.
Install Brackets: Mark the position for brackets on the wall, ensuring they are level. Drill pilot holes, then secure brackets with screws.
Mount the Table: Attach the tabletop to the brackets or hinges. Ensure it folds smoothly and locks in place when upright.
Test Weight Capacity: Before placing items, test how much weight the table can handle safely.
Personal Experience
I installed a fold-down table in my kitchen to replace a bulky breakfast nook. Now, I have a dedicated prep area that folds away after cooking.
During meals, it’s perfect for two people, and when folded, I suddenly had double the free floor space—making my kitchen feel surprisingly roomy.
Tips for Success
- Add a latch or hook to secure the table in the upright position.
- Choose a wall near an electrical outlet if you plan to use appliances.
- Keep stools lightweight and stackable for maximum flexibility.
Also Read:
11. Use Clear Containers for Storage
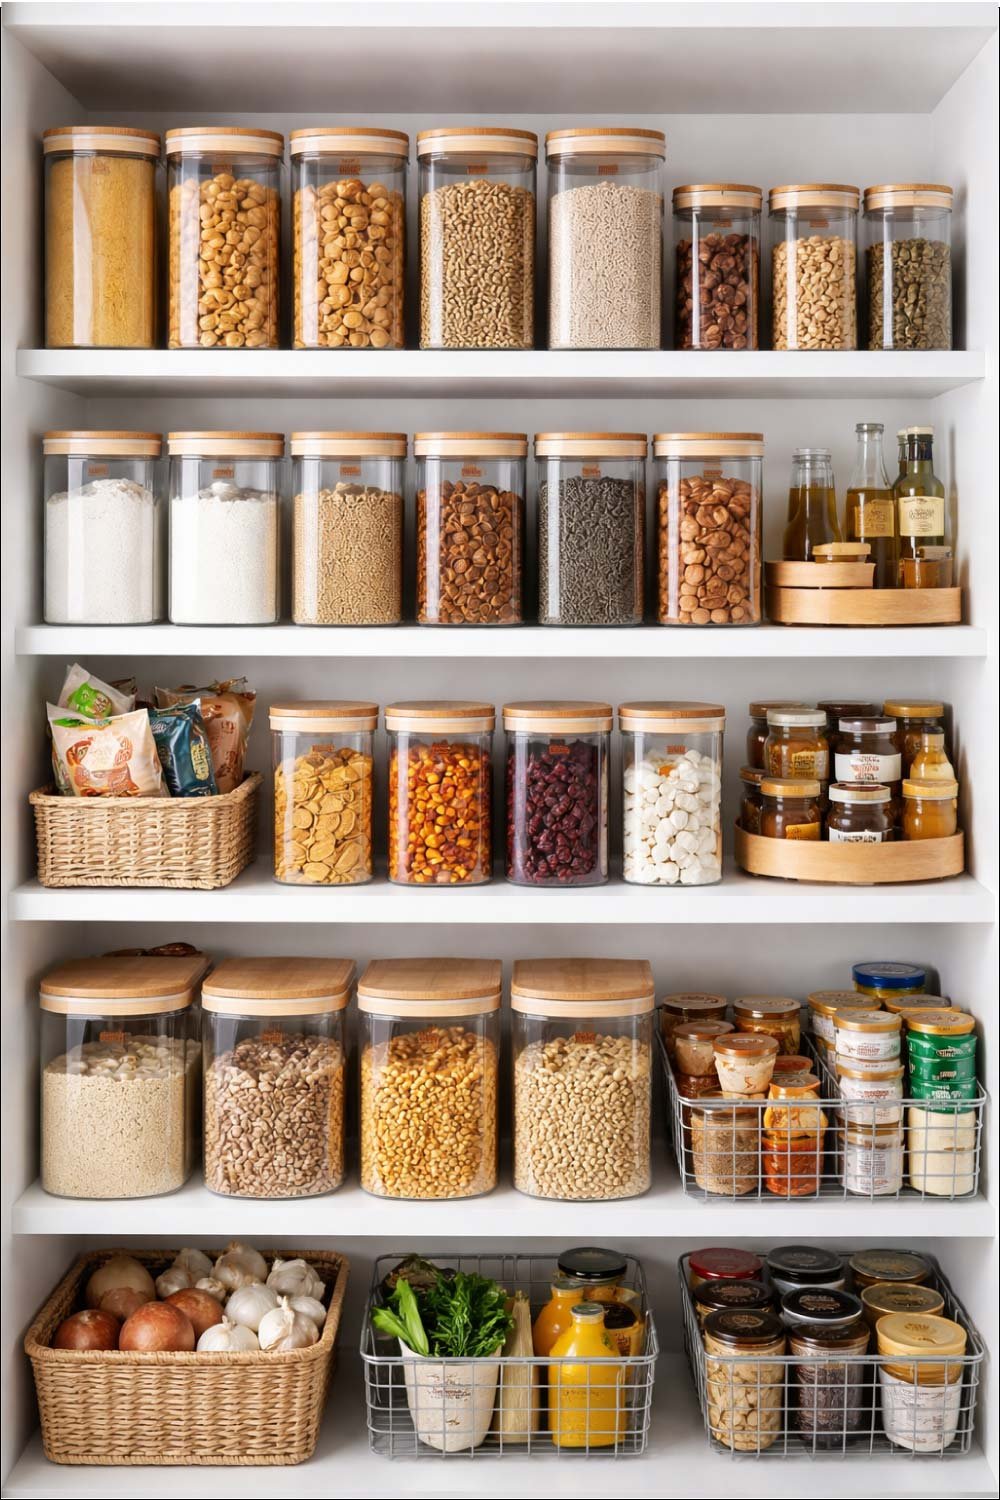
A cluttered pantry can make even a large kitchen feel chaotic. Clear containers are a simple solution—they allow you to see ingredients at a glance, keep food fresh, and create a visually appealing storage system.
Benefits
Easy Visibility: Quickly find what you need without rummaging.
Reduces Waste: You know what’s in stock, preventing expired items.
Uniform Look: Matching containers make the pantry look neat and organized.
Materials Needed
- Clear plastic or glass jars with lids
- Labels or chalk markers
- Storage baskets or racks (optional)
Step-by-Step Process
Sort Ingredients: Group pantry items by type—grains, pasta, snacks, spices, etc.
Choose Containers: Pick jars that are stackable and the right size for your ingredients. Glass jars with airtight lids work best for freshness.
Transfer Ingredients: Pour items into containers, wiping up spills immediately to avoid mess.
Label Everything: Use labels or chalk markers to clearly identify contents and expiration dates.
Arrange Thoughtfully: Place frequently used items at eye level or front of shelves.
Personal Experience
Switching to clear containers was transformative for my kitchen. I used to buy multiple bags of flour and sugar because I forgot what was left in the pantry. Now, I can see quantities at a glance, which has saved money and reduced waste. The pantry also looks so much cleaner and organized—it’s almost a joy to open it!
Tips for Success
- Stackable containers maximize vertical space.
- Reserve small containers for spices and larger jars for grains.
- Choose uniform lids for a clean, cohesive look.
Also Read:
12. Install Corner Shelves
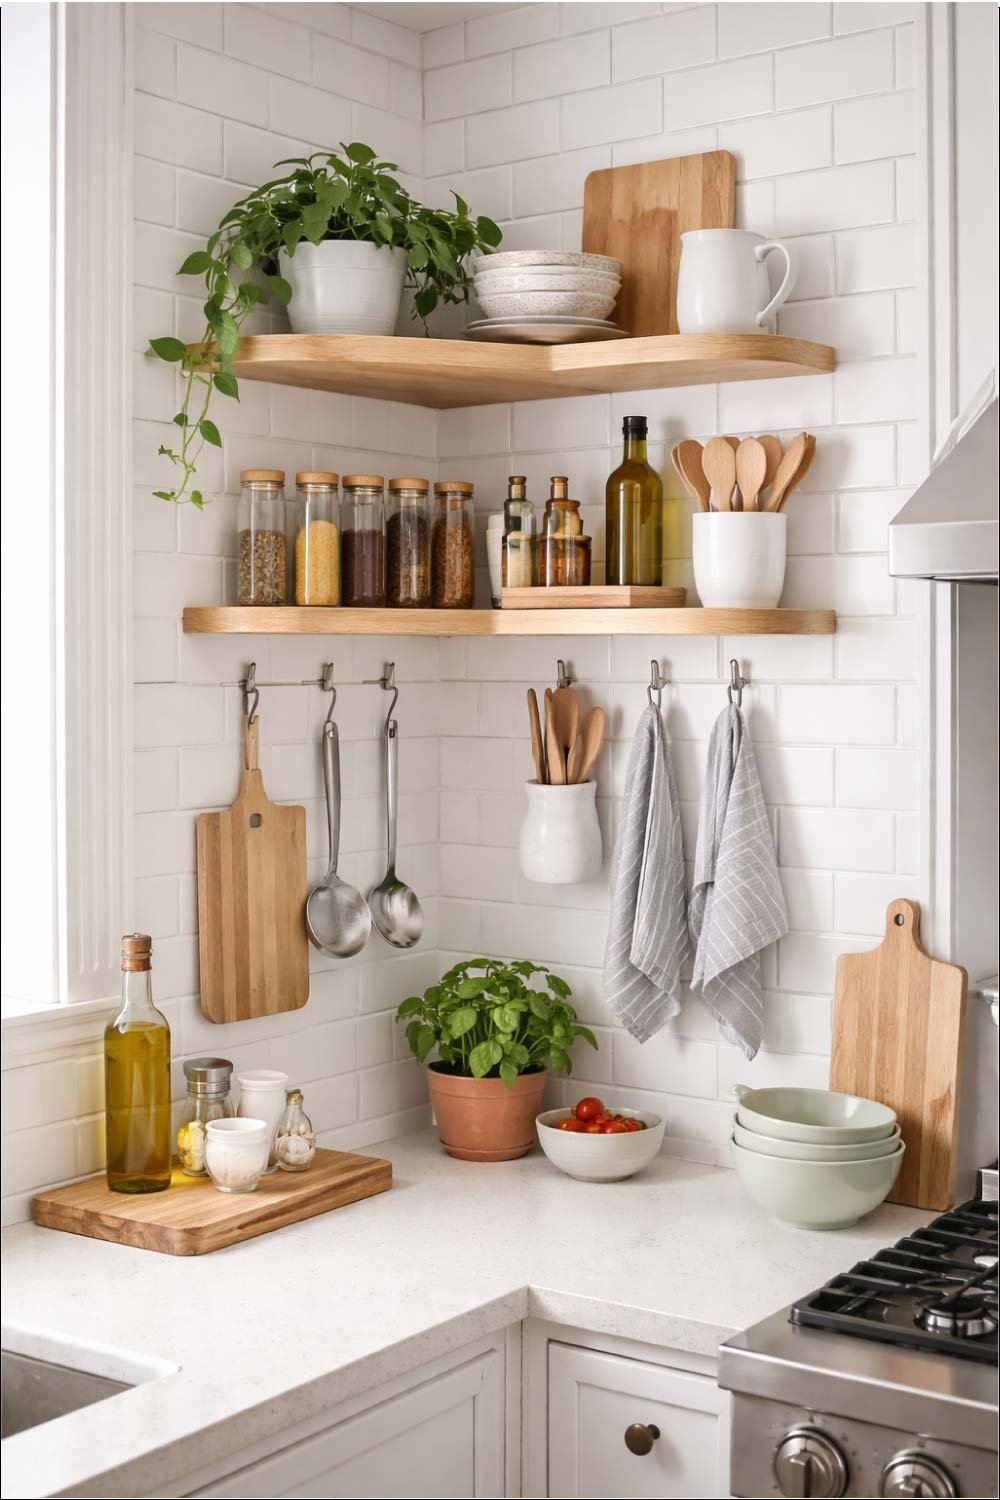
Corners are often overlooked, yet they can be turned into highly functional storage areas. Small corner shelves are ideal for spices, decorative items, or frequently used kitchen tools.
Benefits
Maximizes Wasted Space: Makes use of otherwise inaccessible corners.
Organizational Boost: Keeps small items visible and easy to reach.
Stylish Display: Can be decorative as well as functional.
Materials Needed
- Wooden or metal corner shelves
- Screws and wall anchors
- Drill, level, and measuring tape
- Optional: Paint or varnish
Step-by-Step Process
Measure the Corner: Determine the size and number of shelves needed. Ensure the corner space is clear and accessible.
Mark Positions: Use a level to mark where each shelf will go. Consider the height of objects you plan to store.
Install Brackets or Supports: Drill pilot holes and secure brackets to the wall using wall anchors.
Mount Shelves: Place shelves on brackets, checking for stability.
Style or Organize: Arrange spices, jars, or decorative items in a visually appealing way.
Personal Experience
I added corner shelves near my stovetop for spices. Not only did it save cabinet space, but I also could reach everything quickly while cooking. It became one of the most functional and efficient spots in my kitchen, and guests often comment on how smart it looks.
Tips for Success
- Consider floating shelves for a modern look.
- Don’t overload; maintain a balance between utility and aesthetics.
- Use corner shelves for items that are used frequently to reduce bending or reaching.
Final Thoughts
Transforming a tiny kitchen doesn’t require a huge budget or professional help. With these simple DIY ideas, you can create a space that is both beautiful and functional. From painting cabinets to installing clever storage solutions, every small change adds up.
From my personal experience, the biggest difference came from combining organization with design. Once everything had a place and the kitchen looked visually appealing, cooking became more enjoyable.
If you are working with a small kitchen, start with one or two of these ideas and gradually build your dream space. Trust me—even the smallest upgrades can make a big impact!
Also Read: