

Water damage on walls is one of the most common household problems, and it can happen for many reasons leaking pipes, roof leaks, flooding, condensation, or even poor ventilation. At first, it may look like just a small stain or bubbling paint, but if ignored, it can quickly lead to serious structural damage, mold growth, and costly repairs.
The good news is that most water-damaged walls can be repaired if the problem is addressed early and correctly. In this guide, you’ll learn how to identify the damage, stop the source of water, dry the wall properly, and restore it so it looks as good as new.
Understanding Water Damage in Walls
Water damage in walls is a serious issue that can affect both the appearance and structural integrity of your home. Understanding how moisture impacts wall materials helps you take the right repair steps and prevent long-term damage or costly repairs.

Before jumping into repairs, it’s important to understand what water does to a wall. When moisture enters wall materials like plaster, drywall, or cement, it weakens their structure. Over time, this leads to:
- Paint bubbling or peeling
- Yellow or brown stains
- Soft or crumbling wall surfaces
- Musty odors
- Mold or mildew growth
- Swelling or warping
In severe cases, the wall may become hollow or unstable. That’s why early detection is critical.
There are generally three levels of water damage:
1. Minor Damage
Minor damage is usually limited to surface-level issues and can often be repaired easily if addressed early before it spreads further.
Small stains, slight paint bubbling, or damp patches. Usually caused by humidity or small leaks.
2. Moderate Damage
Moderate damage involves deeper impact on the wall surface, often requiring more thorough repair and treatment to restore its condition.
Noticeable discoloration, peeling paint, soft drywall, and possible mold spots.
3. Severe Damage
Severe damage affects the structural integrity of the wall and may require extensive repair or professional intervention to ensure safety and durability.
Large wet areas, structural weakening, mold infestation, and crumbling wall material.
Each level requires a slightly different approach, but the basic repair process remains similar.
Step-by-Step Guide to Repair Water-Damaged Walls
Repairing water-damaged walls requires patience and a systematic approach. Following each step carefully ensures that the damage is fully addressed and does not return in the future.
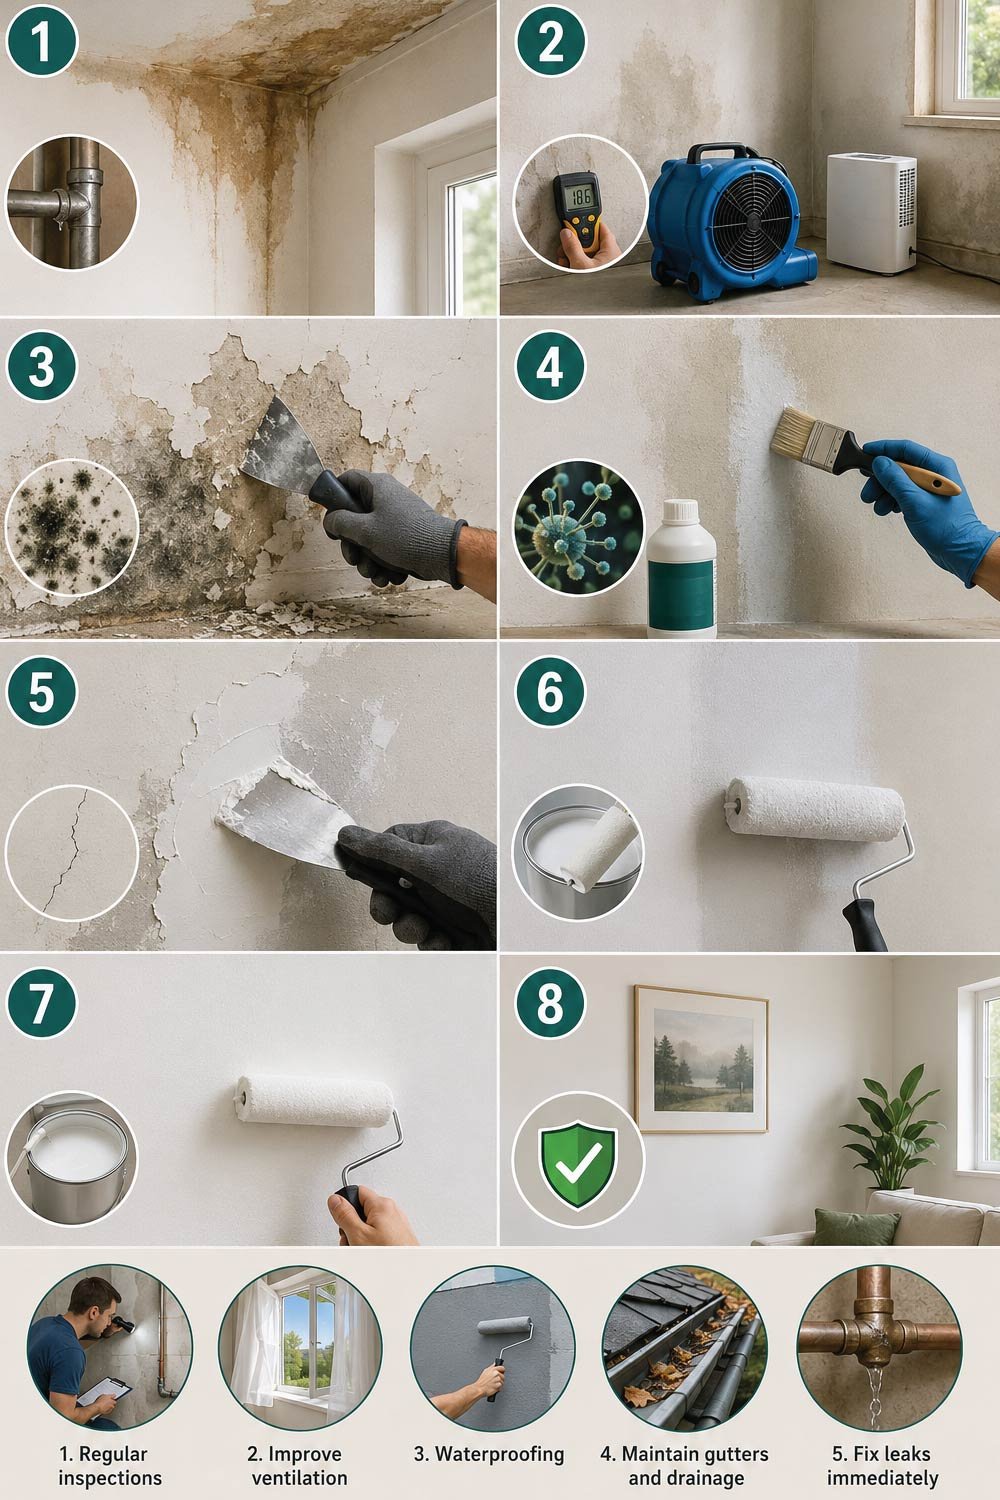
Step 1: Find and Stop the Source of Water
Identifying and fixing the source of water is the most critical step. Without resolving the root cause, any repair work will be temporary and the problem will reappear.
Before repairing anything, you must fix the root cause. Otherwise, the damage will return—even after a perfect repair.
Common sources include:
- Leaking water pipes inside walls
- Roof leaks during rain
- Bathroom or kitchen plumbing issues
- Poor external waterproofing
- Rising damp from the ground
Carefully inspect the area above, below, and around the damaged wall. If necessary, call a plumber to check internal pipes or a roofer to inspect leakage points.
Once the water source is fixed, wait until the wall is completely dry before continuing.
Step 2: Dry the Damaged Wall Completely
Proper drying is essential to prevent mold growth and ensure the success of the repair. Any trapped moisture can lead to recurring problems even after fixing the wall.
Drying is one of the most important steps. If moisture remains inside the wall, mold will grow again even after repair.
How to dry the wall properly
Using the right drying methods helps remove hidden moisture and prepares the wall for safe repair work.
- Open windows and doors for ventilation
- Use fans to circulate air
- Use a dehumidifier if available
- Remove furniture near the wall
- For severe cases, use heat drying carefully (not too hot)
Depending on the level of damage, drying can take anywhere from 24 hours to several days. Do not rush this step.
A simple test is to touch the wall—if it feels cool or damp, it is still not fully dry.
Also Read:
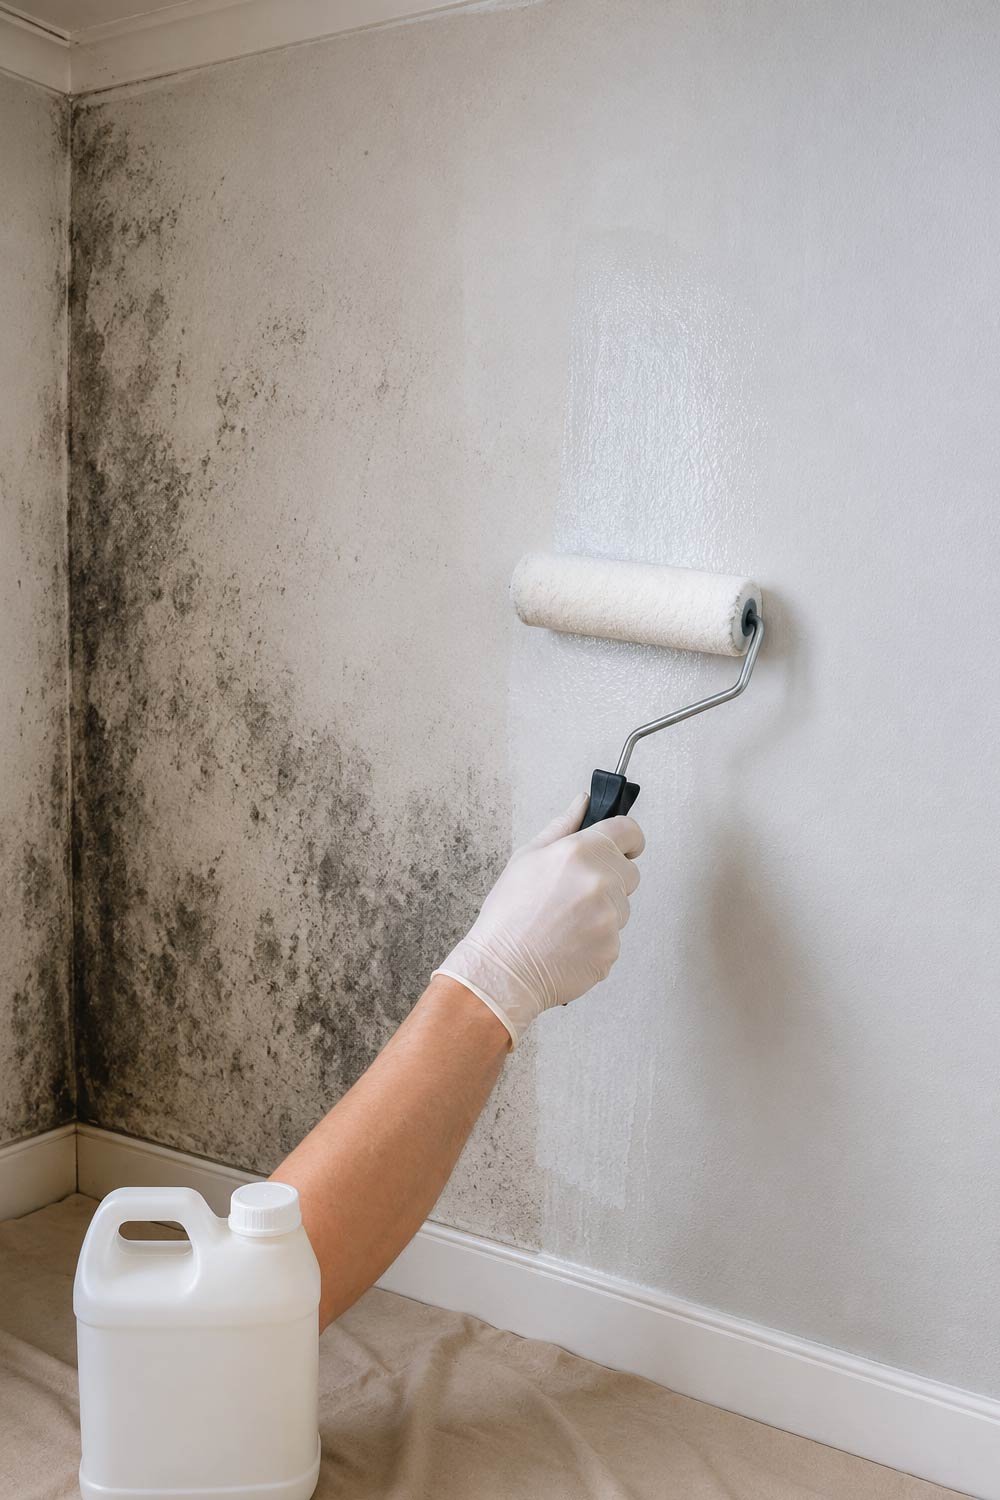
Step 3: Remove Damaged Paint and Plaster
Removing all weak and damaged material ensures a solid base for repair. Leaving behind compromised surfaces can lead to failure of the new finish.
Once the wall is dry, inspect the damaged area closely.
Use a scraper or putty knife to remove:
- Peeling paint
- Cracked plaster
- Soft or powdery drywall
- Mold-infested surface material
If mold is present, clean the area using a mixture of water and mild detergent or a vinegar solution. Wear gloves and a mask to avoid inhaling spores.
For heavy mold, a commercial mold remover may be necessary.
Make sure you remove all weak or damaged material until you reach a solid, stable surface.
Step 4: Treat the Wall for Mold and Moisture Protection
Treating the wall with protective solutions helps eliminate hidden mold spores and prevents future moisture-related damage.Even if you don’t see visible mold, spores may still be present. This step helps prevent future problems.
Apply:
- Anti-fungal solution
- Mold-resistant primer
- Waterproofing sealant (for external walls or bathrooms)
Allow it to dry completely according to product instructions.
This layer acts as protection between the wall and future moisture exposure.
Step 5: Repair Cracks and Surface Damage
Repairing the wall surface restores its structure and prepares it for finishing. Proper filling and smoothing are essential for a seamless appearance.
Now that the wall is clean and dry, it’s time to rebuild the surface.
For small cracks
Small surface cracks can be easily repaired using standard wall fillers for a smooth and even finish.
Use wall filler or spackle. Apply it with a putty knife, press it into cracks, and smooth the surface.
For larger damaged areas
Larger areas require more material and careful application to ensure strength and durability.
You may need plaster or joint compound. Apply in thin layers, allowing each layer to dry before adding the next.
Once fully dry, sand the surface using fine sandpaper until smooth and even.
A properly sanded wall is key to achieving a professional finish later.
Also Read:
Step 6: Apply Primer
Applying primer is a crucial step that ensures better paint adhesion and long-term durability, especially for water-damaged surfaces.
Primer is often skipped, but it is essential for water-damaged walls.
It helps:
- Seal repaired areas
- Prevent stains from bleeding through paint
- Improve paint adhesion
- Strengthen surface durability
Choose a stain-blocking or moisture-resistant primer for best results.
Apply one or two coats depending on severity, and allow it to dry completely.
Step 7: Repaint the Wall
Repainting is the final and most rewarding step in restoring a water-damaged wall. This stage not only improves appearance but also adds a protective layer that enhances durability and resistance against future moisture issues.
Now comes the final and most satisfying step—painting.
Choose a high-quality interior paint, preferably one that is:
- Moisture resistant
- Anti-fungal
- Durable and washable
Apply the paint in thin, even coats. Two coats are usually required for full coverage.
Let the first coat dry before applying the second.
If done correctly, the repaired area should blend seamlessly with the rest of the wall.
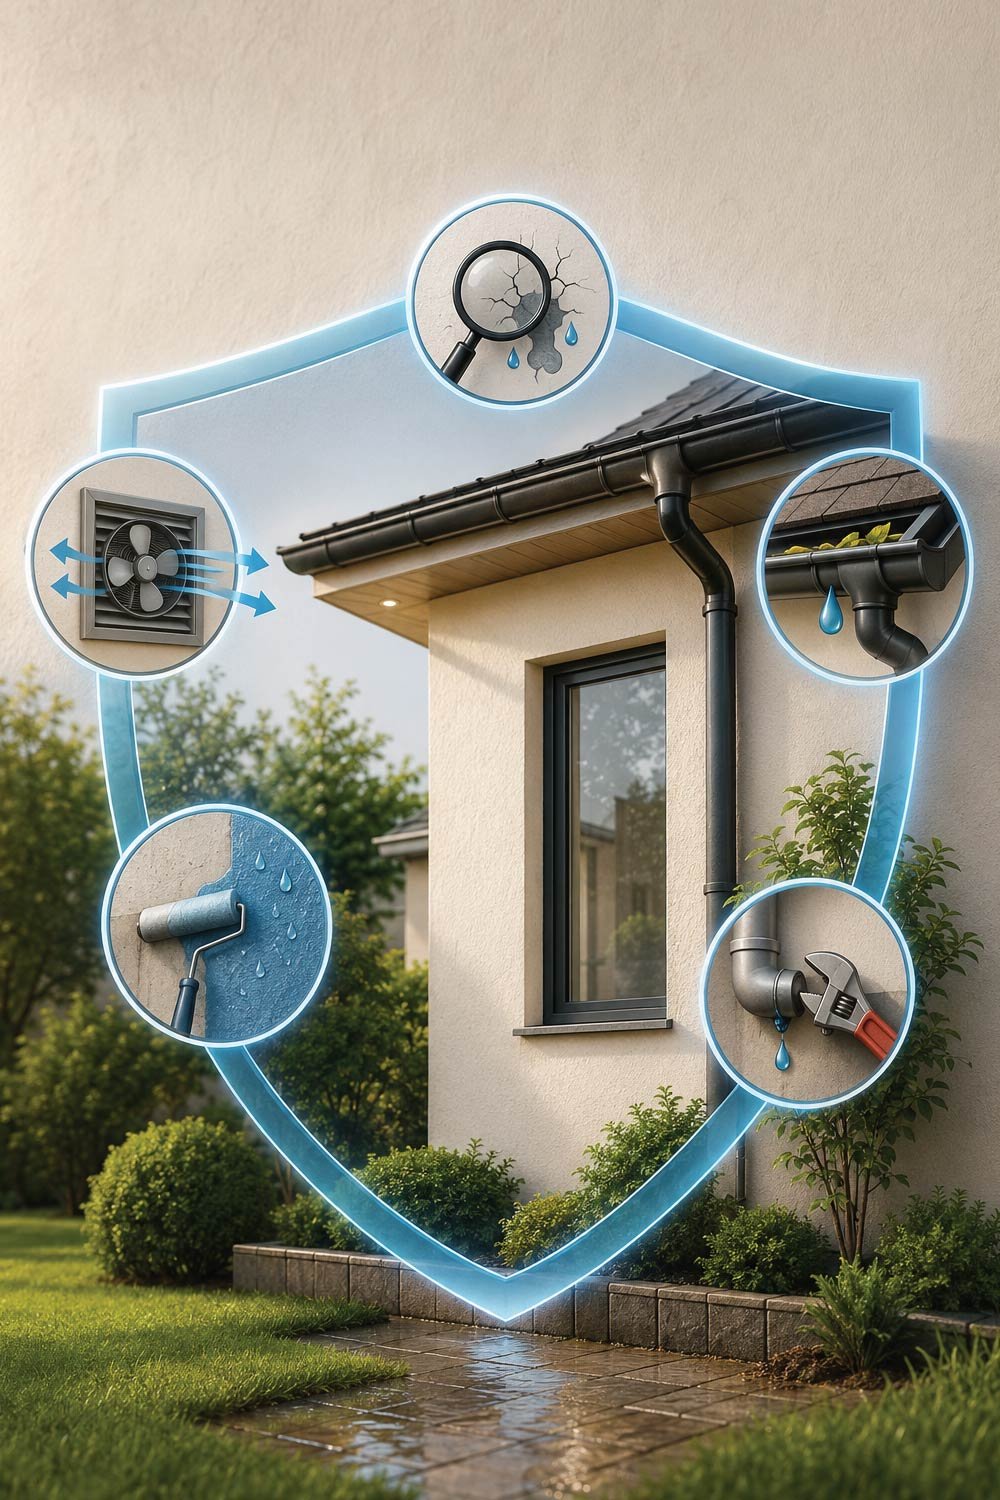
Step 8: Prevent Future Water Damage
Preventing future water damage is just as important as repairing the current issue. Taking proactive steps helps protect your walls, reduce maintenance costs, and ensure long-term durability of your home.
Fixing the wall is only half the job. Preventing future damage is equally important.
Here are some preventive measures:
1. Regular inspections
Routine checks help identify early signs of leaks or dampness before they turn into major problems.
Check walls, ceilings, and plumbing for leaks every few months.
2. Improve ventilation
Proper airflow reduces moisture buildup, which is a major cause of wall damage, especially in enclosed spaces.
Good airflow reduces moisture buildup, especially in kitchens and bathrooms.
3. Waterproofing
Applying waterproof solutions creates a protective barrier that prevents water from penetrating walls.
Apply waterproof coatings on exterior walls and damp-prone areas.
4. Maintain gutters and drainage
Efficient drainage systems prevent water from accumulating and seeping into walls, reducing the risk of damage.
Blocked gutters can cause water to seep into walls.
5. Fix leaks immediately
Addressing leaks quickly prevents minor issues from turning into serious structural damage over time.
Even small leaks can cause major damage over time.
Also Read:
When to Call a Professional
While many water damage issues can be handled with DIY methods, some situations require expert intervention to ensure safety and long-term effectiveness.
While minor and moderate water damage can often be repaired at home, there are situations where professional help is necessary:
- Severe structural damage
- Persistent mold growth
- Electrical wiring affected by water
- Large-scale flooding damage
- Repeated wall dampness even after repairs
Professionals have specialized tools like moisture meters and industrial drying systems that ensure deeper and more reliable repairs.
Common Mistakes to Avoid
Avoiding common mistakes is essential for ensuring that your repair work lasts and does not lead to recurring problems in the future.
Many people make simple mistakes that lead to recurring damage. Avoid the following:
- Painting over wet walls
- Ignoring the source of leakage
- Skipping primer
- Not removing all damaged material
- Rushing the drying process
These shortcuts may make the wall look fine temporarily but will cause problems again later.
Also Read:
Final Thoughts
Fixing a water-damaged wall is not just about appearance—it’s about protecting your home’s structure and preventing long-term issues like mold and decay. The process may take time, but each step is important: stopping the water source, drying the wall, removing damaged material, treating for mold, repairing the surface, and finally repainting.
With patience and proper technique, even badly damaged walls can be restored to a clean, strong, and fresh condition. More importantly, by taking preventive steps, you can ensure the problem doesn’t return.
A well-maintained wall is not just about beauty—it’s about safety, comfort, and the long-term health of your home.