
A broken plumbing pipe is one of those problems that can turn a normal day into a stressful one very quickly. Water leakage can damage walls, floors, and furniture within minutes if not controlled. The good news is that not every broken pipe requires an immediate full replacement or expensive emergency plumber visit.
In many cases, you can temporarily or even permanently repair the pipe yourself if you act carefully and follow the right steps.This guide explains how to identify the problem, stop the leak, and repair a broken pipe using practical DIY methods.
Table of Contents
ToggleFirst: Understand the Type of Pipe Damage
Before starting any pipe repair, it is essential to correctly identify the type of damage because each issue requires a different repair approach. Misdiagnosing the problem can lead to ineffective fixes, recurring leaks, or even worsening damage, especially in pressurized plumbing systems where small issues can escalate quickly.
1. Small pinhole leak
A small pinhole leak is a tiny perforation in the pipe, often caused by corrosion or aging material, and it typically releases slow drips or fine sprays that can go unnoticed at first but gradually worsen over time.
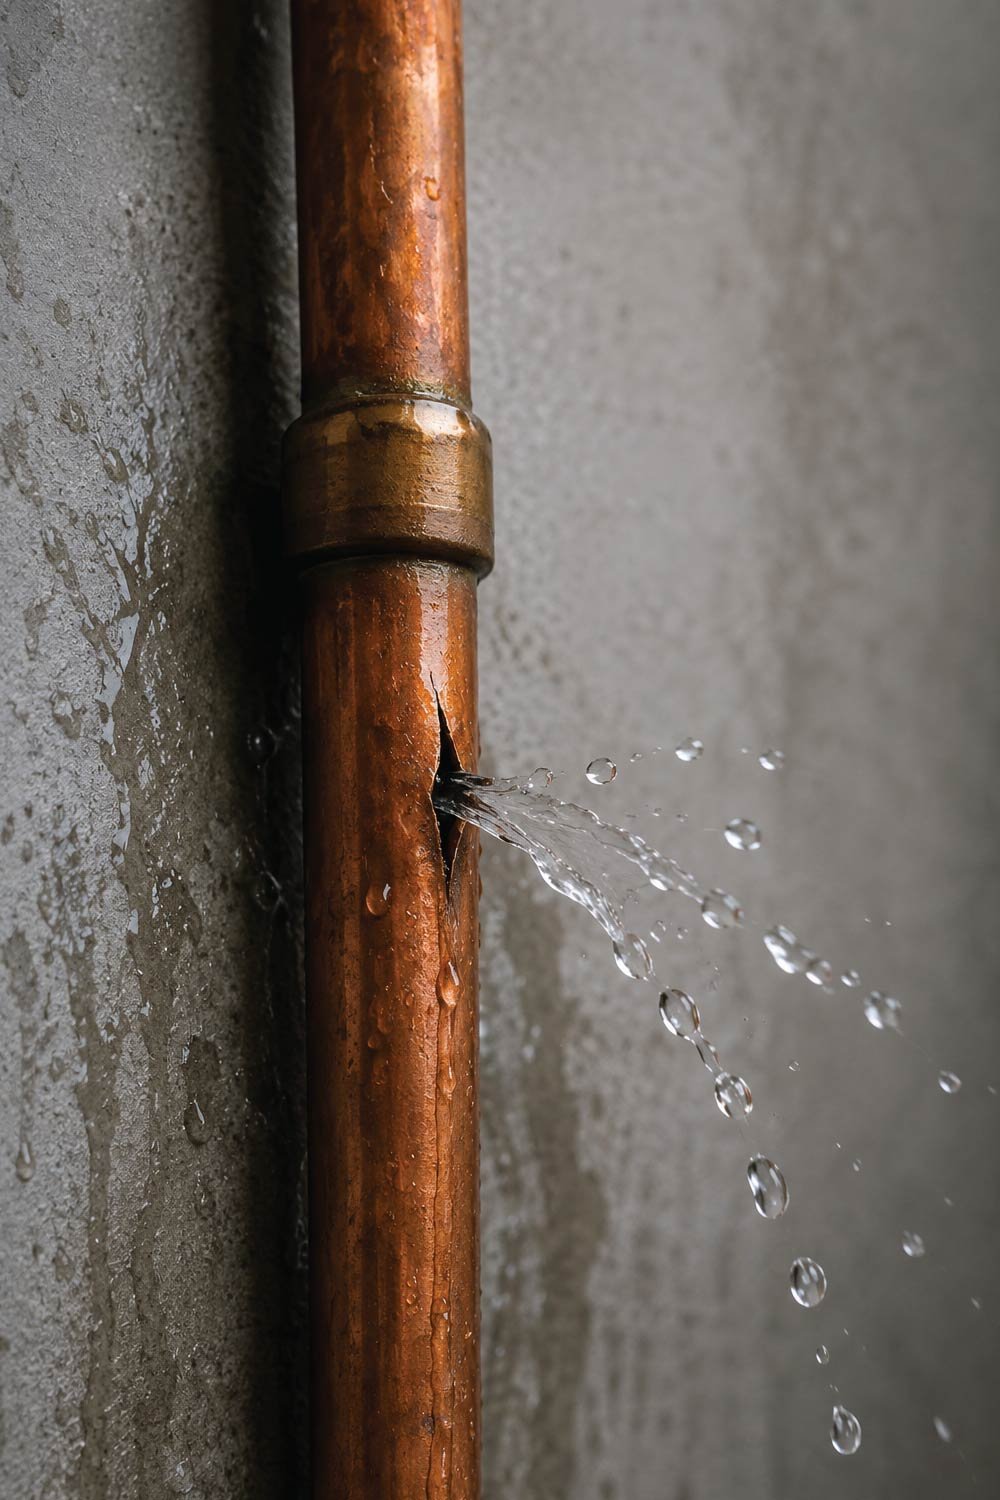
2. Cracked pipe
A cracked pipe appears as a visible split or line along the pipe surface and can result in significant water leakage, which may quickly increase if pressure continues to act on the damaged section.
3. Burst pipe
A burst pipe is a severe rupture where the pipe has completely failed, causing rapid and uncontrolled water flow, and it is considered an emergency that requires immediate action to prevent flooding and property damage.
4. Loose joint or coupling leak
A loose joint or coupling leak occurs when the pipe itself is intact but the connecting fittings are not sealed properly, often due to wear, vibration, or improper installation, leading to water seepage at connection points.
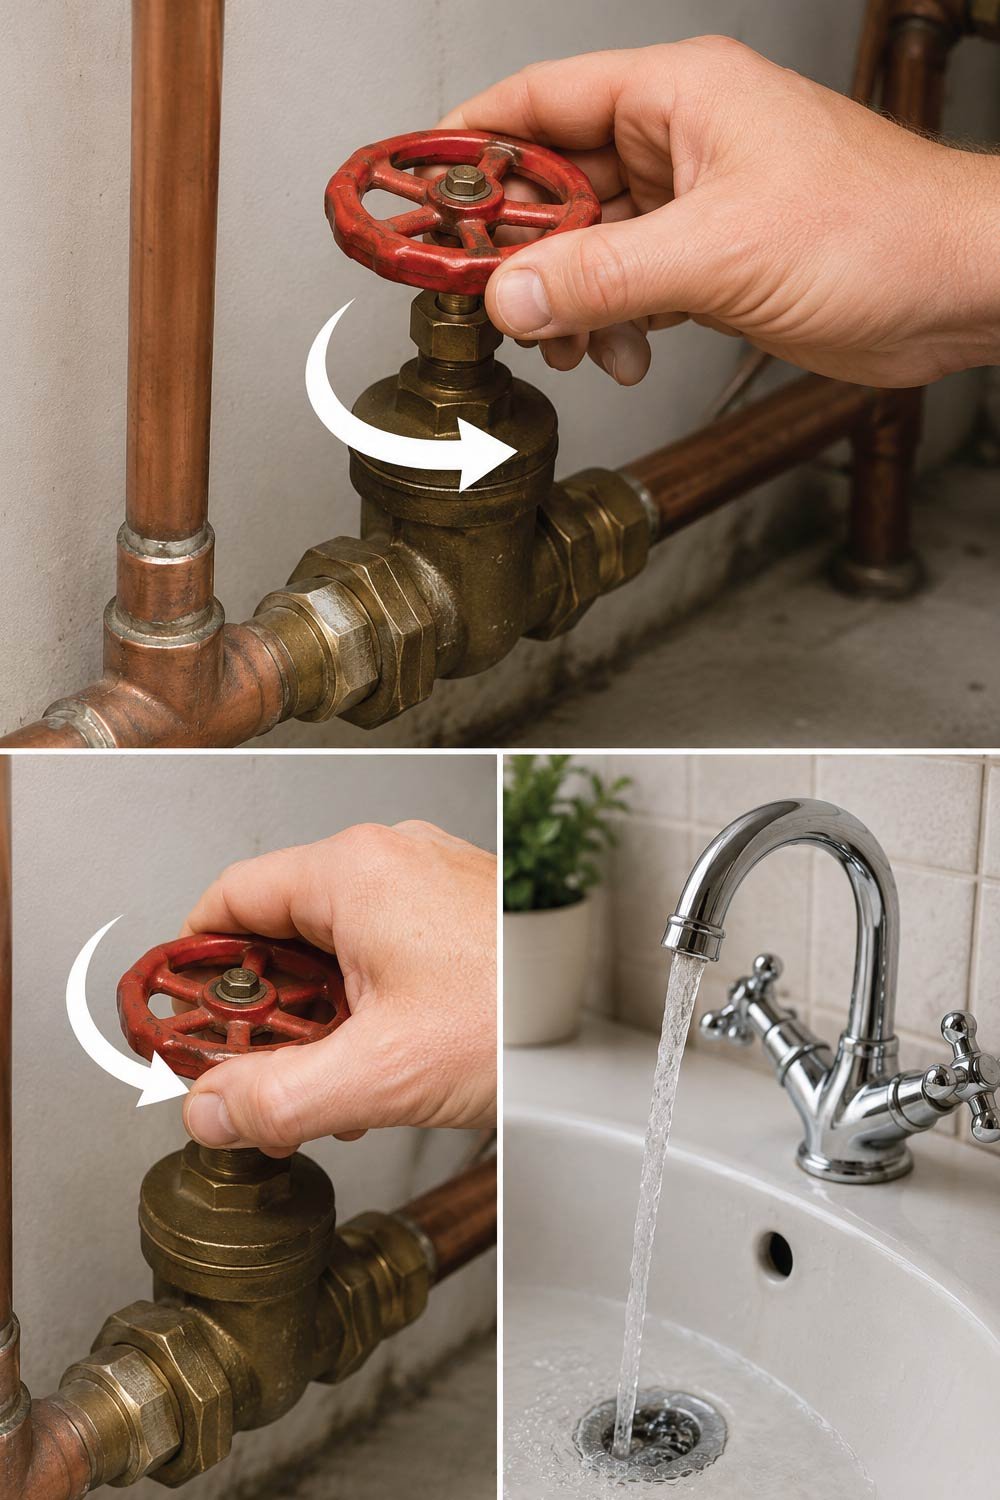
Step 1: Turn Off the Water Supply Immediately
Turning off the water supply is the most critical first action in any pipe repair situation because it stops water pressure from worsening the leak and helps prevent flooding or structural damage. This step ensures a safer working environment and allows you to proceed with repairs without continuous water flow interfering.
How to Do It
How to Do It: These steps help you quickly stop water flow, relieve pressure in the system, and reduce the risk of additional leakage or water damage during repairs.
- Locate the main water valve in your home.
- Turn it clockwise to shut off the supply.
- Open nearby taps to drain remaining water from the system.
This reduces pressure and prevents further flooding.
Step 2: Drain and Dry the Pipe Area
Draining and drying the pipe area is essential before applying any repair material because most sealing products require a clean, dry surface to bond effectively. Moisture can weaken adhesion and reduce the success of temporary or permanent repairs, so proper preparation is a key step in ensuring a reliable fix.
Steps
Steps: This process removes excess water from the system and prepares the damaged pipe surface for effective sealing or patching.
- Use a cloth or towel to wipe the area.
- If water keeps seeping, wait a few minutes after shutting off the supply.
- For active leaks, place a bucket underneath to collect dripping water.
Most repair materials will not stick properly to a wet surface, so this step is crucial.
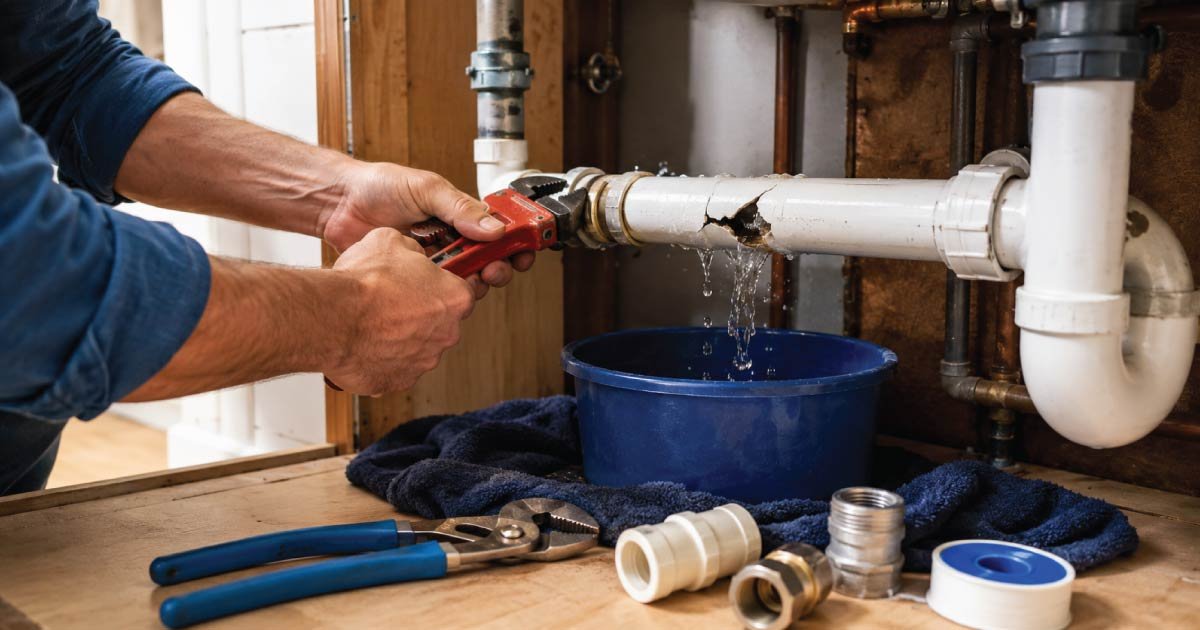
Step 3: Identify the Exact Leak Point
Accurately identifying the exact leak point is important because visible water spread can sometimes be misleading, making the damage appear larger than it actually is. Pinpointing the true source ensures that repairs are applied correctly and efficiently, preventing unnecessary work or incomplete sealing.
How to Inspect
These steps help you carefully locate the precise origin of the leak so that repair efforts are focused and effective.
- Look for cracks, holes, or wet spots
- Run your hand gently along the pipe (if safe)
- Watch where water is escaping
Sometimes the leak appears larger than it actually is, so pinpointing the exact source helps you choose the right repair method.
Also Read:
How to Fix a Leaking Tap: A Complete Step-by-Step Guide (DIY)
Step 4: Temporary Emergency Fix (Pipe Tape Method)
The pipe tape method is a quick emergency solution designed to temporarily seal leaks until a permanent repair can be completed. It works best for small cracks or pinhole leaks by creating a tight, pressure-resistant wrap around the damaged area, helping reduce water loss immediately.
Materials & Steps
This method uses self-fusing or plumber’s tape to create a compressed seal over the damaged section, providing a short-term but effective leak control solution.
- Self-fusing silicone tape or plumber’s tape
Steps:
- Stretch the tape tightly.
- Wrap it around the leak starting a few centimeters before the damaged area.
- Overlap each layer as you move across the leak.
- Continue wrapping beyond the damaged section.
Why it works: The tape compresses and seals the leak using pressure. It is a strong temporary solution but not always permanent.
Step 5: Rubber Patch and Clamp Method (Strong Temporary Repair)
The rubber patch and clamp method is a reliable short-term solution for sealing small cracks or holes in pipes when a permanent repair cannot be done immediately. It works by applying direct pressure over the damaged area, creating a tight barrier that significantly reduces or stops water leakage under moderate household pressure conditions.
Materials & Steps
This method uses a flexible rubber layer combined with a tightening clamp to compress the damaged area and form a secure temporary seal over the leak.
- Rubber piece (from an old hose or rubber sheet)
- Pipe clamp or metal strap
- Screwdriver or wrench
Steps:
- Place the rubber piece over the leak.
- Wrap a clamp around it tightly.
- Tighten the clamp until the rubber is firmly pressed against the pipe.
Result: This creates a strong seal and can last weeks or even months depending on pressure.
Also Read:
How to Repair a Leaking Pipe Under the Sink (DIY Homeowner Guide)
Step 6: Epoxy Putty Repair (Semi-Permanent Fix)
Epoxy putty is a highly effective DIY repair material that can seal pipe leaks by hardening into a solid, cement-like substance. It bonds strongly to metal and PVC surfaces, making it suitable for cracks, pinholes, and small damaged sections where a longer-lasting fix is needed without immediate pipe replacement.
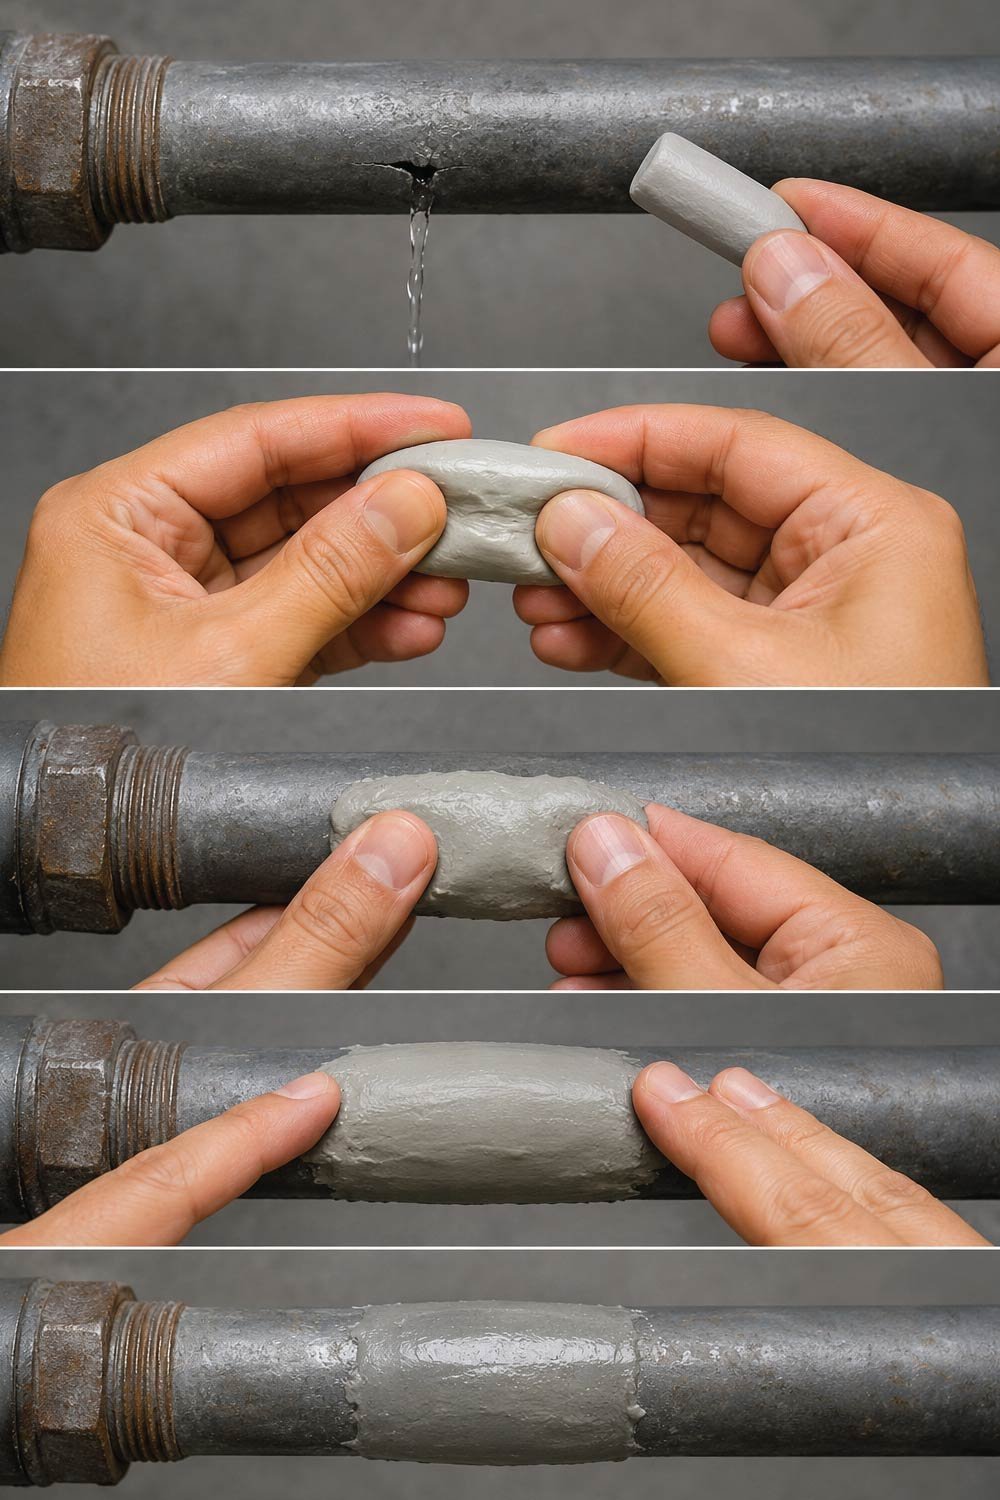
Steps
This process involves preparing, applying, and curing epoxy putty to create a hardened seal that blocks leaks and restores pipe integrity.
- Cut a piece of epoxy putty.
- Knead it until it becomes uniform in color.
- Press it firmly over the leak.
- Smooth it around the pipe surface.
- Let it cure for the recommended time (usually 1–2 hours).
Why it works: Epoxy hardens like cement and bonds strongly to metal and PVC pipes, sealing cracks permanently in many cases.
Step 7: Replace a Damaged Pipe Section (Permanent Fix)
Replacing a damaged pipe section is the most reliable long-term solution when a pipe is severely cracked, corroded, or repeatedly leaking. Unlike temporary fixes, this method restores full structural integrity and ensures the plumbing system functions safely and efficiently without ongoing repair issues.
Tools Needed
These essential tools and materials are required to safely cut out damaged pipe sections and install new replacements with proper sealing and alignment.
- Pipe cutter or hacksaw
- Replacement pipe
- Couplings or connectors
- PVC cement (for plastic pipes) or wrench (for metal pipes)
For PVC Pipes
This process involves cutting out damaged sections and securely bonding new pipe pieces using chemical adhesive for a strong, leak-free connection.
- Cut out the damaged section.
- Clean the edges.
- Apply PVC primer and cement.
- Insert the new pipe section and hold firmly.
- Allow it to set for a few minutes.
For Metal Pipes
This method replaces damaged sections using threaded or compression fittings, ensuring a tight mechanical seal to prevent future leaks.
- Cut out the damaged part.
- Thread or fit a new pipe section using couplings.
- Tighten using a wrench.
- Use sealing tape on threads for extra protection.
Also Read:
How to Repair a Leaking Pipe Under the Sink (DIY Homeowner Guide)
Step 8: Fixing a Leaky Pipe Joint
A leaky pipe joint often occurs when threaded connections loosen or old sealing material deteriorates over time. In many cases, the pipe itself remains intact, so simply resealing the joint can effectively stop leaks without replacing larger sections of plumbing.
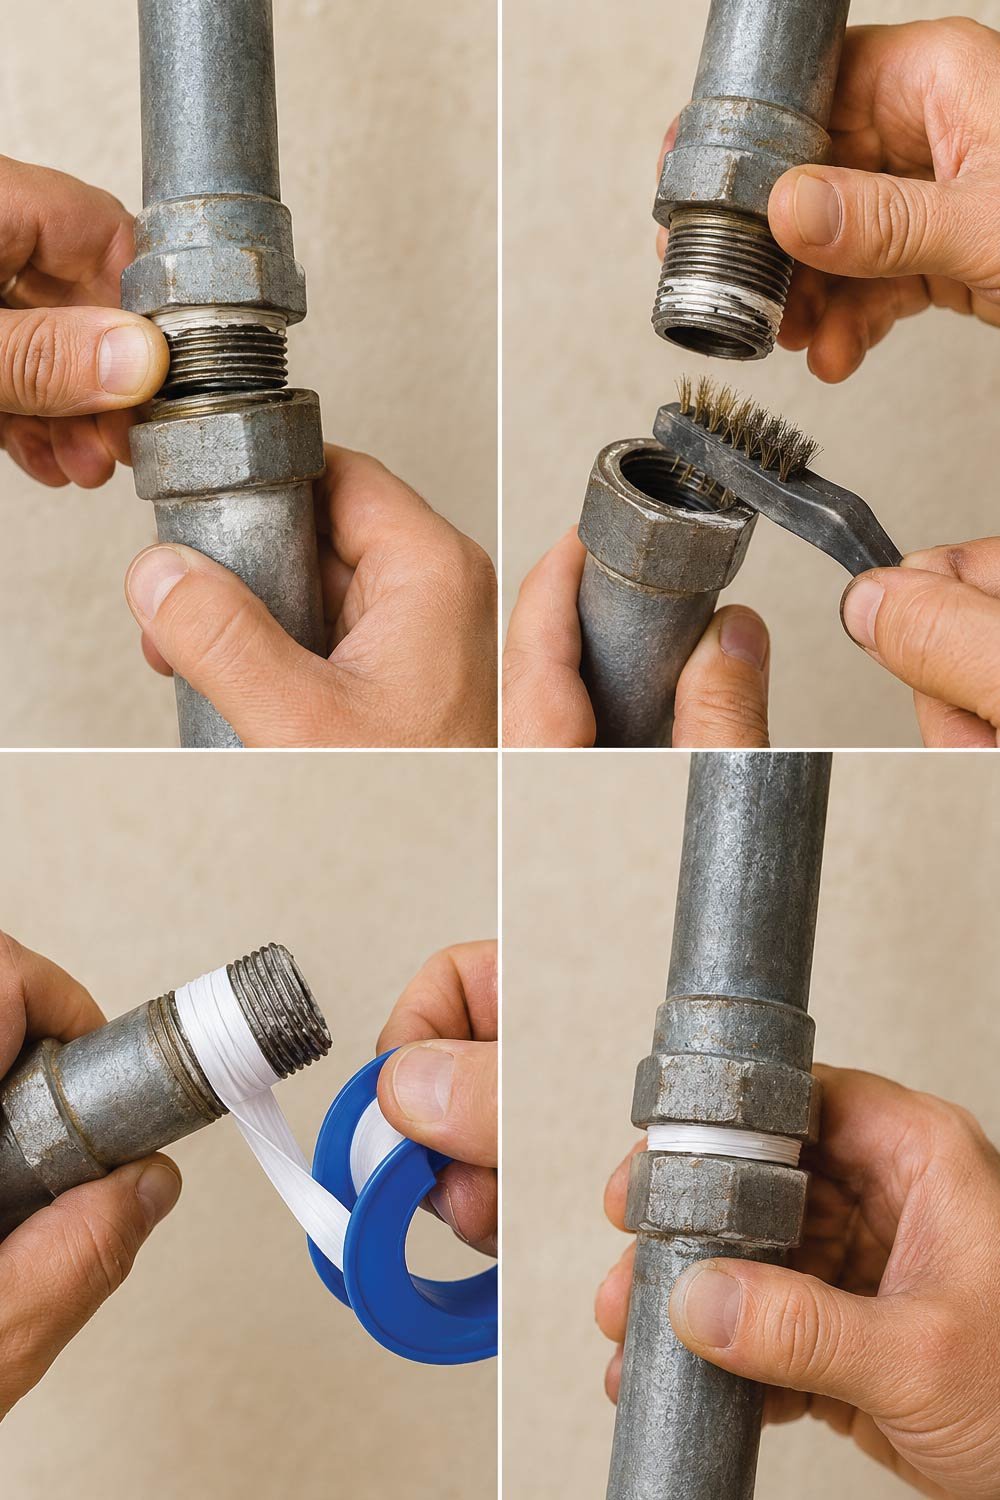
Steps
This process focuses on disassembling the joint, cleaning old sealing material, and reapplying fresh plumber’s tape to restore a watertight connection.
- Unscrew the joint carefully.
- Clean old sealing tape or debris.
- Wrap fresh plumber’s tape around the threads.
- Reconnect and tighten securely.
This often solves leaks instantly.
Step 9: Turn the Water Back On Slowly
After completing any pipe repair, restoring water flow should always be done carefully because sudden pressure can reopen weak seals or expose unfinished repairs. Slow reactivation of the system allows you to monitor the repaired area closely and ensure the fix is holding properly before full pressure is restored.
Steps
This process gradually reintroduces water pressure so you can safely test the repaired section and confirm there are no leaks or weak points.
- Turn the main water supply on slowly.
- Watch the repaired area carefully.
- Check for dripping or moisture.
- Tighten or reapply material if needed.
Never rush this step testing is critical.
Also Read:
How to Fix a Running Toilet: A Complete DIY Guide for Homeowners
Common Mistakes to Avoid
Avoiding common mistakes during pipe repair is just as important as following the correct steps. Small errors can weaken repairs, cause repeat leaks, or even damage the plumbing system further, leading to higher repair costs and more complicated fixes in the future.
1. Not turning off water properly
Failing to fully shut off the water supply leaves pressure in the system, which can disrupt repairs and cause immediate leakage once work begins.
2. Applying tape on wet pipes
Applying sealing materials on wet surfaces prevents proper adhesion, causing the repair to fail quickly or leak again under pressure.
3. Ignoring small leaks
Small leaks may seem harmless, but they often expand over time and can eventually lead to major pipe failures or water damage.
4. Over-tightening joints
Over-tightening fittings can crack pipes or damage threads, making the leak worse instead of fixing it and requiring part replacement.
When You Should Call a Professional Plumber
While DIY repairs are effective for minor issues, some plumbing problems require professional tools and expertise. Recognizing these situations early helps prevent serious damage, safety risks, and costly repairs caused by improper handling of complex plumbing systems.
Warning Signs
These conditions indicate serious plumbing failures that cannot be safely or effectively repaired using basic home methods.
- Pipe is completely burst and flooding continues
- Main underground pipe is damaged
- Multiple leaks are appearing in different areas
- You smell sewage or suspect contamination
- Pipe system is old and corroded throughout
In such cases, a plumber will provide a safer and more permanent solution.
Also Read:
How to Fix a Kitchen Sink Leak: A Complete Step-by-Step Guide
How to Prevent Pipe Damage in the Future
Preventing pipe damage is far easier and more cost-effective than repairing leaks after they occur. Regular maintenance, environmental protection, and proper water usage habits can significantly extend the lifespan of your plumbing system and reduce the likelihood of unexpected failures.
1. Regular inspection
Regularly inspecting visible pipes every few months helps detect early signs of rust, moisture, or wear before they develop into serious leaks.
2. Avoid freezing temperatures
Protecting pipes from freezing weather by insulating them helps prevent expansion-related bursting and long-term structural damage.
3. Control water pressure
Maintaining stable water pressure reduces stress on pipe joints and fittings, helping prevent cracks and leaks over time.
4. Replace old pipes early
Replacing aging or corroded pipes proactively prevents sudden failures and reduces the risk of extensive water damage.
5. Avoid chemical buildup
Limiting harsh chemical exposure helps preserve pipe integrity, especially in plastic plumbing systems that may weaken over time.
Final Thoughts
Repairing a broken plumbing pipe may look complicated, but most common leaks can be handled with basic tools and a calm approach. The key is to act quickly, stop the water supply, and choose the right repair method based on the severity of the damage.
Small leaks can often be fixed with tape or epoxy, while larger damage may require replacing a section of pipe. And remember temporary fixes are helpful in emergencies, but long-term reliability comes from proper repair or replacement.If you take your time and follow the steps carefully, you can save both water damage costs and emergency repair expenses.