

A broken door handle is one of those small household problems that can quickly turn into a daily annoyance. One moment everything works fine, and the next, you’re pulling, twisting, or jiggling the handle just to open a door. Whether it’s a bedroom door, bathroom door, or main entrance, a faulty handle can make your home feel inconvenient and frustrating.
The good news is that most door handle problems are not serious. In fact, many can be fixed at home using simple tools and a little patience—no professional needed. In this guide, you’ll learn why door handles break, how to diagnose the issue, and step-by-step DIY fixes that actually work.
Table of Contents
ToggleUnderstanding Why Door Handles Break
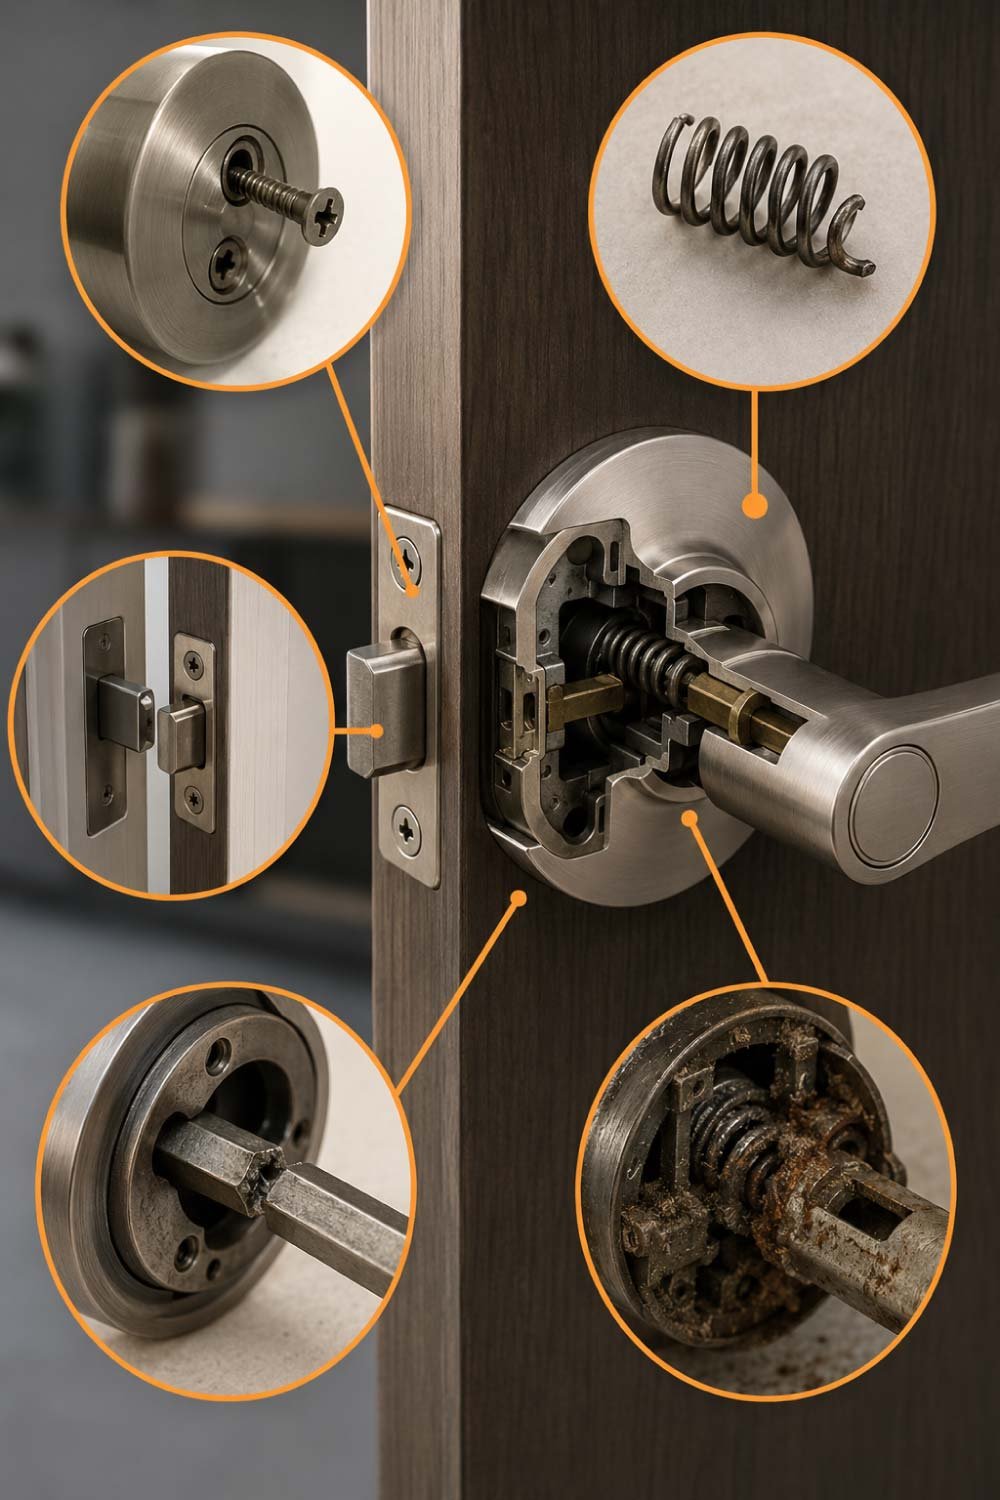
Door handles may look simple, but inside they contain several small moving parts that constantly work together every time you open or close a door. With repeated use, pressure, and environmental factors, these parts gradually weaken, loosen, or fail, leading to common issues that affect smooth operation.
Here are the most common causes:
1. Loose Screws
Loose screws are one of the most common reasons a door handle starts failing. Continuous daily use causes vibration, which slowly loosens internal and external screws. When this happens, the handle begins to wobble, feel unstable, or stop engaging the latch correctly, making operation unreliable and frustrating over time.
2. Worn-Out Internal Spring
Inside most door handles is a small spring responsible for returning the handle to its original position after being pressed. Over time, this spring can lose tension or snap completely. When that happens, the handle may feel floppy, unresponsive, or fail to bounce back after being turned.
3. Misaligned Latch
Door frames can shift slightly due to humidity, temperature changes, or loose hinges. When this happens, the latch no longer aligns properly with the strike plate. This misalignment causes resistance when turning the handle, making the door feel stuck, tight, or difficult to open and close smoothly.
4. Broken Spindle
The spindle is the metal rod that connects both sides of the door handle and transfers motion to the latch. If it becomes worn, bent, or breaks, one side of the handle may rotate freely without engaging the mechanism, leaving the door unable to open even though the handle moves.
5. Dirt and Rust Build-Up
Over time, dust, grime, and moisture can accumulate inside the handle mechanism, especially in older or humid environments. This buildup causes friction, stiffness, and sometimes complete jamming. Rust can also corrode internal parts, making the handle harder to move and reducing its overall lifespan significantly.
Understanding the cause helps you apply the right fix instead of guessing.
Tools You’ll Need for the Repair
Fixing a door handle does not require professional equipment or expensive tools. In most cases, simple household tools are enough to complete the repair. Preparing everything in advance ensures a smoother workflow and helps you avoid interruptions while dismantling or fixing the handle mechanism.
1. Screwdriver Set (Flathead and Phillips)
A screwdriver set is essential because different door handles use different screw types. Flathead and Phillips screwdrivers allow you to remove cover plates, tighten loose screws, and access internal components safely without damaging the hardware or stripping the screw heads during the repair process.
2. Lubricant Spray (WD-40 or Silicone Spray)
Lubricant spray helps loosen stiff or jammed parts inside the handle mechanism. It reduces friction, removes rust buildup, and restores smooth movement. A small amount applied carefully can make a huge difference in improving handle performance, especially in older or rarely maintained doors.
3. Pliers
Pliers are useful for gripping small parts, adjusting bent components, or pulling out stubborn screws or pins. They provide extra control when your fingers are not enough to handle tight or slippery parts inside the mechanism, making the repair process easier and more precise.
4. Small Flashligh
A flashlight helps you clearly see inside the handle assembly, especially in low-light areas or tight corners. It allows you to identify loose parts, misaligned components, or internal damage that may not be visible under normal room lighting, ensuring a more accurate diagnosis of the issue.
5. Replacement Screws (Optional)
Sometimes old screws become stripped or damaged during removal. Having replacement screws ready ensures you can securely reassemble the handle without delays. Using fresh screws also improves stability and prevents future loosening, especially in frequently used doors.
6. Paper Clip or Pin (For Small Adjustments)
A paper clip or pin can be surprisingly useful for small mechanical adjustments, such as resetting internal springs or releasing hidden locking pins. These simple tools help access tiny mechanisms that larger tools cannot reach easily during repair work.
7. Clean Cloth
A clean cloth is useful for wiping away dust, grease, or rust from internal parts. Cleaning components before reassembly ensures smoother operation and prevents debris from interfering with moving parts, helping the door handle function more efficiently after repair.
Having everything ready before you start makes the process smoother and faster.
Step-by-Step DIY Fix for a Broken Door Handle
Repairing a broken door handle becomes much easier when you follow a structured process instead of guessing. Each step helps you identify the exact issue, whether it is loose hardware, internal damage, or misalignment. Taking your time ensures a proper and long-lasting fix without unnecessary replacements.
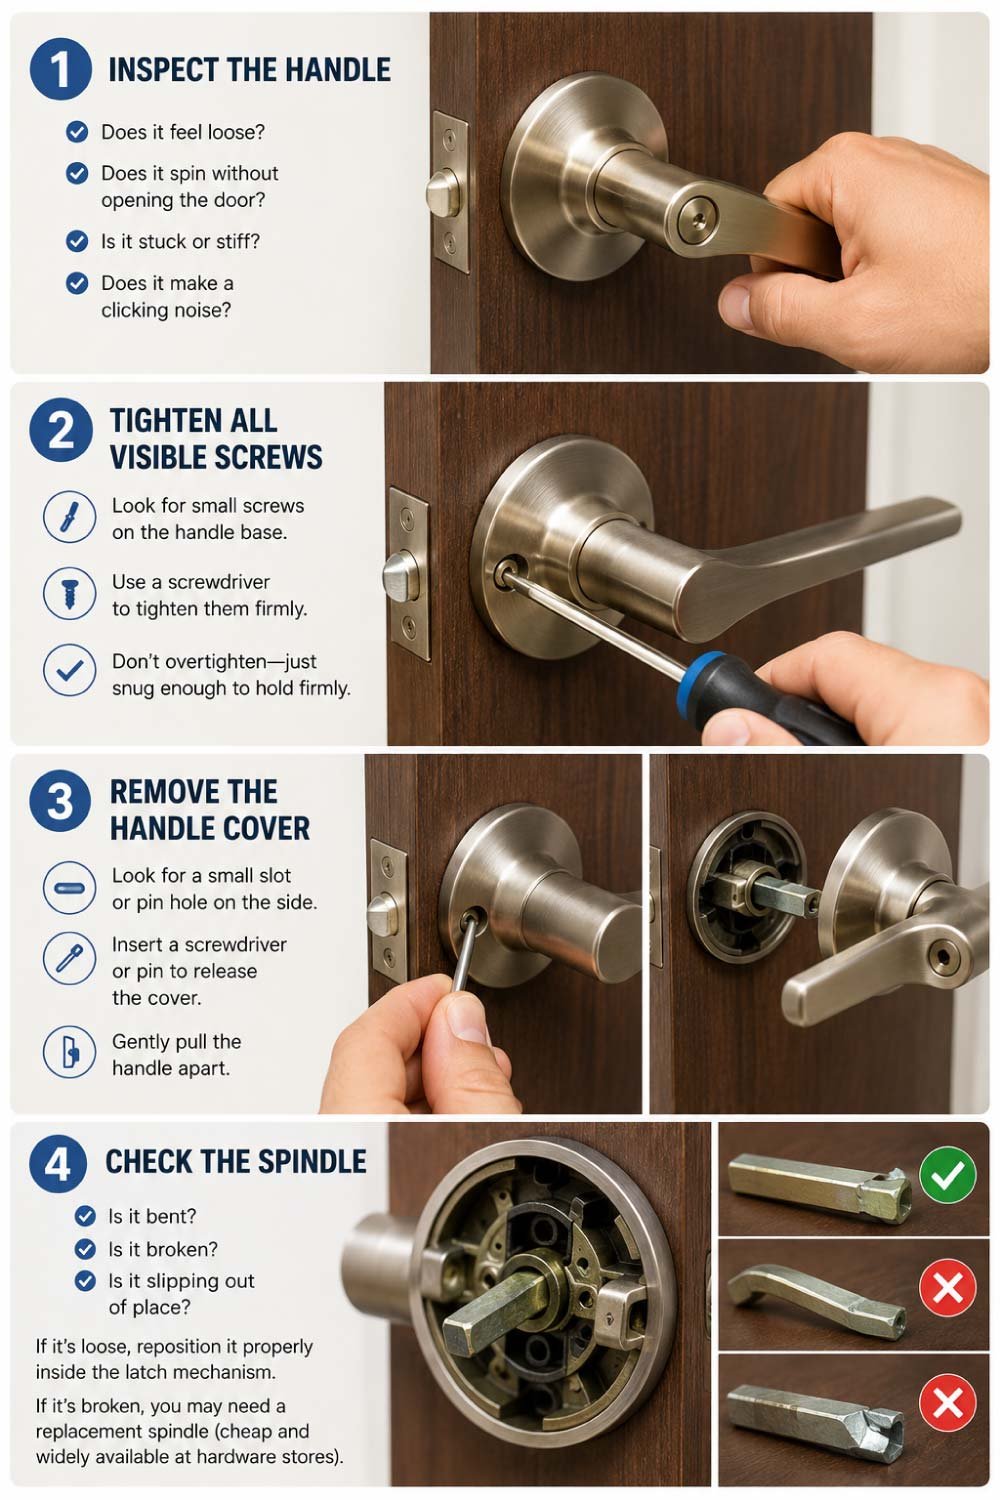
Step 1: Inspect the Handle
Start by carefully testing how the handle behaves during use. Turn it slowly and observe its movement. Check whether it feels loose, stiff, or completely unresponsive. Listening for unusual sounds like clicking or grinding can also help identify internal damage or alignment issues.
Does it feel loose?
Does it spin without opening the door?
Is it stuck or stiff?
Does it make a clicking noise?
This quick inspection helps you narrow down the issue.
If the handle is completely loose, it’s usually a screw problem. If it turns but doesn’t open the door, the spindle is likely the issue.
Step 2: Tighten All Visible Screws
Begin by locating all accessible screws on the handle plate or base. Use a suitable screwdriver to tighten them carefully. This step often solves the problem immediately because loose screws are one of the most common causes of unstable or malfunctioning door handles.
Look for small screws on the handle base.
Use a screwdriver to tighten them firmly.
Don’t overtighten—just snug enough to hold firmly.
If the screws were loose, this alone might solve the problem instantly.
Step 3: Remove the Handle Cover
If tightening screws does not fix the issue, you may need to open the handle casing. Most handles have a small release point or hidden slot that allows safe disassembly. Carefully open the cover without forcing it to avoid damaging internal components.
Look for a small slot or pin hole on the side.
Insert a screwdriver or pin to release the cover.
Gently pull the handle apart.
Be careful during this step—do not force anything. Most handles come apart easily when done correctly.
Step 4: Check the Spindle
Once the handle is open, inspect the spindle carefully. This metal rod is crucial because it connects both sides of the handle and controls the latch mechanism. Any damage or misalignment here can stop the door from opening properly.
Is it bent?
Is it broken?
Is it slipping out of place?
If it’s loose, reposition it properly inside the latch mechanism. If it’s broken, you may need a replacement spindle (cheap and widely available at hardware stores).
A properly seated spindle usually restores full functionality immediately.
Also Read:
Step 5: Inspect the Latch Mechanism
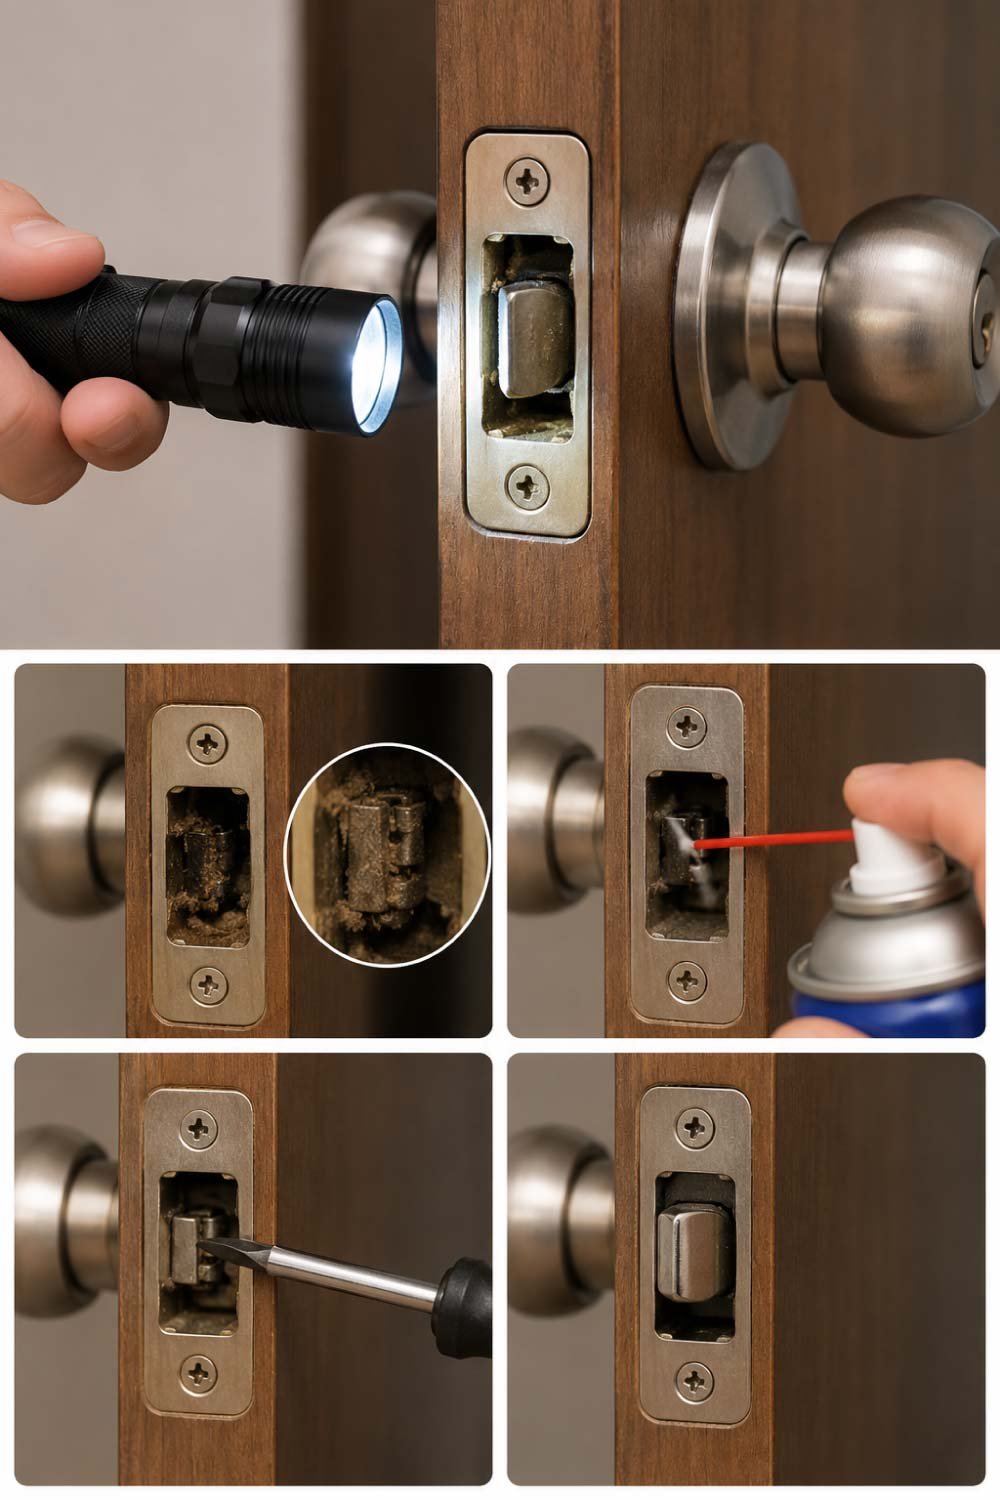
If tightening screws and checking the spindle still doesn’t solve the issue, the problem often lies deeper inside the latch mechanism. This is the part that actually moves in and out of the door frame, so even a small obstruction, dirt buildup, or internal stiffness can stop the handle from working properly.
Start by carefully examining the latch area with proper lighting.
Try this:
Shine a flashlight into the latch hole.
Look for dirt, rust, or obstruction.
Spray a small amount of lubricant inside.
Move the latch manually using a screwdriver.
If the latch moves smoothly after lubrication, you’ve likely fixed the issue.
Step 6: Fix a Stiff or Jammed Handle
A stiff or hard-to-turn handle is usually caused by internal friction between moving parts. This can happen due to dryness, dust accumulation, or lack of maintenance over time. Fortunately, this issue is often easy to fix without replacing any components.
Here’s a simple solution:
Spray lubricant into the moving parts.
Rotate the handle several times.
Wipe away excess oil.
This reduces internal friction and restores smooth movement.
Avoid using too much lubricant—it can attract dust over time.
Step 7: Replace a Broken Spring
If the handle does not return to its original position after being turned, the internal spring is likely damaged or completely broken. This spring is responsible for pushing the handle back into place, so once it fails, the handle feels loose, unresponsive, or stays stuck in a downward position.
Fix options:
Replace the spring (if available separately)
Replace the entire handle set (more common and easier)
Replacing the full handle is often quicker and more reliable for long-term use.
Step 8: Realign the Door if Needed
Sometimes the handle itself is not the real issue—the problem is with the door alignment. When a door shifts even slightly due to loose hinges or frame movement, it affects how the latch connects with the strike plate, making the handle feel faulty.
Signs include:
Handle works, but door won’t close properly
Latch doesn’t catch the strike plate
Door feels tight or misaligned
Quick fix:
Tighten hinge screws
Adjust strike plate position slightly
Check door movement
A small adjustment can make a big difference.
Also Read:
Common Mistakes to Avoid
During DIY door handle repairs, many people unintentionally make mistakes that worsen the issue or create new problems. Being careful and patient during the process helps ensure a smooth and successful repair without unnecessary damage to the handle or door structure.
1. Forcing the Handle
Never force a stuck or jammed handle. Applying excessive pressure can damage internal components like the spindle or spring, turning a simple repair into a full replacement job. Always inspect first and apply gentle adjustments before using force.
2. Ignoring Loose Screws
Loose screws may seem minor, but ignoring them allows the problem to grow over time. Eventually, the handle becomes unstable or completely detached. Regular tightening prevents long-term damage and keeps the mechanism secure and functional.
3. Over-Lubricating
Using too much lubricant can create more problems than it solves. Excess oil attracts dust and dirt, which builds up inside the mechanism and leads to stiffness or jamming. A light application is always more effective and longer-lasting.
4. Using Wrong Tools
Using incorrect tools, especially the wrong screwdriver size, can strip screws and make them difficult to remove later. Always use properly fitting tools to avoid damaging the hardware and ensure a clean, efficient repair process.
When You Should Replace the Door Handle
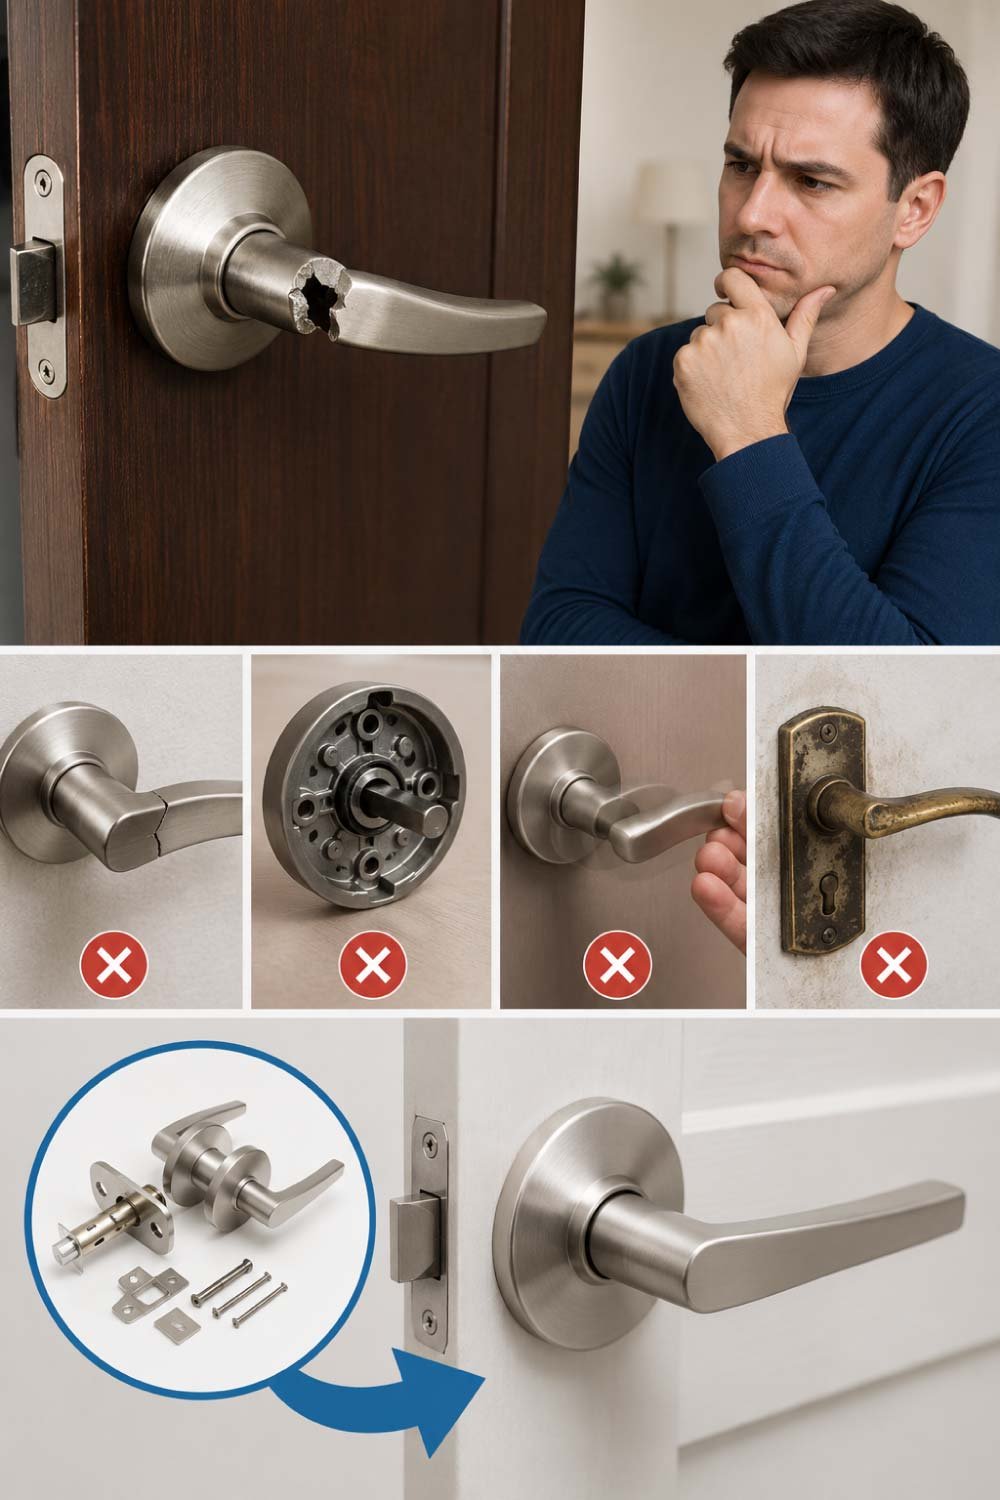
Not every door handle is worth repairing. In some cases, the damage is too severe or the internal parts are too worn out to restore proper function. Recognizing when replacement is the better option can save both time and effort.
Consider replacing if:
The handle is cracked or physically broken
Internal parts are missing
Repairs don’t last more than a few days
The handle is very old and worn out
Modern door handles are inexpensive and easy to install, so replacement is often the smartest choice.
Also Read:
How to Prevent Door Handle Problems in the Future
Regular maintenance can significantly extend the life of your door handles and reduce the chances of sudden breakdowns. A few simple habits are enough to keep everything working smoothly for years without major repairs.
✔ Tighten screws every few months
A quick check prevents long-term looseness.
✔ Clean regularly
Dust and dirt can affect internal movement.
✔ Use lubricant once or twice a year
Keeps internal parts moving smoothly.
✔ Avoid slamming doors
Hard impacts damage internal mechanisms over time.
Final Thoughts
A broken door handle might seem like a big inconvenience at first, but in most cases, it’s a simple fix you can handle yourself. Whether it’s a loose screw, a misaligned latch, or a worn-out spindle, the solution is usually straightforward and inexpensive.
With just a screwdriver and a few minutes of attention, you can restore your door handle to smooth working condition without calling a repair technician.
The key is to diagnose the problem correctly and apply the right fix step by step. Once you get comfortable with basic door hardware repairs, you’ll find that many household issues are easier to solve than they appear.
A little DIY effort goes a long way—and your door will thank you every time it opens smoothly again.