

Plaster walls are known for their durability, solid feel, and classic appearance. However, even the strongest plaster can develop cracks, holes, or surface damage over time due to settling, moisture, impacts, or simple aging. The good news is that repairing a plaster wall is completely doable as a DIY project if you follow the right steps and use the correct materials.In this guide, you’ll learn how to repair common plaster wall problems—from small cracks to larger damaged areas—using simple tools and practical techniques.
Understanding Plaster Wall Damage
Plaster wall damage can range from minor cosmetic cracks to serious structural issues. Understanding the type and severity of the damage is essential before starting repairs, as different problems require different techniques for a long-lasting and professional result.
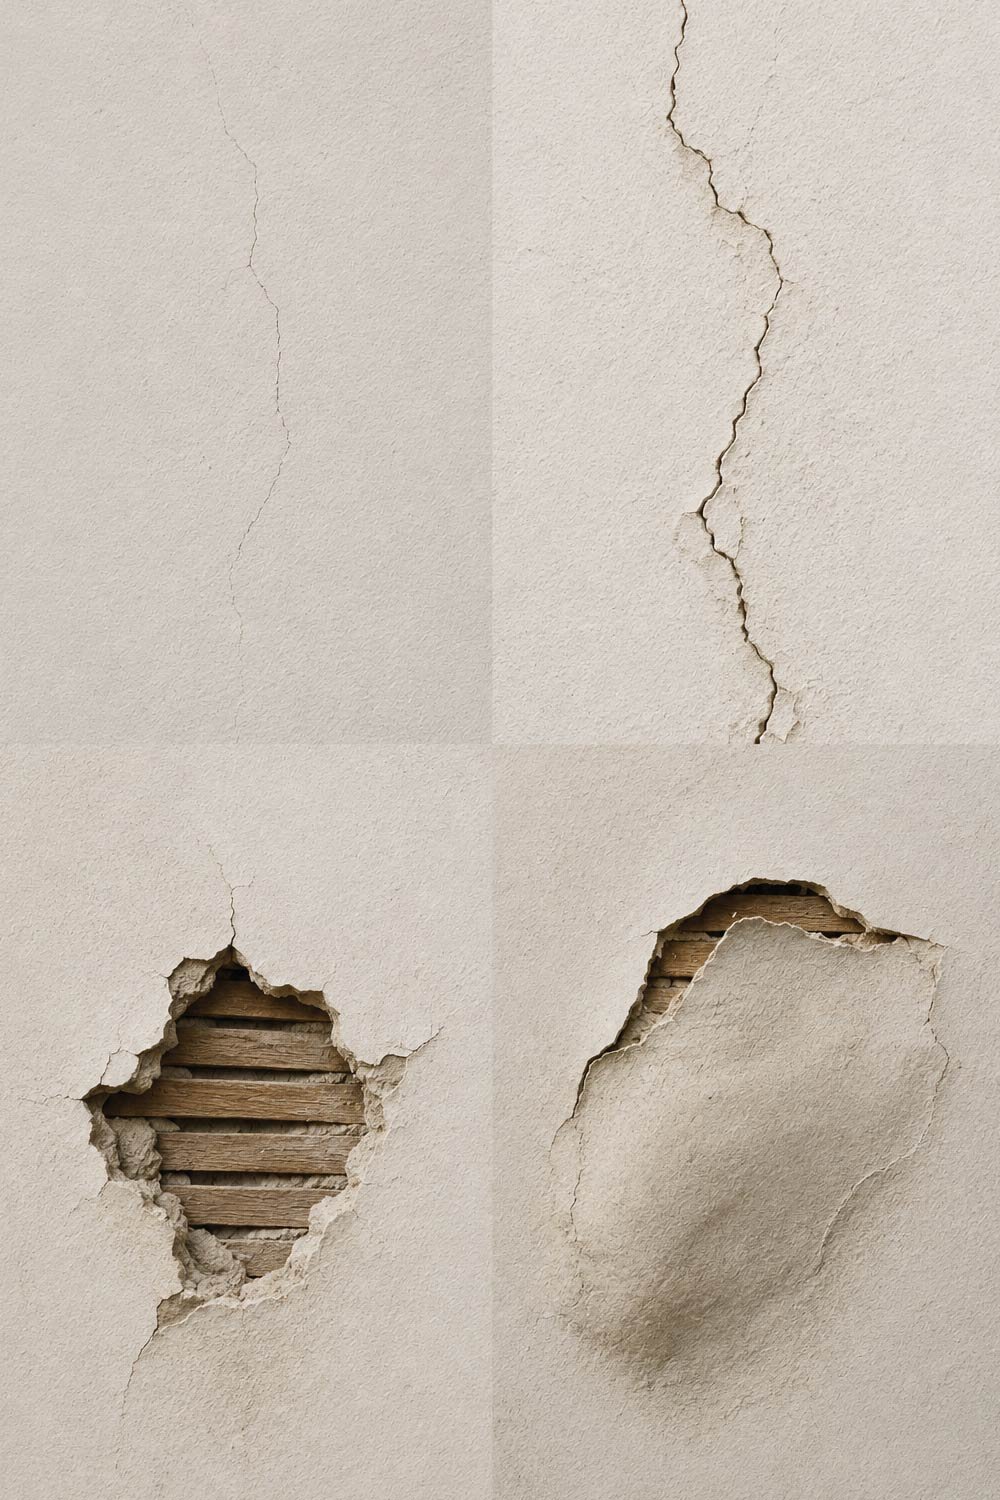
Before jumping into repairs, it’s important to understand what kind of damage you’re dealing with. Plaster walls can fail in a few common ways:
1. Hairline cracks
Hairline cracks are very thin and usually appear due to natural movement or settling of the building. While they are mostly cosmetic, repairing them early helps prevent them from widening over time.
These are thin surface cracks that usually appear due to natural settling of the house or minor movement in the structure. They are usually cosmetic but should still be repaired to prevent expansion.
2. Larger cracks
Larger cracks may indicate deeper issues within the wall, such as structural movement or weakened plaster, requiring more careful repair techniques.
Wider cracks may indicate deeper movement in the wall or weakened plaster. These require more careful filling and reinforcement.
3. Holes or missing plaster
Holes or missing sections of plaster expose the underlying structure and require proper filling and rebuilding to restore the wall’s integrity.
These occur from accidental impact, drilling mistakes, or removing fixtures. They expose the underlying lath or masonry.
4. Bulging or loose plaster
Bulging or detached plaster is a more serious issue, often indicating that the plaster has separated from the base layer and needs reattachment or replacement.
Sometimes plaster detaches from the lath underneath and creates a hollow or bulging surface. This is more serious and may require reattachment or replacement.
Understanding the type of damage helps you choose the right repair method.
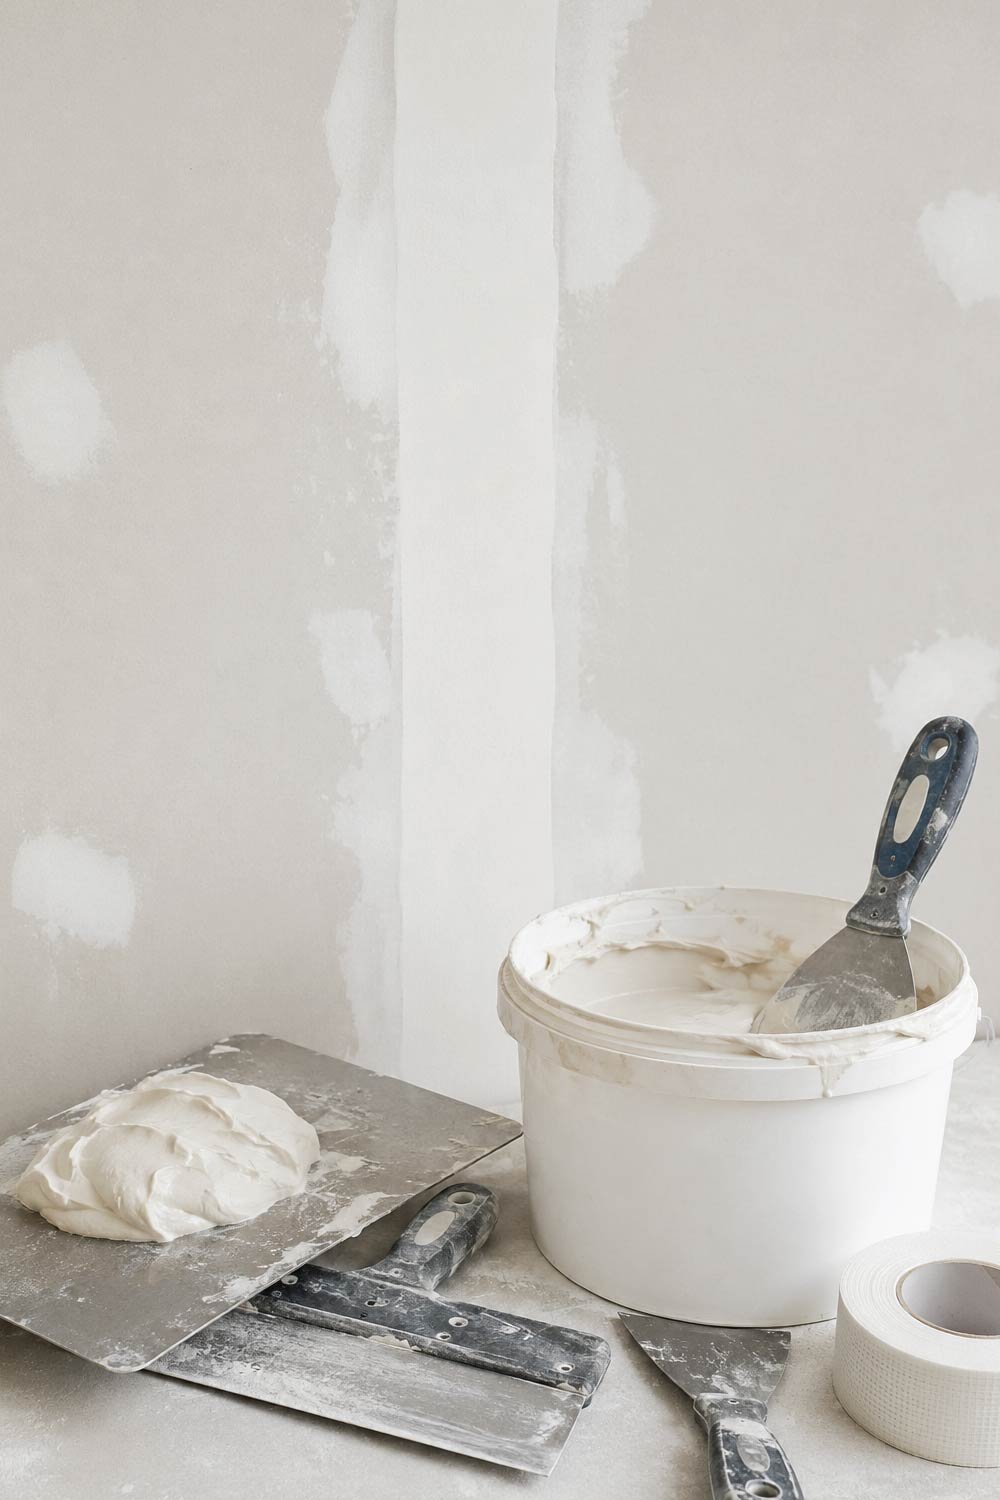
Tools and Materials You’ll Need
Having the right tools and materials ready before starting ensures a smooth and efficient repair process. Proper preparation helps avoid interruptions and allows you to complete the work with better results.
Before starting, gather everything you’ll need so you don’t have to stop midway through the repair.
Basic tools
These essential tools help with cleaning, preparing, and smoothing the damaged area for repair.
- Utility knife or scraper
- Putty knife (various sizes)
- Sandpaper (medium and fine grit)
- Drill (optional for larger holes)
- Dust brush or vacuum
- Paintbrush or sponge
Repair materials
Using the right materials ensures durability and helps achieve a smooth, professional-looking finish after repair.
- Joint compound or plaster patching compound
- Plaster bonding agent (for deeper repairs)
- Fiberglass mesh tape (for cracks and holes)
- Screws and washers (for loose plaster)
- Primer
- Paint matching your wall color
Having everything ready will make the repair process much smoother and more efficient.
Step-by-Step Guide to Repair Plaster Walls
Repairing plaster walls requires patience and proper technique to ensure long-lasting results. Following each step carefully will help restore both the strength and appearance of the wall.
Step 1: Prepare the Area
Preparation is a critical step that ensures proper adhesion and a clean working environment, which directly affects the quality of the final repair.
Proper preparation is essential for a long-lasting repair.
Start by clearing the area around the damage. Remove any furniture or cover it with a cloth. Lay down a drop sheet to catch dust and debris.
Next, use a utility knife or scraper to remove any loose plaster, flaking paint, or crumbling edges around the damaged area. This step is important because new plaster will not adhere properly to weak surfaces.
For cracks, slightly widen them in a V-shape using the knife. This gives the filler more surface area to grip.
Finally, clean the area using a dry brush or vacuum to remove dust. A clean surface ensures better adhesion.
Step 2: Apply a Bonding Agent (If Needed)
Applying a bonding agent improves adhesion for deeper repairs, ensuring that new plaster properly sticks to the underlying surface and lasts longer.
If the plaster is deeply damaged or you’re working on a bare lath or masonry surface, apply a plaster bonding agent. This helps the new material stick properly.
Use a brush to apply a thin coat and let it become tacky according to the product instructions. Do not skip this step for large repairs—it can make the difference between a lasting fix and a recurring crack.
For minor surface cracks, you can usually skip this step.
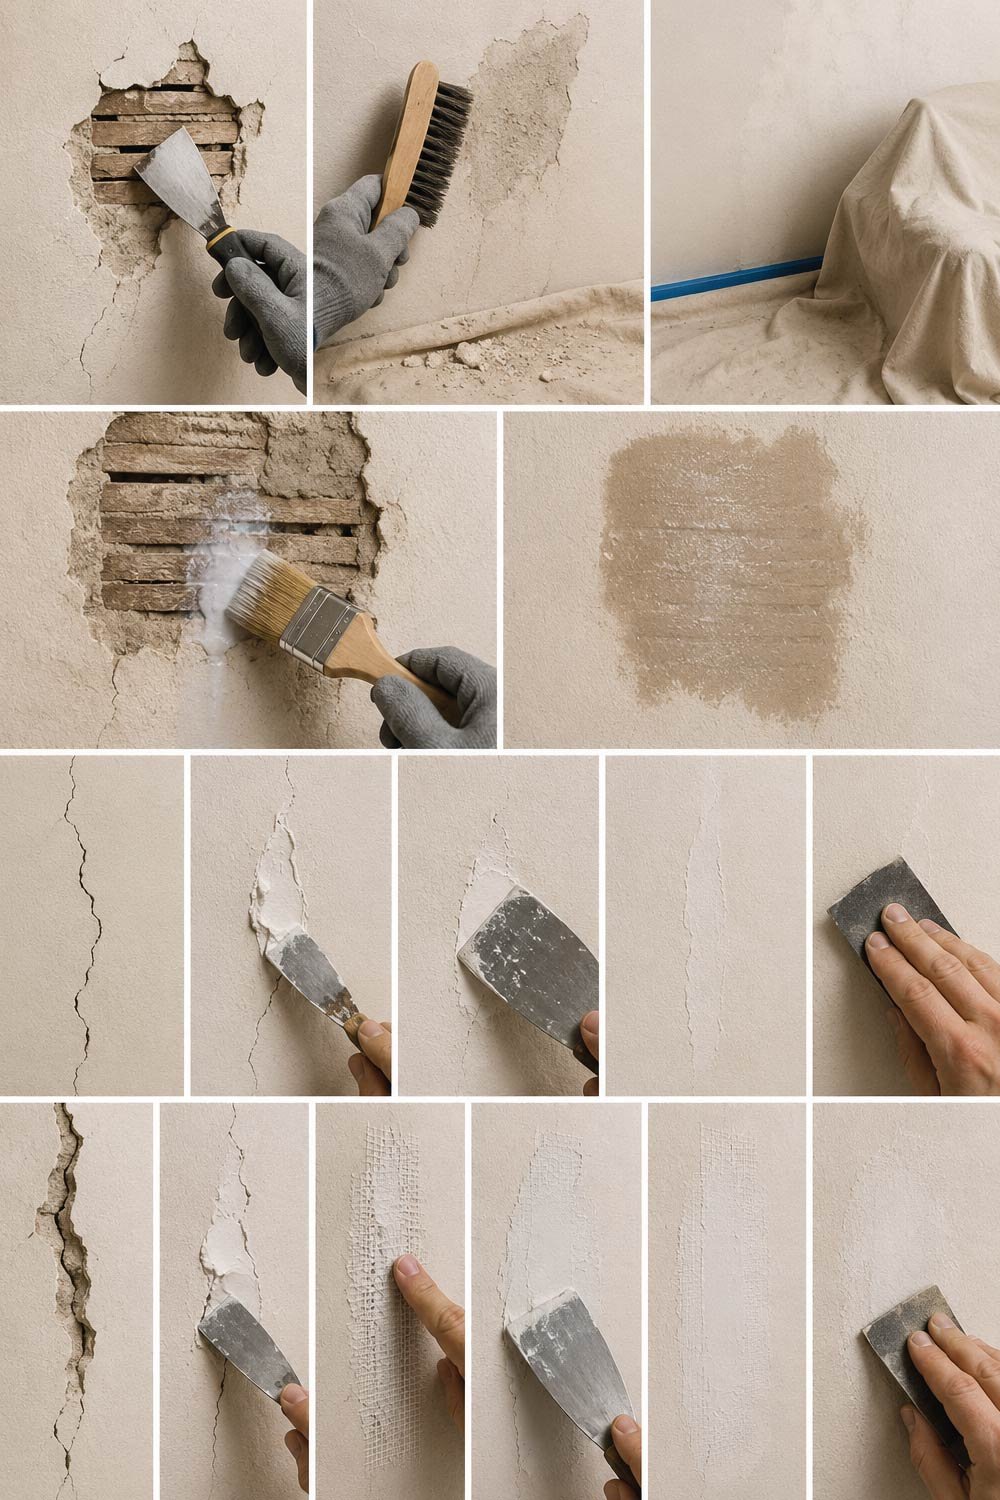
Step 3: Repair Small Cracks
Small cracks are simple to fix and require minimal materials, making them one of the easiest plaster repairs to handle.
Small cracks are the easiest to fix and usually require only filler and smoothing.
How to do it
Following the correct method ensures that the crack is filled completely and blends seamlessly with the surrounding wall.
- Apply joint compound directly into the crack using a putty knife.
- Press firmly so the compound fills the entire depth.
- Scrape off excess material, leaving the surface as smooth as possible.
- Allow it to dry completely (usually a few hours or overnight).
- Sand lightly with fine-grit sandpaper until smooth.
If the crack is slightly wider, you may need to apply a second coat for a seamless finish.
Step 4: Repair Medium to Large Cracks
Larger cracks require reinforcement to ensure durability and prevent them from reopening over time.
Larger cracks need reinforcement to prevent them from reappearing.
Steps
Following a layered approach helps strengthen the repair and ensures a smooth finish.
- Widen and clean the crack as described earlier.
- Fill the crack halfway with joint compound.
- Apply fiberglass mesh tape over the crack while the compound is still wet.
- Press the tape gently into the surface.
- Cover the tape with another layer of compound, smoothing it out with a wide putty knife.
- Let it dry completely.
- Sand and apply a second coat if needed.
The mesh tape acts like a bridge, holding both sides of the crack together and preventing future movement.
Also Read:
How to Fix a Running Toilet: A Complete DIY Guide for Homeowners
Step 5: Repair Holes in Plaster Walls
Repairing holes requires different techniques depending on their size, ensuring proper support and a smooth finish.
Small holes (like nail or screw holes) are easy to patch, but larger holes require more structure.
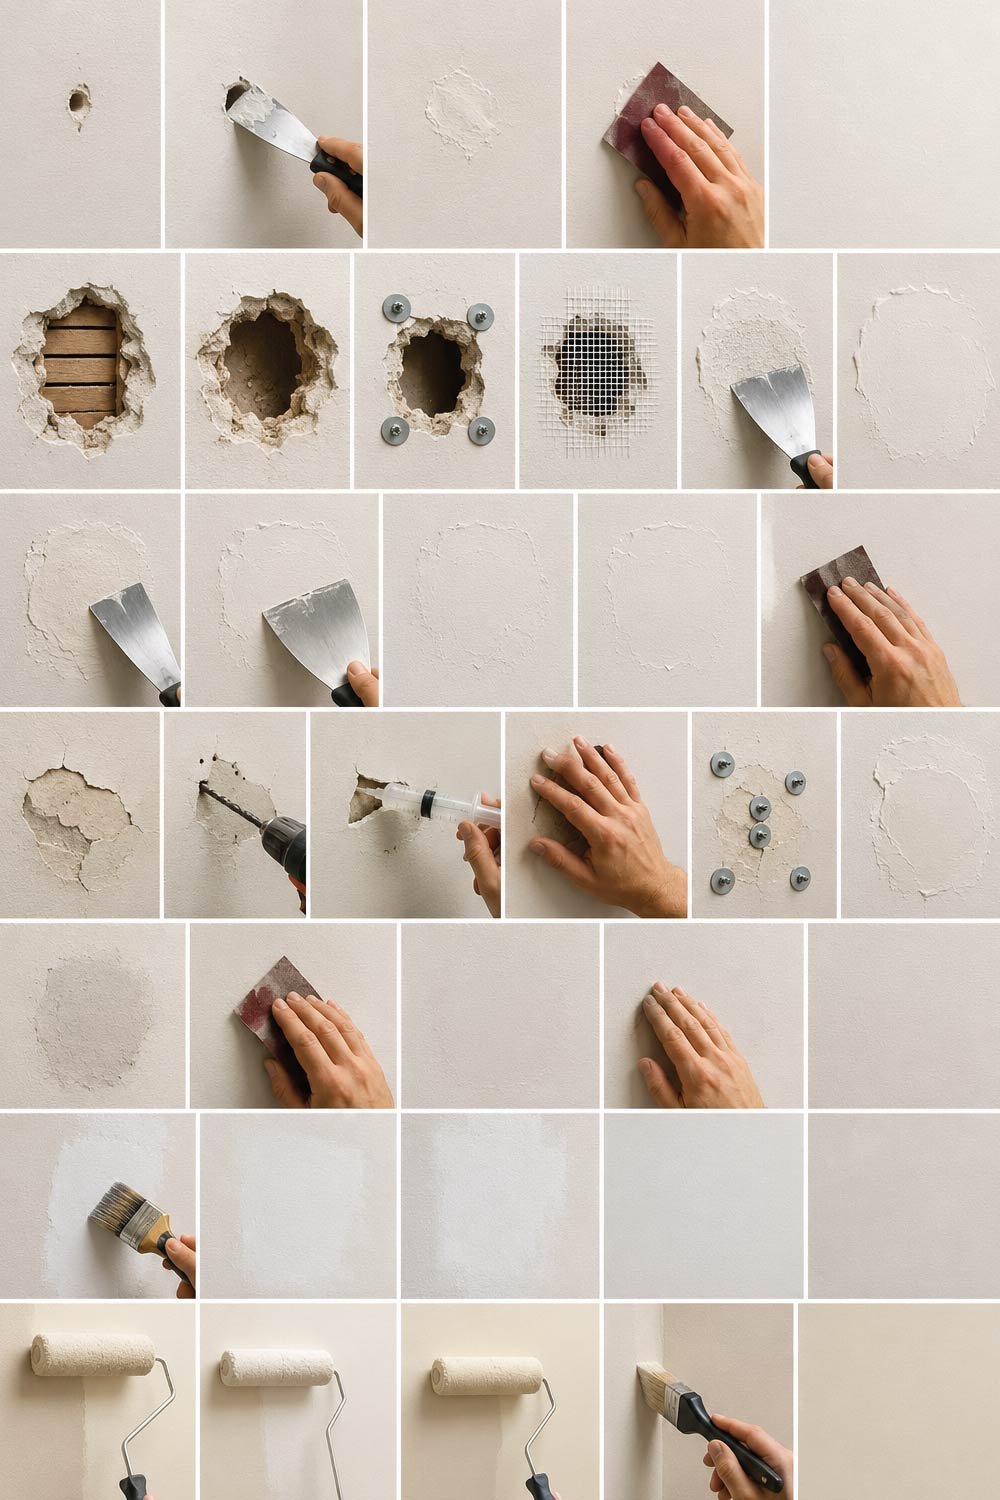
For small holes
Simple patching methods can quickly restore small damaged areas without extensive work.
- Fill with joint compound
- Smooth and let dry
- Sand and repeat if necessary
For larger holes
Larger holes require layering and reinforcement to rebuild the wall surface properly.
- Clean the edges and remove loose plaster.
- If the hole is deep, screw small washers into surrounding plaster to stabilize loose sections.
- Apply mesh tape across the opening if needed.
- Fill the hole with plaster or joint compound in layers rather than one thick coat.
- Allow each layer to dry before adding the next.
- Finish with sanding until flush with the wall.
For holes larger than a few inches, patience is key. Rushing the process can lead to shrinkage or cracking.
Step 6: Fix Loose or Bulging Plaster
Loose or bulging plaster requires reattachment to restore the wall’s stability and prevent further deterioration.
Loose plaster is more serious and requires securing the material back to the wall structure.
Steps
Careful handling and proper support ensure the plaster is securely reattached and remains stable over time.
- Tap the wall gently to identify hollow areas.
- Drill small holes into the loose section (if necessary).
- Inject plaster adhesive behind the surface using a syringe or applicator.
- Press the plaster firmly back into place.
- Use screws with washers to hold it temporarily until the adhesive sets.
- Cover screw heads with joint compound.
- Once dry, sand smooth.
If the plaster is severely damaged or crumbling, you may need to remove and replace that section entirely.
Also Read:
How to Fix a Kitchen Sink Leak: A Complete Step-by-Step Guide
Step 7: Sanding for a Smooth Finish
Sanding is a crucial step that determines how seamless and professional the final repair will look. Proper sanding ensures that the repaired area blends perfectly with the surrounding wall surface.
Sanding is what makes the repair invisible.
Once the compound is fully dry, use medium-grit sandpaper first, followed by fine-grit for finishing. Sand in circular motions and avoid applying too much pressure, which can damage the repair.
Run your hand over the surface to check smoothness. If you feel ridges or uneven areas, apply another thin layer of compound and sand again once dry.
A smooth finish is essential for painting later.
Step 8: Prime the Repaired Area
Priming prepares the repaired surface for painting and ensures consistent color and adhesion across the wall.
Priming is often overlooked but very important. Fresh plaster or joint compound absorbs paint differently than old wall surfaces, which can lead to visible patches.
Apply a coat of primer over the repaired area and slightly beyond it to blend with the surrounding wall. Let it dry completely before painting.
Step 9: Paint the Wall
Painting is the final step that restores the wall’s appearance and ensures the repaired area is no longer visible.
Once the primer is dry, repaint the area using the same color as the rest of the wall.
For best results
Using proper painting techniques helps achieve a smooth and uniform finish across the repaired area.
- Use a roller for large areas
- Feather the edges to blend with existing paint
- Apply two coats if necessary
If the wall is old, you may want to repaint the entire section or room to ensure uniform color.
Common Mistakes to Avoid
Avoiding common mistakes is essential to ensure your repair lasts and maintains a clean, professional appearance over time.
Even simple plaster repairs can go wrong if you’re not careful. Avoid these common mistakes:
1. Skipping surface preparation
Proper preparation is critical for adhesion, and skipping it can lead to weak repairs that fail quickly.
Dusty or loose surfaces prevent proper bonding.
2. Applying thick layers
Thick applications can lead to uneven drying and cracking, reducing the durability of the repair.
Thick plaster layers take longer to dry and often crack.
3. Not using reinforcement for large cracks
Reinforcement provides strength and prevents cracks from reappearing after repair.
Without mesh tape, cracks will likely return.
4. Painting too soon
Allowing sufficient drying time ensures the repair sets properly and supports a durable paint finish.
Always wait for full drying before priming and painting.
5. Over-sanding
Excessive sanding can weaken the repair and create uneven surfaces that are difficult to fix.
Too much sanding can damage the repair and create dips in the wall.
Also Read:
Tips for Long-Lasting Repairs
Following best practices during repair helps ensure durability and prevents recurring damage over time.
Always work in thin layers rather than one heavy coat
Let each layer dry fully before continuing
Use high-quality joint compound for better durability
Check for underlying moisture issues before repairing
Keep your tools clean for smoother application
If cracks keep returning in the same area, there may be structural movement or moisture issues that need attention.
Also Read:
When to Call a Professional
While many plaster repairs can be handled at home, certain situations require expert knowledge and tools to ensure proper and safe restoration.
While most small to medium plaster repairs are DIY-friendly, some situations require expert help:
- Large sections of detached plaster
- Severe water damage
- Structural cracks in multiple areas
- Historical or decorative plaster ceilings
Professionals can assess whether partial replacement or full resurfacing is needed.
Final Thoughts
Repairing a plaster wall may seem intimidating at first, but it becomes straightforward once you understand the process. The key steps—preparation, proper filling, reinforcement, sanding, and finishing—work together to restore your wall to a smooth, strong surface.
With patience and attention to detail, even noticeable damage can be made completely invisible. Whether you’re fixing a small crack or patching a larger hole, these techniques will help you restore your plaster wall and extend its life for years to come.